
Listen, we see you scrolling through Pinterest at 11 PM, staring at those elaborate seven-layer rainbow cakes and hand-sewn leprechaun costumes. Beautiful? Absolutely. Realistic for a Tuesday afternoon with your crew? Not so much.
Here’s the truth: You don’t need a degree in arts and crafts or a lucky four-leaf clover to pull off a memorable St. Patrick’s Day celebration. What you need are smart, simple craft ideas that look impressive but won’t have you hot-gluing shamrocks until midnight.
We’ve rounded up five ridiculously easy St. Patrick’s Day crafts that actually work in the real world – you know, the one where you have approximately 15 minutes of cooperation before someone needs a snack. These ideas are perfect for classrooms, living rooms, or anywhere kids gather to create (controlled) chaos. Each one delivers maximum fun with minimum stress, and your students or little ones will be so proud of what they make, they’ll want to show everyone.
Ready to become the hero of St. Patrick’s Day? Let’s dive in.
1. DIY Paper Plate Shamrock Hats

Best for: Preschoolers through early elementary, classroom parties, quick photo ops
Time to Make: 10-15 minutes
Mess Level: Low (just markers or paint!)
This craft is pure magic because it transforms a boring paper plate into wearable art in under 15 minutes. Kids get to create AND wear their masterpiece, which basically makes them walking billboards for their own creativity. Plus, these hats are photo-ready, meaning grandparents everywhere are about to get the cutest text messages of their lives.
What You’ll Need:
Paper plates (one per child)
Scissors (adult supervision for younger kids)
Green markers, crayons, or washable paint
Optional: Green construction paper for a stem, glue, stickers for decoration
How to Make It:
1. Cut the plate in half. Take your paper plate and cut it straight down the middle. You’ll use one half per hat.
2. Draw and cut out the shamrock shape. On one plate half, draw a shamrock (three-leaf clover) shape in the curved part of the plate. Cut out the center, leaving the shamrock outline attached to the plate rim. Don’t stress about perfection – wonky shamrocks have character!
3. Decorate like crazy. Hand over the green art supplies and let kids color, paint, or marker their shamrock however they want. This is their time to shine (and yes, glitter is optional but highly effective).
4. Create the headband. Take the second plate half and wrap it around the child’s head to measure the right size. Cut off any excess and staple or tape the ends together to form a headband.
5. Attach the shamrock to the headband. Tape or glue your decorated shamrock to the front of the headband. Boom – instant St. Patrick’s Day royalty!
Pro Tip: Make these early in the day so the paint can dry completely before the big reveal. And if you’re working with toddlers, pre-cut the shamrock shapes yourself and just let them handle the decorating. They’ll still feel like they made the whole thing!

2. Rainbow Fruit Platter (The Healthy Snack That Looks Like a Craft Project)

Best for: All ages, classroom snack time, party spreads
Time to Make: 15-20 minutes
Mess Level: Low to medium (some chopping involved)
Forget complicated seven-layer desserts – this rainbow is made entirely of fruit, which means you’re basically a nutrition superhero. The best part? It looks so impressive that people will think you spent hours on it, when really you just arranged some fruit in an arc. That’s our kind of win.
What You’ll Need:
Strawberries (red)
Oranges or clementines (orange)
Pineapple chunks (yellow)
Green grapes or kiwi slices (green)
Blueberries (blue)
Purple/red grapes (purple)
Whipped cream (for clouds)
A large serving platter
How to Make It:
1. Prep your fruit. Wash everything and cut as needed. For younger kids helping, leave grapes whole and use clementine segments instead of sliced oranges – less knife work, same colorful impact.
2. Start with the outer arc. Place your strawberries in a curved rainbow arc on one side of your platter. This is your red layer and it sets the shape for the whole rainbow.
3. Work your way through the rainbow. Add each fruit color in rainbow order: orange, yellow, green, blue, purple. Each layer should follow the curve of the one before it, creating that classic rainbow arc shape.
4. Add the clouds. Dollop whipped cream at both ends of your rainbow to create fluffy clouds. (This is also where kids can get involved without a knife!)
5. Stand back and accept compliments. Seriously, this looks amazing and people will be impressed.
Pro Tip: Get older kids involved by having them arrange the fruit themselves. They’ll learn about color patterns, practice fine motor skills, and actually want to eat their healthy snack because they made it. Triple win!
3. Rainbow Potato Stamp Art
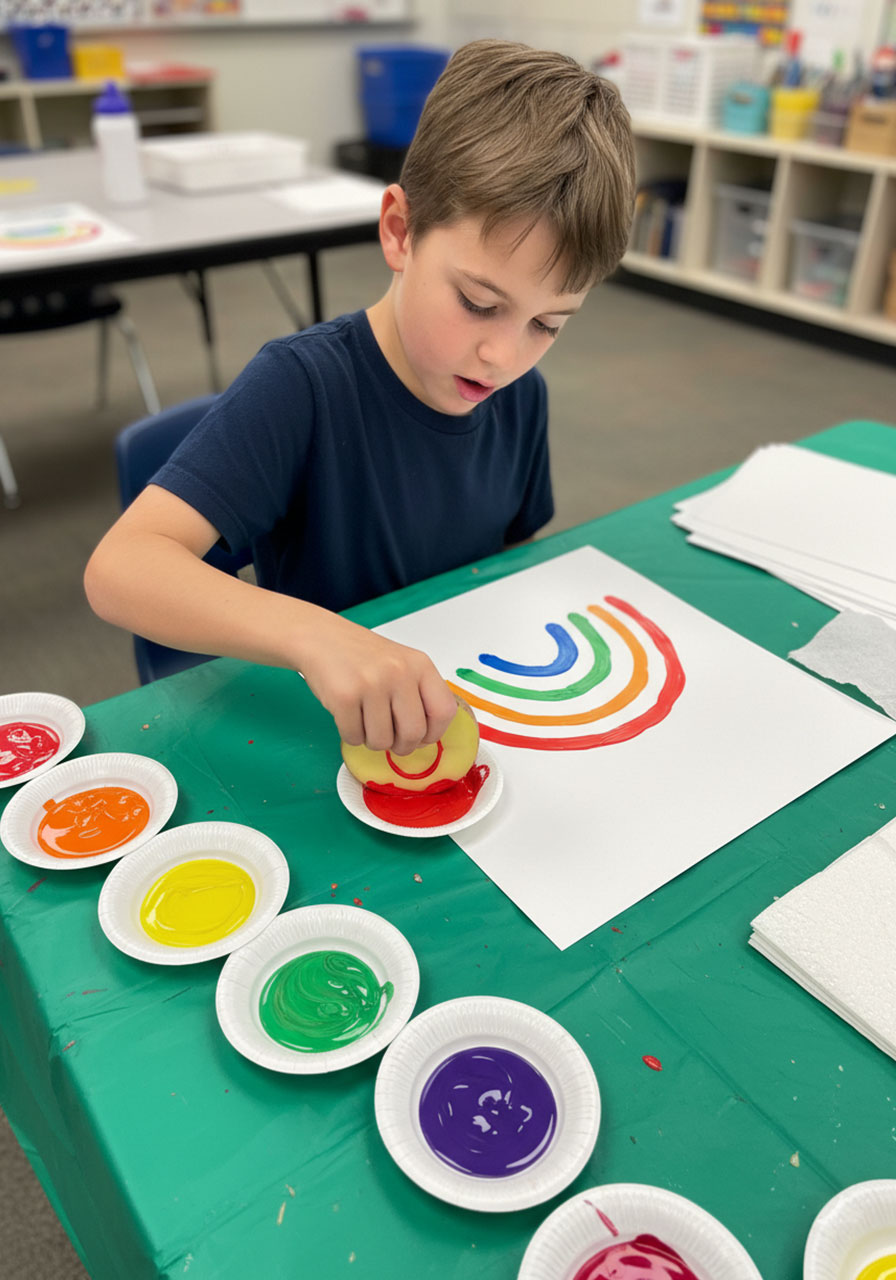
Best for: Toddlers through elementary, process art lovers, rainy day activities
Time to Make: 20-30 minutes (including drying time)
Mess Level: Medium (it’s paint, so…yeah)
This is the craft that looks way fancier than the effort required. You’re using a humble potato as a stamp, but the end result? Gallery-worthy rainbows your kids will want to give to everyone they know. Teachers, this one’s perfect for a St. Patrick’s Day art station.
What You’ll Need:
One large potato (or paper towel tube cut into a U-shape works too!)
Paint in rainbow colors (red, orange, yellow, green, blue, purple)
White paper or cardstock
Paper plates (for paint palettes)
Paper towels (for cleanup)
How to Make It:
1. Create your rainbow stamp. Cut the potato in half lengthwise. Then carve out a U-shape or semicircle on the flat side – this is your rainbow stamp. (Adults, this is your job. Kids, you’re up next!)
2. Set up your paint station. Squirt each paint color onto a paper plate. Set up your “rainbow palette” in order so kids remember the sequence.
3. Stamp away! Dip the potato stamp into the first color (red) and press firmly onto the paper. Wipe the stamp, then move to the next color, stamping slightly inside the first arc. Repeat through all the colors until your rainbow is complete.
4. Add finishing touches. Once the paint dries a bit, kids can add clouds with white paint, grass with green, or even a pot of gold with yellow paint and a black marker.
5. Let it dry completely. Give it at least 30 minutes before displaying or mailing to favorite people.
Pro Tip: Make extras! These rainbows are so cute, kids will want to give them away as gifts. Set up an assembly line and make a bunch at once – same mess, more masterpieces.
4. 3D Paper Shamrocks (They Look Fancy, We Promise They’re Not)

Best for: Elementary age and up, classroom decorations, table scatter
Time to Make: 10-15 minutes per shamrock
Mess Level: Low (just paper and glue!)
If you can cut out a heart shape, you can make these show-stopping 3D shamrocks. The secret? Four paper hearts mysteriously transform into one dimensional shamrock. It’s like a magic trick, except it’s just folding and gluing. Your students or kids will feel like craft geniuses.
What You’ll Need:
Green construction paper or cardstock
Scissors
Glue stick or tape
Optional: String for hanging, markers for decorating
How to Make It:
1. Cut out four identical hearts. They don’t have to be perfect – just roughly the same size. Trace a template if you want, or freehand it for a more organic look.
2. Fold each heart in half vertically. You should have four folded hearts that look like little tents.
3. Glue the hearts together. Here’s where the magic happens: Glue the back of one folded heart to the back of another. Then glue the remaining two hearts the same way. You now have two sets of connected hearts.
4. Connect your sets. Glue the two sets together, and suddenly you have a 3D shamrock! The folds create dimension that makes it look incredibly professional.
5. Add a stem if you want. Cut a small stem from green paper and glue it to the bottom, or skip it entirely – your call.
Pro Tip: Make shamrocks in different sizes and scatter them across a table for an instant festive tablescape. Or punch a hole in the top and hang them from the ceiling with string for floating shamrock magic!
5. Shamrock Tortilla Chips (The Craft You Can Actually Eat)

Best for: All ages with supervision, healthy snack lovers, picky eaters
Time to Make: 15 minutes
Mess Level: Low (just cutting and baking)
This is technically cooking, but it feels like a craft project because you’re making shapes. And the best part? When you’re done, you have a healthy, crunchy snack that kids devoured because they made it themselves. Spinach tortillas naturally give you that green color without any food dye, so you can feel extra good about this one.
What You’ll Need:
Spinach or whole wheat tortillas
Shamrock-shaped cookie cutter (or a knife to freehand it)
Baking sheet
Cooking spray or a light brush of olive oil
Optional: A sprinkle of salt or cinnamon sugar
How to Make It:
1. Preheat your oven to 350°F. Get that oven warming while you cut out your shapes.
2. Cut out shamrocks. Press your cookie cutter into the tortillas to create shamrock shapes. Kids can help with this part – just supervise to make sure they’re pressing firmly enough.
3. Arrange on a baking sheet. Lay your shamrock cutouts on a baking sheet. Give them a light spray of cooking spray or brush with a tiny bit of olive oil. Add a sprinkle of salt if you want savory chips.
4. Bake until crispy. Pop them in the oven for 8-10 minutes, watching carefully. You want them golden and crispy, not brown and burnt.
5. Cool and serve. Let them cool for a few minutes (they’ll get crispier!), then serve with guacamole, hummus, or just eat them plain.
Fun Variation: Make quesadillas instead! Put cheese between two shamrock tortillas, cook in a pan until melty, and call them “Irish grilled cheese.” Your kids will think you’re hilarious.
Your St. Patrick’s Day Success Formula
There you have it – five crafts that won’t stress you out but will absolutely delight the kids in your life. No advanced degrees in Pinterest required, no staying up until midnight to prep, and definitely no special luck needed.
The secret to craft success isn’t elaborate supplies or hours of preparation. It’s choosing activities that actually fit into your real life, involve the kids in meaningful ways, and create memories (and maybe a little mess, but that’s what paper towels are for).
So grab those paper plates, slice up some fruit, and get ready to hear “Look what I made!” about seventeen times today. That’s the sound of a St. Patrick’s Day win.
Now go forth and create – you’ve got this!
More St. Patrick’s Day Party Ideas to Keep the Fun Rolling:
Easy Ideas to Host an Epic St. Patrick’s Day Breakfast for Kids
18 Easy and Fun St. Patrick’s Day Activities for Toddlers (No Prep Required!)
15 Easy St. Patrick’s Day Crafts for Kids That Are Actually Fun
Easy Shamrock Suncatcher Craft – A Magical St. Patrick’s Day Activity for Kids
How to Make a DIY St. Patrick’s Day Garland in 7 Easy Steps
Rainbow Pot of Gold Craft: The Ultimate 3D St. Patrick’s Day Project Kids Will Love
Leprechaun Hat Blowers: The Most Fun St. Patrick’s Day Craft Your Kids Will Actually Want to Make
Marshmallow Shamrock Stamping: The Easiest (and Sweetest!) St. Patrick’s Day Craft
