If you’ve ever needed a science activity that grabs a room full of six-year-olds (or a class of restless second graders) in about ten seconds flat, this is it. The Exploding Monster Bag is loud, colorful, a little bit gross, and secretly packed with real chemistry. Kids get to draw a silly monster face, watch it “come alive,” and learn exactly why it’s puffing up and turning pink – all before the science fair even starts.
This one’s a favorite in our house and in plenty of classrooms, and it’s easy to see why. It needs almost no prep, uses ingredients you probably already have in your pantry, and delivers a genuinely satisfying reaction every single time. Best of all, it teaches a core chemistry concept (acid-base reactions) in a way kids will actually remember, because they watched a monster’s face fill up with foam right in front of them.
Whether you’re a teacher planning a STEM station, a homeschool parent looking for a hands-on lesson, or a mom trying to survive a rainy afternoon, this activity checks every box: quick, cheap, educational, and genuinely fun.
Best for: Ages 6-8 (younger kids can help with adult supervision, older kids can run it solo)
Time needed: Under 30 minutes, including cleanup
Group size: Works for one kid at the kitchen table or a full classroom of monster-makers
Adult supervision: Required

Why This Experiment Works So Well
A lot of “kid science” activities either look cool but teach nothing, or teach something but look boring. This one manages to do both at once.
The visual payoff is huge. Kids draw their own monster face, then get to watch it fill up, change color, and puff out like it’s actually breathing. That kind of instant, visible result is exactly what keeps young attention spans locked in.
At the same time, every single step maps directly to a real science concept: chemical reactions, gas production, and acid-base neutralization. You’re not just keeping kids entertained, you’re giving them a genuine, hands-on introduction to chemistry they’ll actually remember.


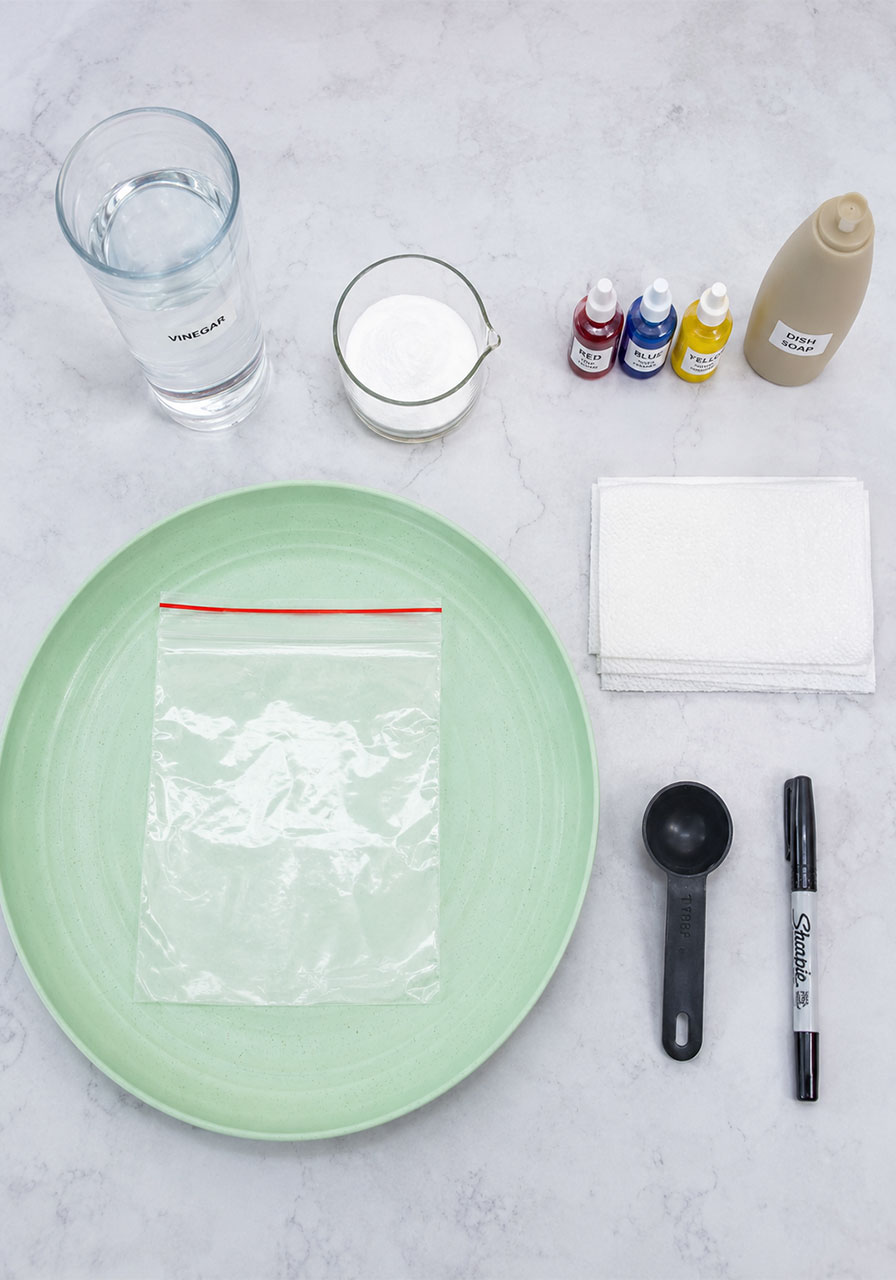
What You’ll Need
White vinegar (about 2 cups per bag)
Baking soda (bicarbonate of soda)
Food coloring (a few different colors so kids can mix and choose)
Dish soap (washing-up liquid)
A tray or shallow dish (to catch any mess)
Zip-lock sandwich bags, one per monster
Paper towels
A measuring spoon
A permanent marker
Every one of these is a grocery store or pantry staple, so there’s no special shopping trip needed. If you’re setting this up for a classroom, these ingredients are also cheap enough to buy in bulk without blowing your supply budget.
How to Play: Step-by-Step Instructions
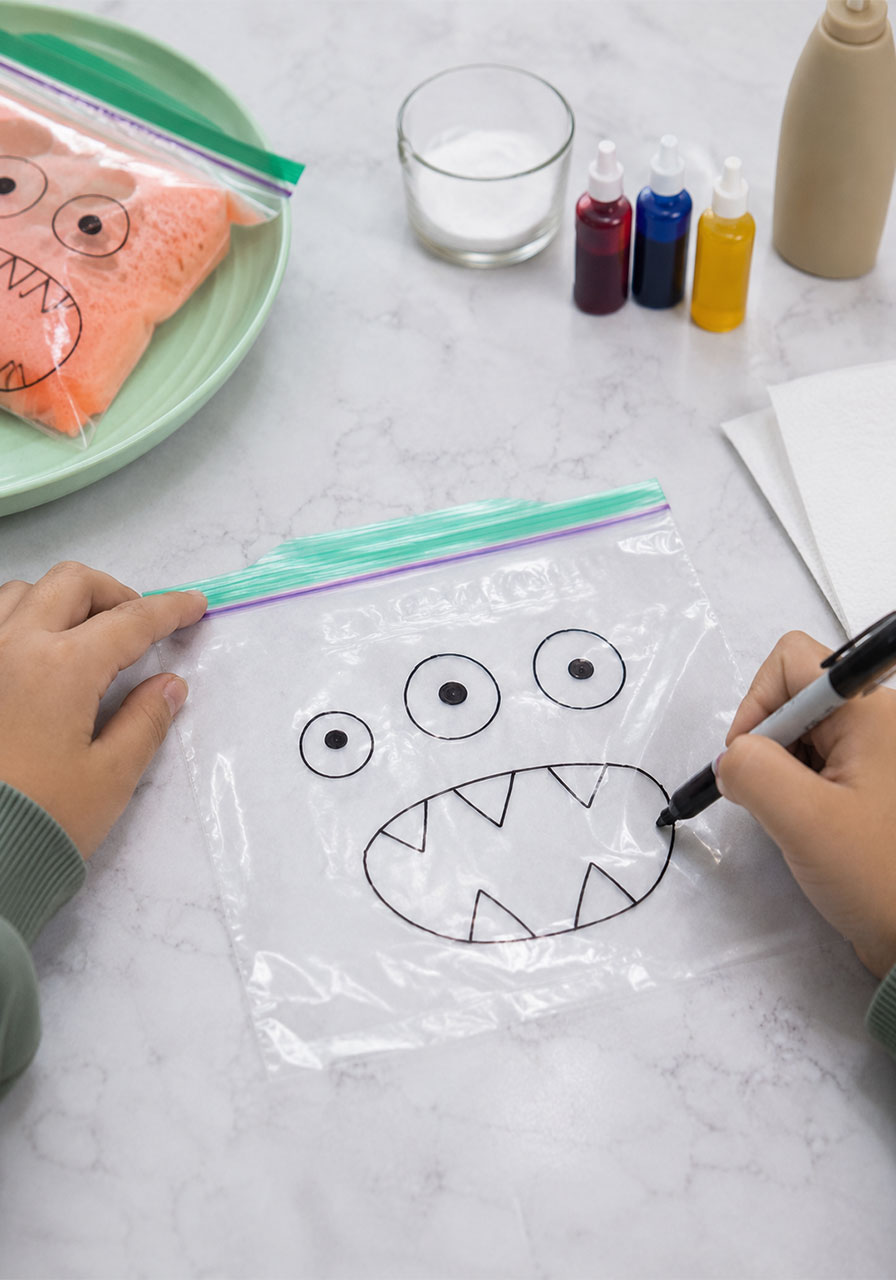
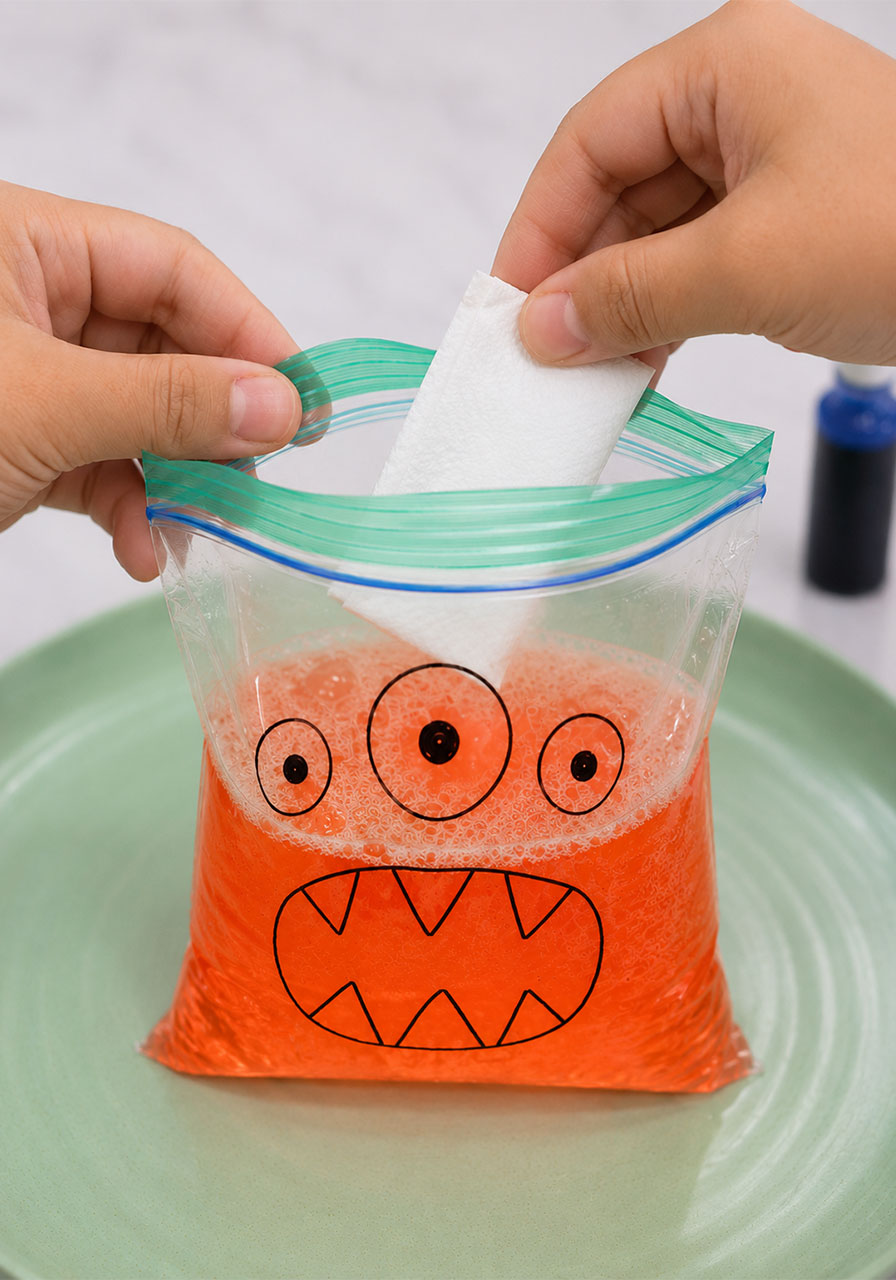
Step 1: Draw the monster.
Using the permanent marker, have each kid draw a silly monster face directly onto their zip-lock bag. Big eyes and jagged teeth work best, since the bag will stretch and distort the drawing later, which is half the fun.
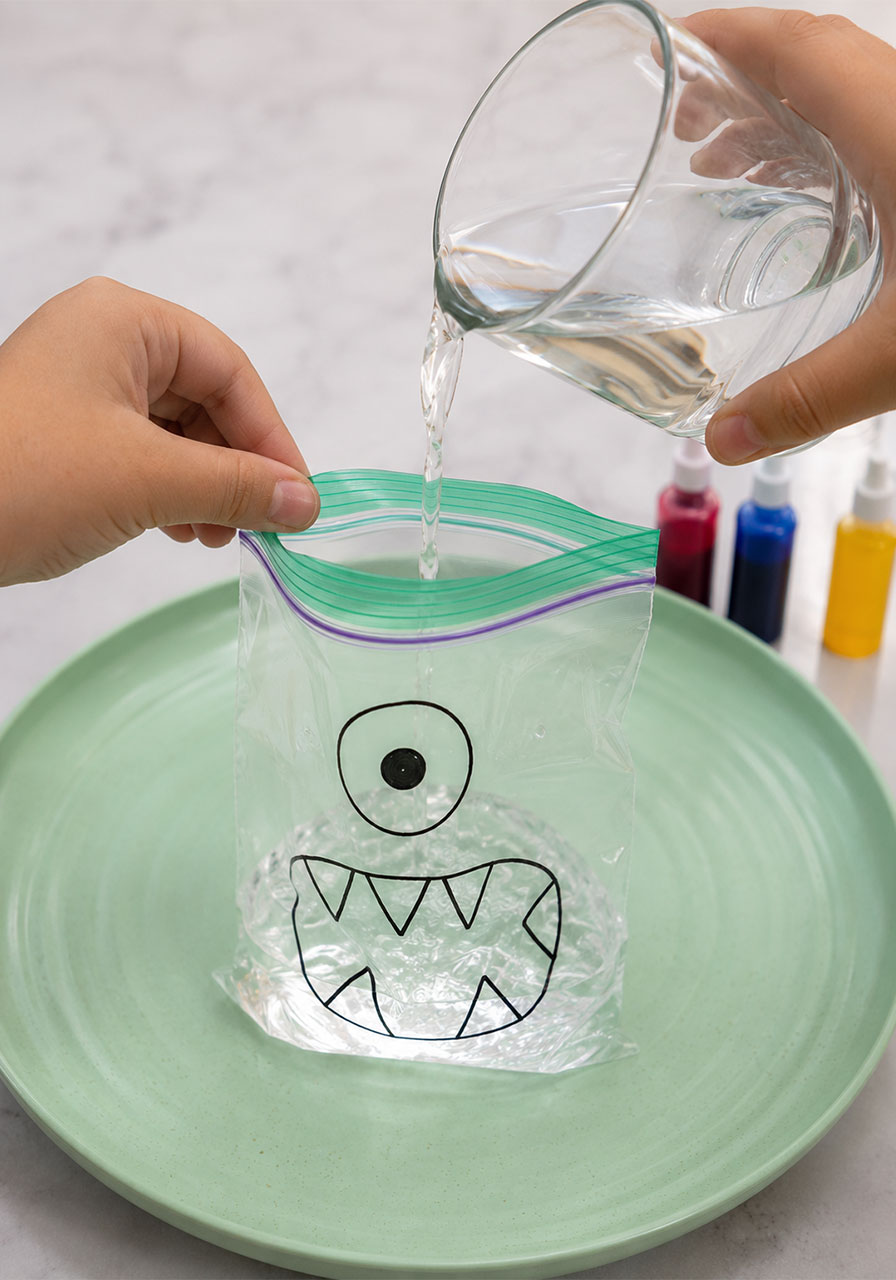
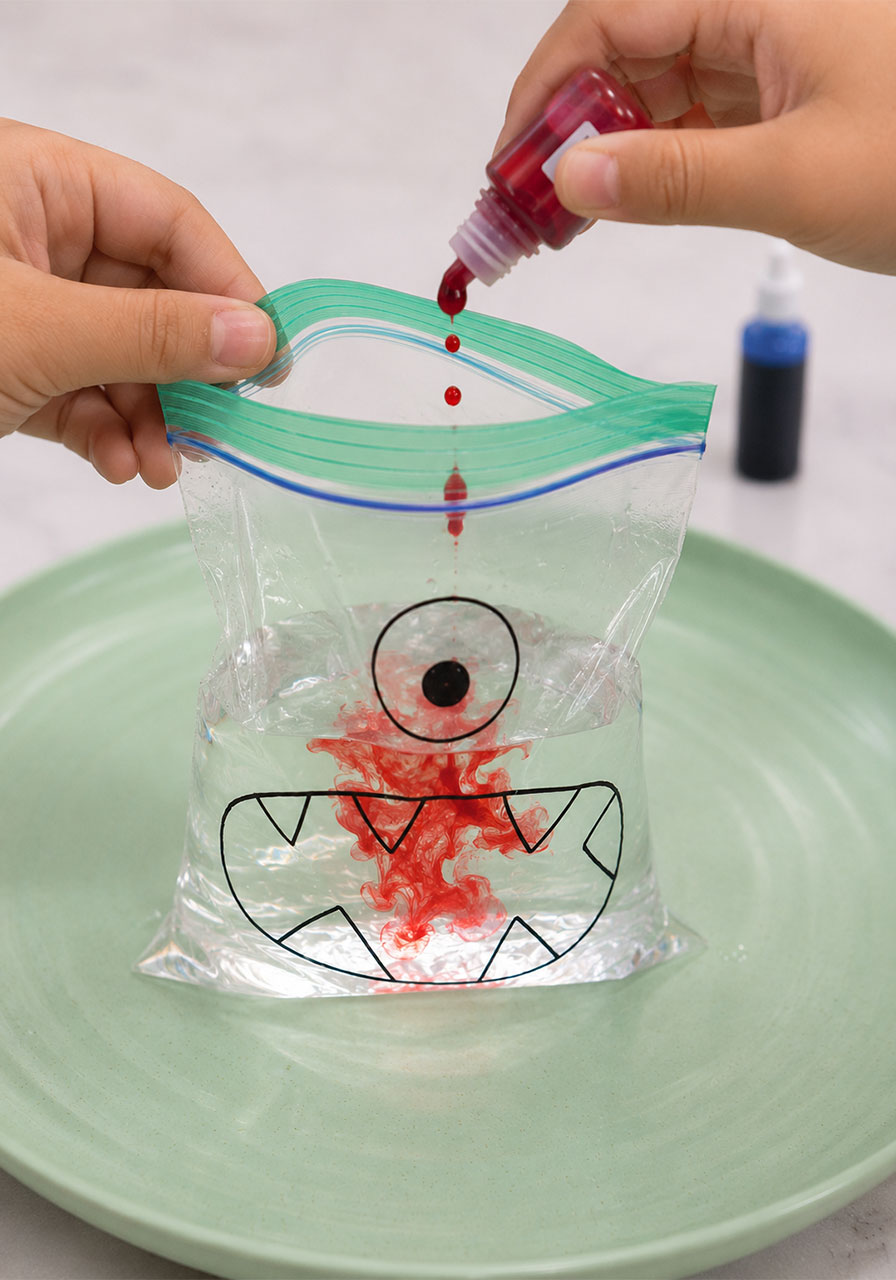
Step 2: Add the vinegar.
Open the bag and pour in about 2 cups of white vinegar. Set the bag inside a tray or shallow dish first, so if anything spills, it stays contained.
Step 3: Add the color.
Drop in 6-8 drops of food coloring. This is the step kids love most, since they get to pick exactly how their monster will look once the reaction kicks in.
Step 4: Add the dish soap.
Squeeze in 5-8 drops of dish soap. This is what turns a simple fizz into a big, dramatic foam explosion, so don’t skip it.
Step 5: Seal and mix.
Zip the bag shut and gently shake it so the color and soap mix evenly through the vinegar.
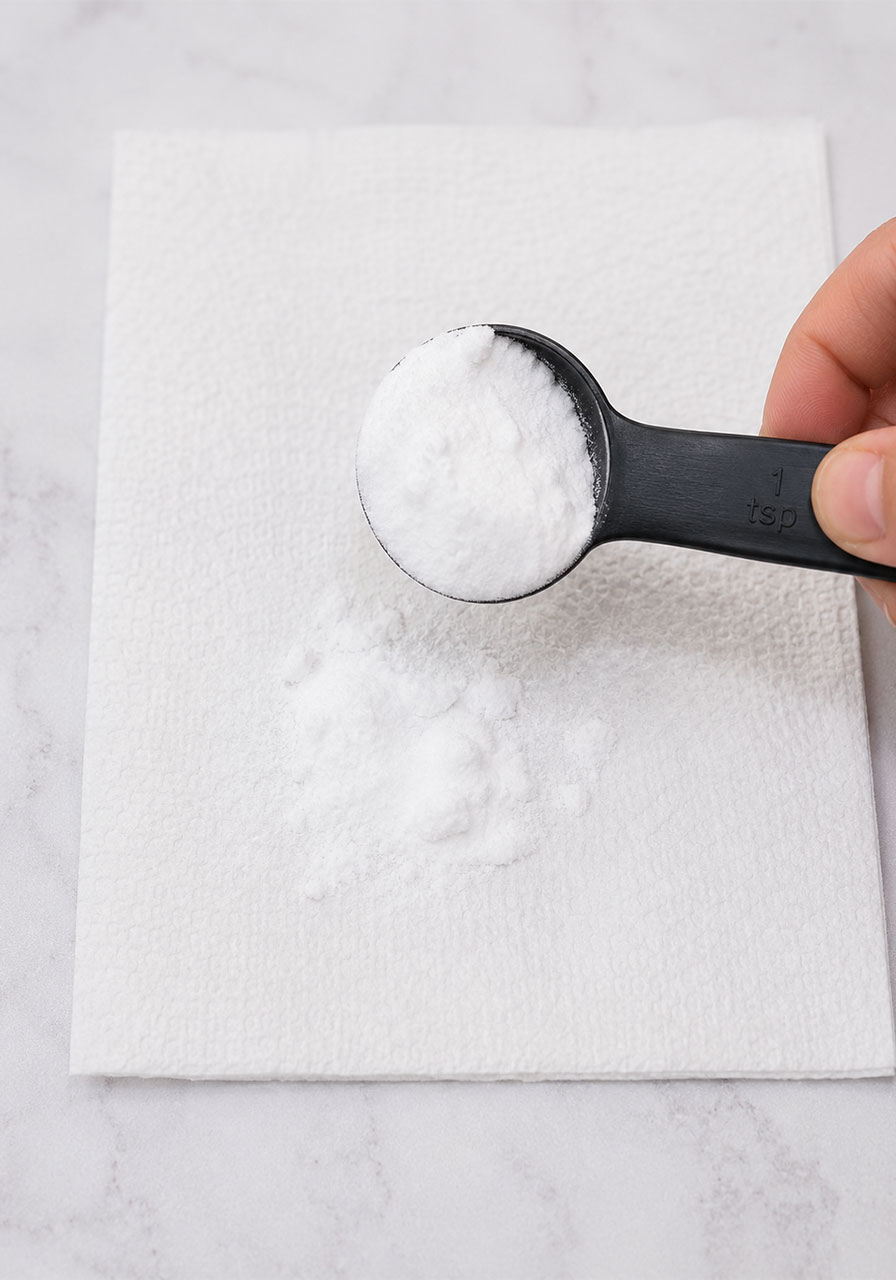
Step 6: Prep the baking soda.
On a separate paper towel, spoon out one measured scoop of baking soda.
Step 7: Wrap it up.
Fold the paper towel around the baking soda carefully, so none of it spills out before it’s supposed to. This little “packet” is what lets you control exactly when the reaction starts.

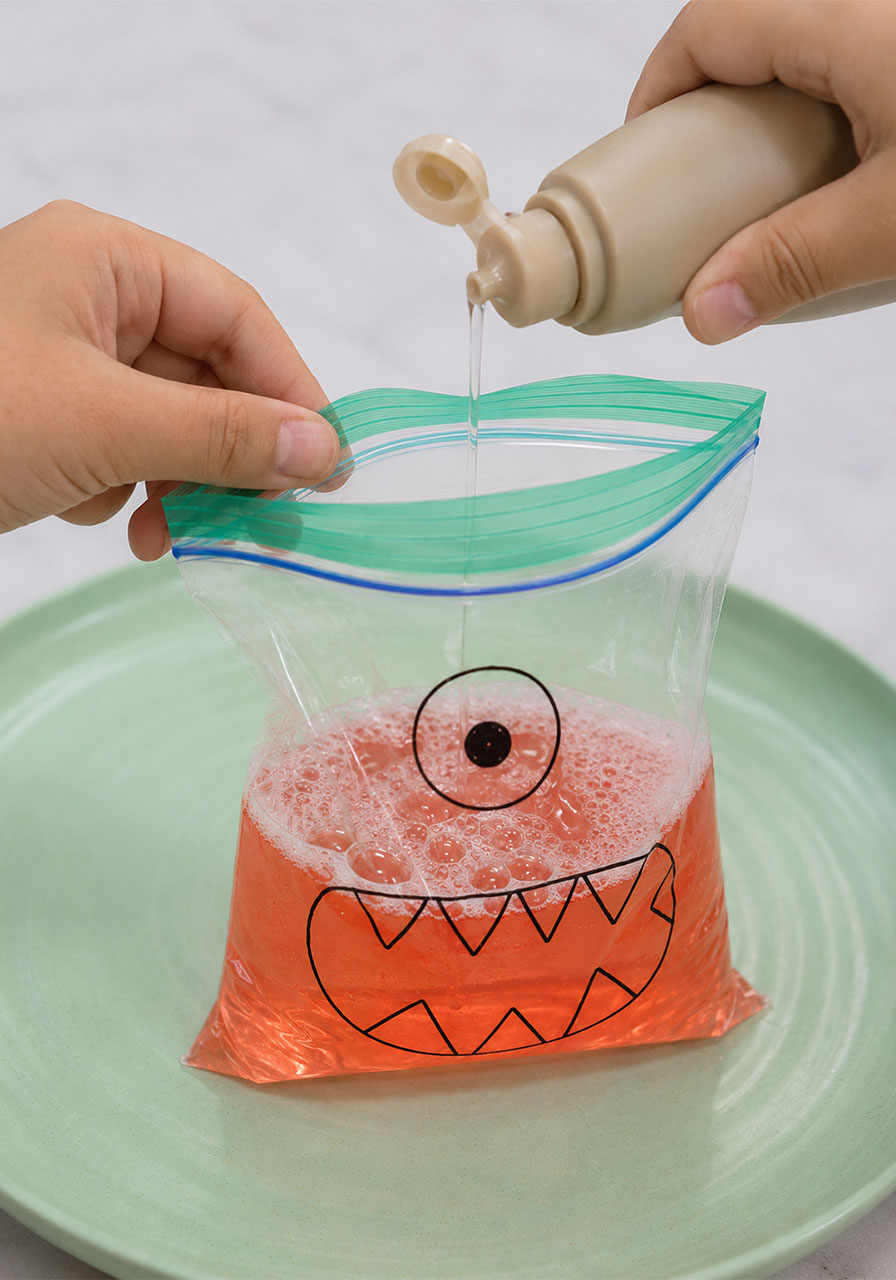
Step 8: Drop it in and seal fast.
Open the bag just enough to drop the wrapped baking soda packet inside, then zip it shut as quickly as you can. Speed matters here, since the reaction starts the moment the paper towel gets wet.
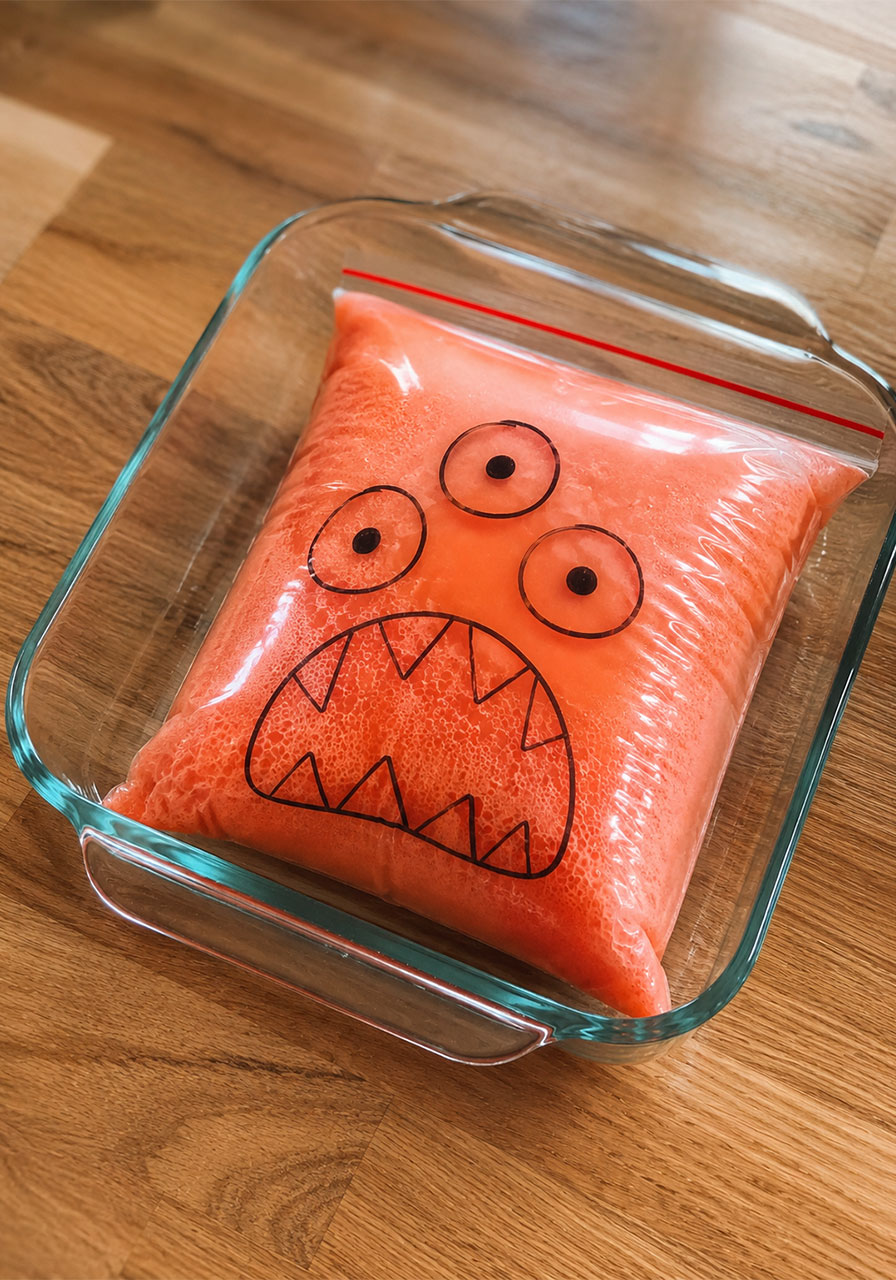
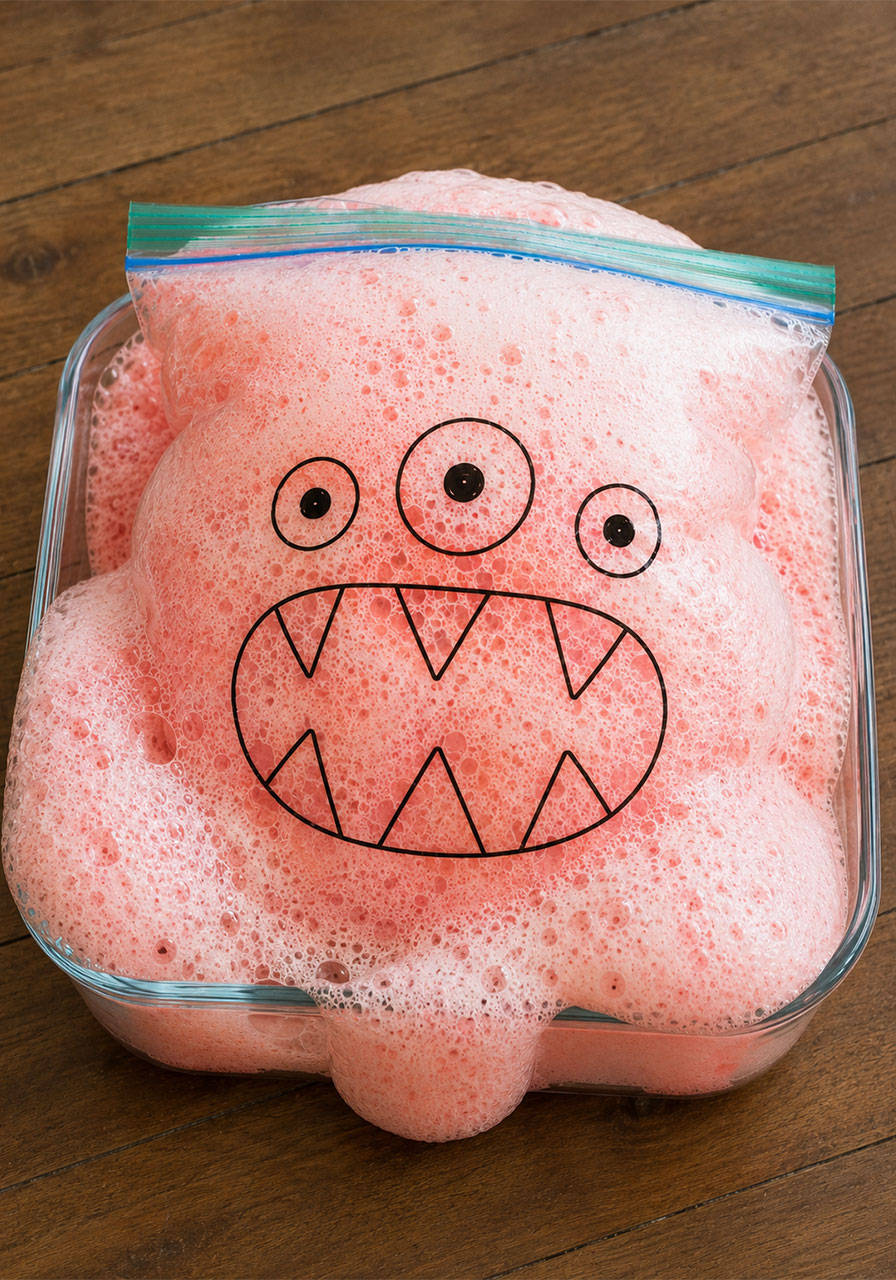
Step 9: Step back and watch.
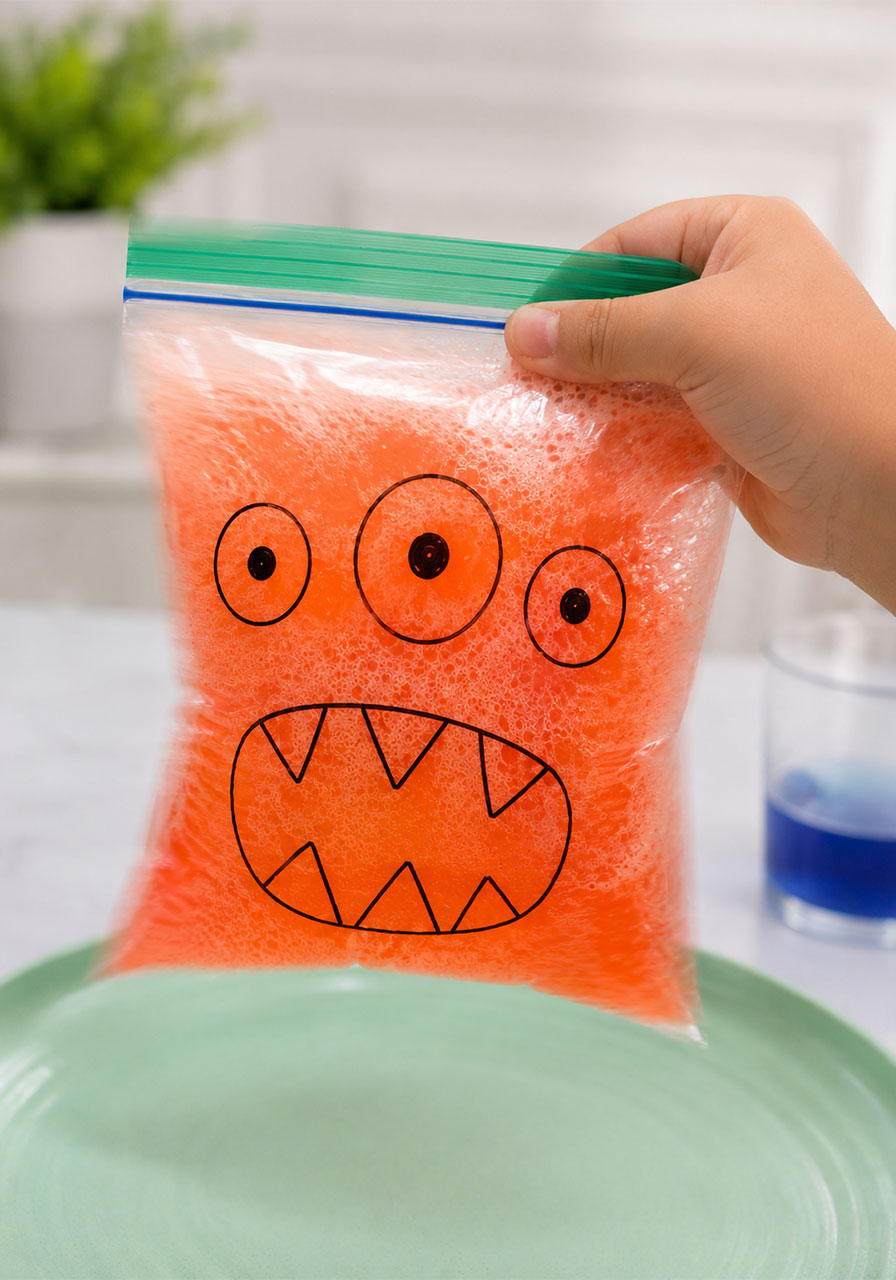
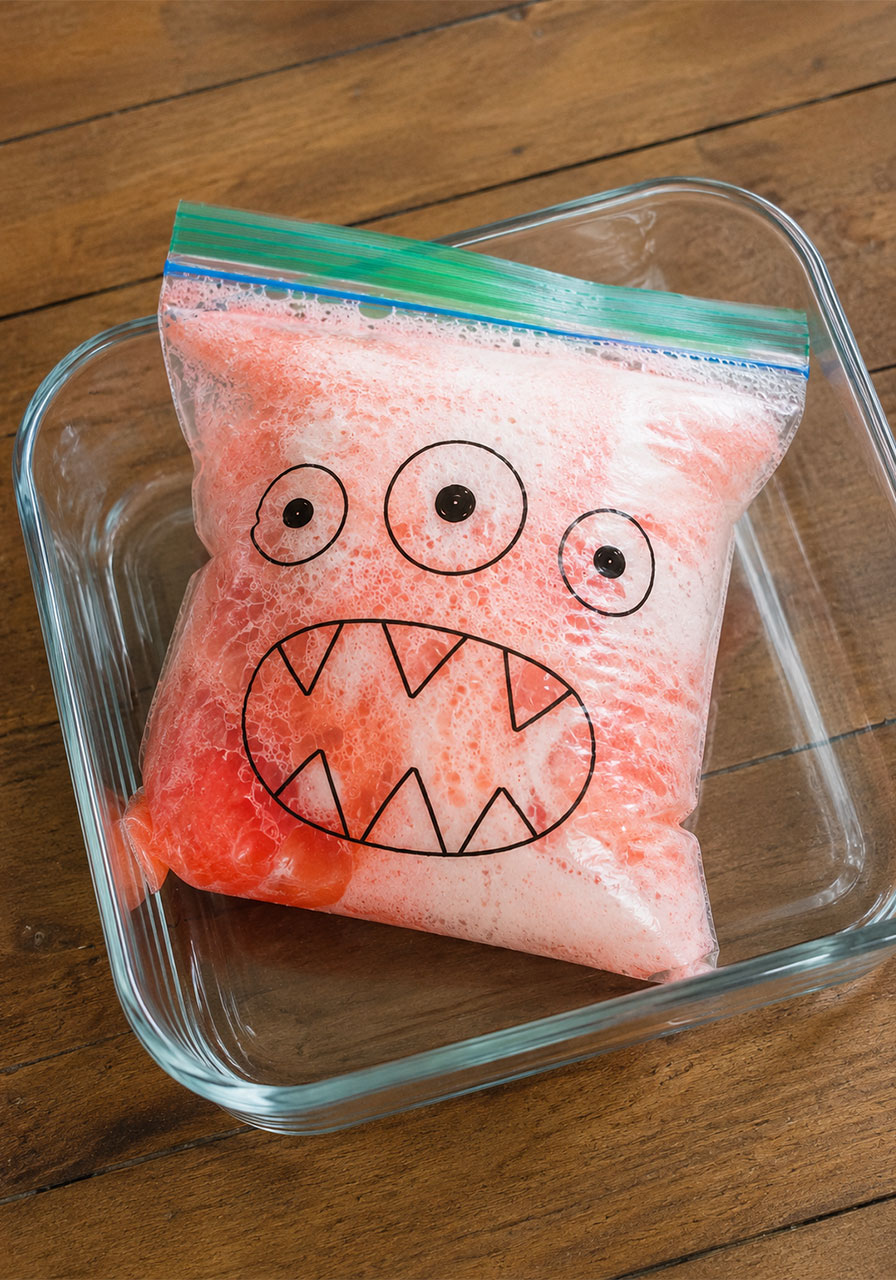
Set the bag down and keep everyone’s hands off it. Within seconds, you’ll see bubbles forming, then foam building, then the whole bag puffing up like your monster is taking a deep breath. Keep a little distance in case the bag pops or leaks at the seams.
The Science Behind It (Great for Classroom Discussion)
This is the part that turns a fun craft into an actual lesson, so it’s worth walking through with your kids or students.
Vinegar is an acid. Baking soda is a base. When they mix, they go through what’s called an acid-base neutralization reaction, and one of the byproducts of that reaction is carbon dioxide gas, which is exactly what you’re seeing as bubbles and foam.
Because the bag is sealed, that gas has nowhere to go. It keeps building up pressure inside the bag, which is why the whole thing puffs out and can even burst if you let it sit long enough.
The dish soap isn’t just for fun, either. It traps the carbon dioxide bubbles in a foam, which is why you get that thick, dramatic bubbling instead of just a quick fizz.
If you’re using this as a classroom activity, this is a perfect moment to introduce vocabulary like reaction, gas, acid, and base, and to ask kids to predict what they think will happen before you even start.
Pro Tips for the Best Results
Use a full 2 cups of vinegar per bag. Skimping on the vinegar means a weaker, less satisfying reaction, and nobody wants a monster that barely wiggles.
Fold the baking soda packet snugly, but not too tight. If it’s wrapped too tightly, the vinegar takes longer to reach the powder, and you’ll be standing around waiting instead of watching the explosion happen.
Work over a tray every time. Even a well-sealed bag can leak a little foam at the seams, and vinegar plus food coloring is not something you want soaking into a carpet.
If you’re doing this with a group, prep the vinegar-and-color bags ahead of time and let each kid add their own baking soda packet when it’s their turn. This keeps the line moving and means nobody is left waiting around with nothing to do.
Fun Variations to Try
Once you’ve run this once, try mixing it up to keep kids engaged over multiple sessions.
Have kids test different amounts of baking soda to see which produces the biggest reaction. This turns the activity into a real experiment with a variable to test, not just a one-time demo.
Try different bag sizes. A larger gallon-size bag gives you a bigger, more dramatic monster, while a small sandwich bag reacts and fills up faster.
Let kids design multiple monsters with different color combinations, then compare which colors mix into the most interesting shades once the foam builds up.
Safety Notes for Parents and Teachers
This activity is low-risk, but a few reminders go a long way.
Always have an adult handle the sealing step, especially with younger kids, since speed matters and small hands can fumble the seal.
Keep everyone’s face and hands away from the bag once it’s sealed. While it’s generally a gentle reaction, pressure can build up quickly, and you don’t want anyone getting a surprise splash of vinegar and food coloring.
Do this activity on a washable surface or over a tray, since food coloring stains fabric and grout easily.
If a bag does burst, that’s part of the fun and part of the science. Just be ready with paper towels for a quick cleanup.
Why This Works So Well for Classrooms and Homeschool Groups
Teachers are always hunting for activities that are cheap, fast to set up, and actually tied to a real learning standard, and this one delivers on all three. It fits neatly into a chemistry unit, an Earth Day lesson on chemical reactions, or even a simple “predict and observe” science lesson for younger grades.
Because each bag is self-contained, you can run this as a station activity where small groups rotate through, each drawing and building their own monster, without needing a full lab setup or expensive equipment.
It also works beautifully as a take-home science kit. Send the dry ingredients home in a small bag with instructions, and let families run the experiment together over the weekend.
Frequently Asked Questions
Can I use lemon juice instead of vinegar?
Yes, lemon juice is also an acid and will react with baking soda, though the reaction tends to be a bit milder than with vinegar.
Why didn’t my bag puff up much?
This usually means too little vinegar or baking soda was used, or the bag wasn’t sealed quickly enough after adding the baking soda packet.
Is this safe for kids with sensitive skin?
Vinegar and baking soda are both gentle and commonly used in households, but if any mixture gets on skin, rinse with water. As always, adult supervision is recommended.
Can this be done outdoors?
Absolutely, and it’s actually a great outdoor activity if you’d rather not worry about mess indoors.
How long can I store leftover ingredients?
Vinegar and baking soda both keep well in a sealed pantry, so you can prep extra baking soda packets ahead of time for a busy classroom day.
Wrap-Up
The Exploding Monster Bag proves that great STEM activities don’t need a fancy lab or an expensive kit. With a few pantry staples, a permanent marker, and a little bit of prep, you can turn any afternoon into a hands-on chemistry lesson kids will beg to repeat.
Because at the end of the day, the best learning happens when kids don’t even realize they’re learning, and that’s exactly what a puffed-up, foaming monster bag delivers.