
Looking for a way to turn a boring afternoon into an explosion of color and fun? You’ve just struck gold! We’ve rounded up 45 rainbow craft ideas that promise to keep little hands busy and imaginations running wild.
These aren’t just any crafts – they’re a ticket to hours of giggles, learning, and pure creative joy. Perfect for rainy days, playdates, or whenever you need to unleash your kiddo’s inner artist, each project brings its own burst of magic.
So grab those art supplies and get ready to transform your space into a vibrant studio where every color tells its own fun story. Let’s dive into the rainbow!
1. Rainbow Woven Paper Plate
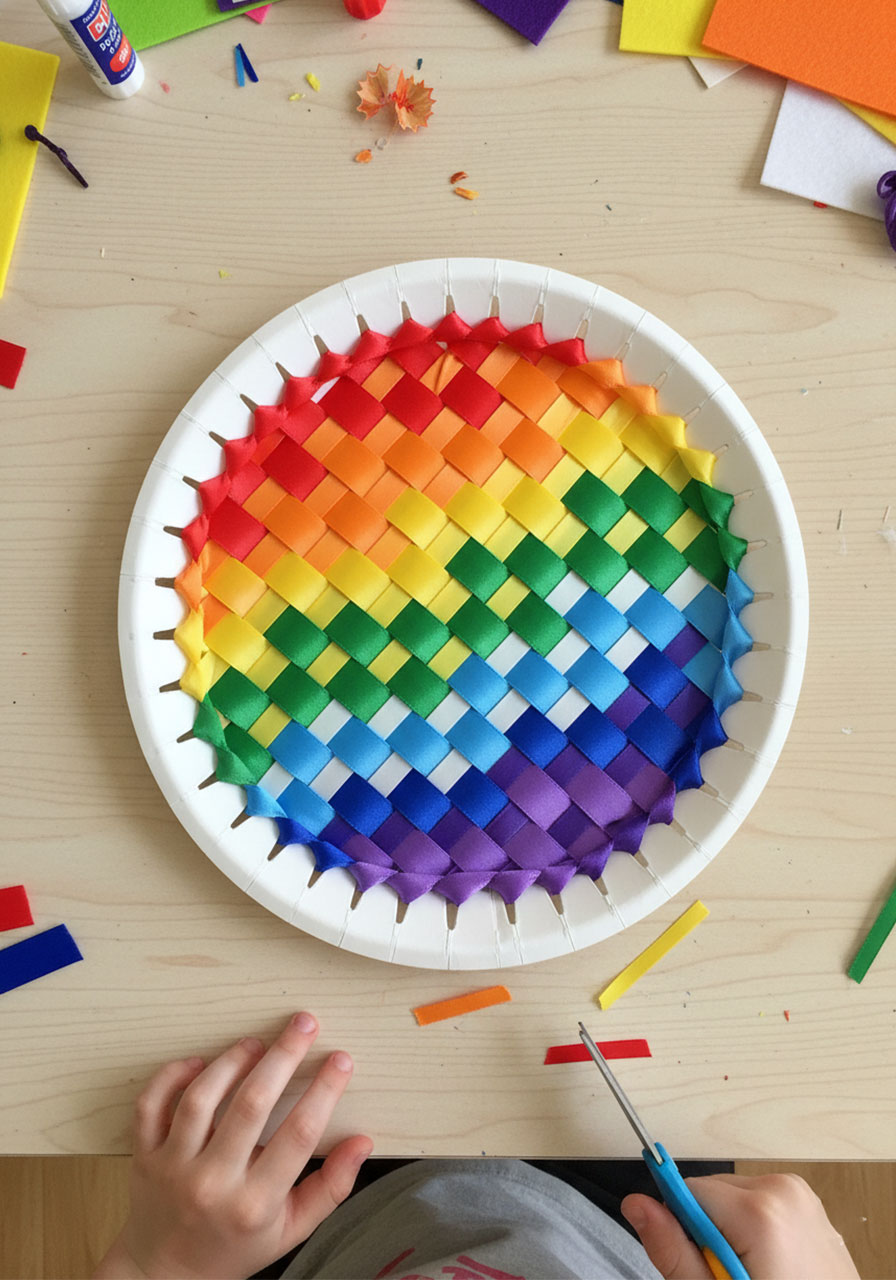
Get ready to introduce your little ones to the art of weaving with this surprisingly simple yet totally impressive craft!
Best for: Ages 5+, fine motor skill development, quiet craft time
Time to Complete: 20-30 minutes
What You’ll Need:
Paper plates
Scissors
Colorful ribbon or yarn (all rainbow colors)
A hole punch (optional)
How to Make It:
1. Prep your plate: Cut evenly spaced notches (about 1 inch apart) around the raised edge of your paper plate.
2. Start the base: Tie one end of your first color ribbon to one notch, then weave it across the plate to the opposite notch.
3. Weave the rainbow: Continue weaving different colored ribbons or yarn through the notches, going over and under the existing strands to create that classic woven pattern.
4. Keep it tight: As you add each new color, gently pull to keep the weave snug and secure.
5. Finish strong: When your plate is beautifully full, tie off the end on the back.
Pro Tip: Use this as a sneaky way to teach color order! Have your kids weave in proper rainbow sequence (red, orange, yellow, green, blue, purple) to reinforce learning while they create.

2. Rainbow-Colored Rice Jars
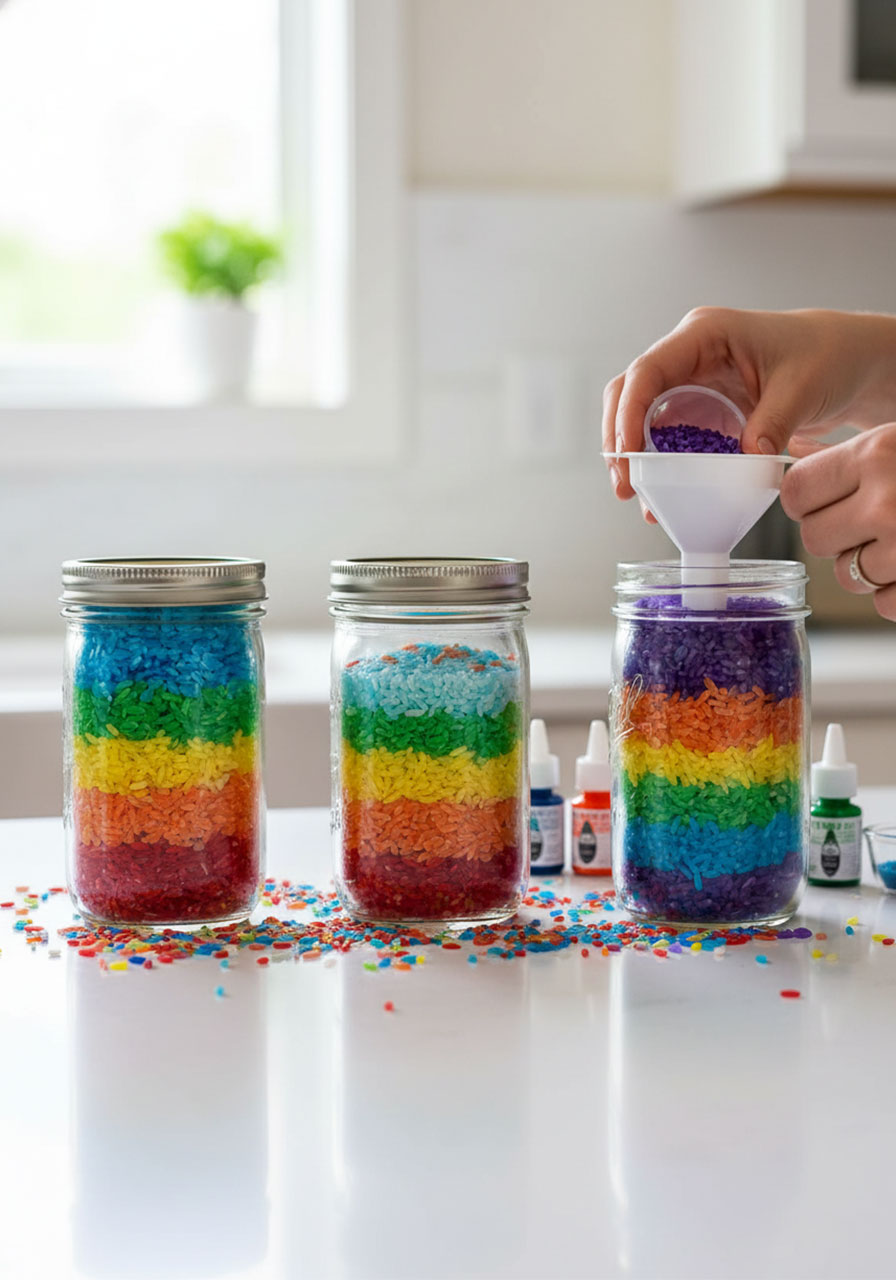
This mesmerizing layered masterpiece doubles as both a craft project and a gorgeous decoration that’ll brighten up any shelf!
Best for: Ages 4+, sensory play, home decor
Time to Complete: 45 minutes (including drying time)
What You’ll Need:
White rice (about 3-4 cups)
Food coloring or liquid watercolors
Ziplock bags
Clear jars with lids
Paper towels
A funnel (makes life easier!)
How to Make It:
1. Color your rice: Divide rice into separate ziplock bags, add a few drops of different food coloring to each, seal, and shake like crazy until evenly colored.
2. Dry it out: Spread each colored batch on paper towels and let dry for 20-30 minutes.
3. Layer the magic: Using a funnel, carefully pour each color into your jar in rainbow order, creating distinct layers.
4. Seal the deal: Screw the lid on tight to preserve those beautiful layers.
5. Shake it up: For an interactive twist, give it a shake and watch the colors swirl, then let it settle and start again!
Pro Tip: Make these in smaller jars as party favors or calming sensory bottles. Kids can shake them when they need a moment to reset!
3. Rainbow Tissue Paper Mosaic Suncatcher

Transform your windows into a kaleidoscope of color with these stunning suncatchers that literally bring sunshine indoors!
Best for: Ages 3+, window decoration, color exploration
Time to Complete: 30-40 minutes
What You’ll Need:
Black cardstock or construction paper
Tissue paper in rainbow colors
Clear contact paper or white glue
Scissors
String for hanging
How to Make It:
1. Cut your shape: Draw and cut out a fun shape (heart, star, rainbow, or circle) from black cardstock, leaving a thick border.
2. Add the sticky base: Cut contact paper slightly larger than your shape and press it over the opening, sticky side up.
3. Create the mosaic: Tear or cut tissue paper into small pieces and let kids stick them onto the contact paper in whatever pattern makes their heart happy.
4. Seal it up: Cover with another piece of contact paper to trap the tissue paper inside.
5. Hang and admire: Punch a hole at the top, thread with string, and hang in a sunny window.
Pro Tip: This is incredibly forgiving – there’s no wrong way to place the tissue paper! Let kids go wild with their color placement for truly unique creations.
4. Rainbow Yarn Wrapping Wall Art

This textured beauty is as fun to make as it is to look at, plus it’s a sneaky workout for those developing fine motor skills!
Best for: Ages 5+, wall decor, tactile exploration
Time to Complete: 45 minutes to 1 hour
What You’ll Need:
A sturdy branch or wooden dowel (12-18 inches long)
Yarn in all rainbow colors
Scissors
String or twine for hanging
How to Make It:
1. Start with red: Tie the end of red yarn to one end of your branch and start wrapping tightly, covering about 2 inches.
2. Transition colors: When you’re ready to switch, tie the next color (orange) to the red and continue wrapping.
3. Keep it tight: The key is maintaining tension as you wrap – this creates that gorgeous, smooth finish.
4. Complete the rainbow: Work through all the colors until your entire branch is wrapped in colorful glory.
5. Add a hanger: Tie a piece of string to each end of the branch and hang it up!
Pro Tip: This is perfect for practicing patience! Put on some music and make it a meditative activity. The repetitive wrapping motion is surprisingly calming for kids (and adults!).
5. Rainbow Handprint Canvas

Capture those adorable little hands while creating a vibrant keepsake that you’ll treasure forever!
Best for: Ages 2+, memory keeping, gift giving
Time to Complete: 30 minutes
What You’ll Need:
Canvas (any size, but 11×14 works great)
Washable paint in rainbow colors
Paper plates (for paint)
Wet wipes or towels for cleanup
Smocks or old t-shirts
How to Make It:
1. Prep your station: Pour each paint color onto separate paper plates and protect all surfaces (trust us on this one!).
2. Start with red: Have your child press their hand into red paint and stamp it onto the canvas.
3. Build the rainbow: Continue with each color, overlapping the handprints slightly to create an arc shape.
4. Fill it in: Don’t worry about perfection – overlapping prints add character and depth!
5. Let it dry: Set aside for a few hours, then display this precious artwork proudly.
Pro Tip: Date the back of the canvas! Years from now, you’ll love looking back at how tiny those hands once were. This makes an incredible grandparent gift too!
6. Rainbow Button Collage
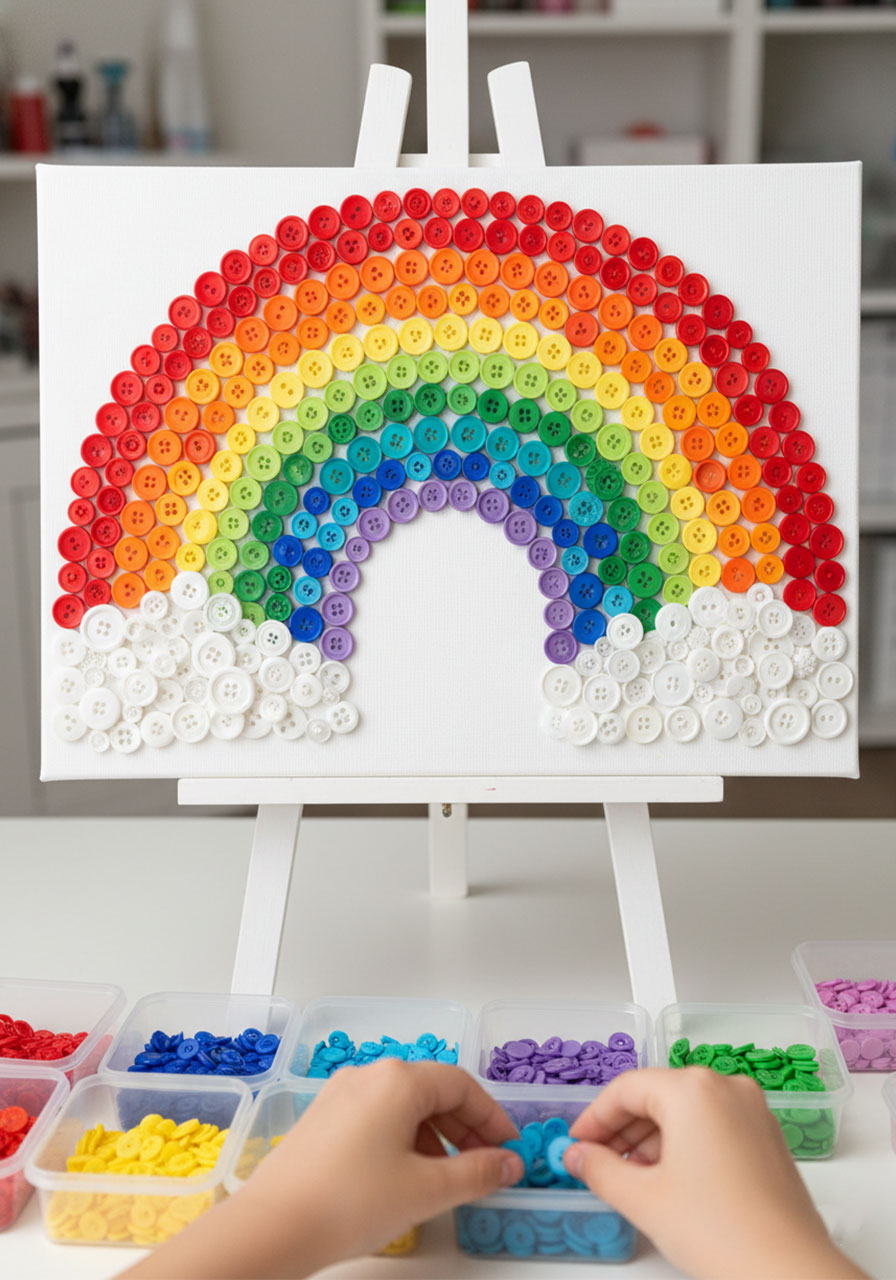
Raid your button stash for this craft that’s as satisfying to create as it is to display!
Best for: Ages 4+, sorting skills, patience building
Time to Complete: 1 hour
What You’ll Need:
Canvas or thick cardboard
Assorted buttons in rainbow colors
White glue or hot glue gun (adult supervision required)
Pencil for sketching
How to Make It:
1. Sketch your rainbow: Lightly draw a rainbow arc on your canvas as a guide.
2. Sort the buttons: Have kids organize buttons by color – this is learning in action!
3. Start gluing: Beginning with red at the top, glue buttons along your sketched line.
4. Layer for depth: Overlap different sized buttons to create texture and visual interest.
5. Fill it completely: Keep adding buttons until each rainbow stripe is completely covered.
Pro Tip: Mix button sizes and shades within each color for a more dynamic, eye-catching result. The variety adds so much personality!
7. Paper Strip Rainbow Sculpture

This three-dimensional beauty is easier than it looks and makes a statement piece that’ll wow everyone who sees it!
Best for: Ages 5+, understanding curves and arcs, party decor
Time to Complete: 30 minutes
What You’ll Need:
Construction paper in rainbow colors
Scissors
Glue or tape
Ruler
A base (cardboard or foam board)
How to Make It:
1. Cut your strips: Cut long strips from each color paper – red should be longest, purple shortest.
2. Curve the first arc: Bend your red strip into an arc and glue both ends to your base.
3. Build the rainbow: Working from outside to inside, glue each progressively shorter colored strip inside the previous one.
4. Keep them centered: Make sure each arc is centered with the others for that perfect rainbow curve.
5. Add clouds: Cut fluffy white clouds from paper and glue them at the rainbow’s ends for extra charm!
Pro Tip: This sculpture is surprisingly sturdy once complete! Display it as a table centerpiece or party decoration – it’s a guaranteed conversation starter.
8. Rainbow Salt Painting

Combine art with a bit of science magic in this craft that sparkles and shines like the real deal!
Best for: Ages 4+, sensory exploration, science fun
Time to Complete: 45 minutes (plus drying time)
What You’ll Need:
Thick paper or cardstock
White school glue
Table salt
Food coloring or liquid watercolors
Paintbrushes
Small containers for colored salt
How to Make It:
1. Draw with glue: Squeeze glue in a rainbow arc design on your paper – go bold and thick!
2. Add the salt: While glue is still wet, sprinkle salt generously over all the glue lines.
3. Shake off excess: Gently lift paper and tap to remove loose salt.
4. Paint the rainbow: Use a wet paintbrush dipped in food coloring to touch the salt – watch it absorb and spread like magic!
5. Let it sparkle: Allow to dry completely (this is the hardest part – waiting!).
Pro Tip: The wetter your paintbrush, the faster and further the color will spread. Teach kids to control the moisture for different effects. They’ll feel like real artists!
9. Layered Rainbow Sand Jar
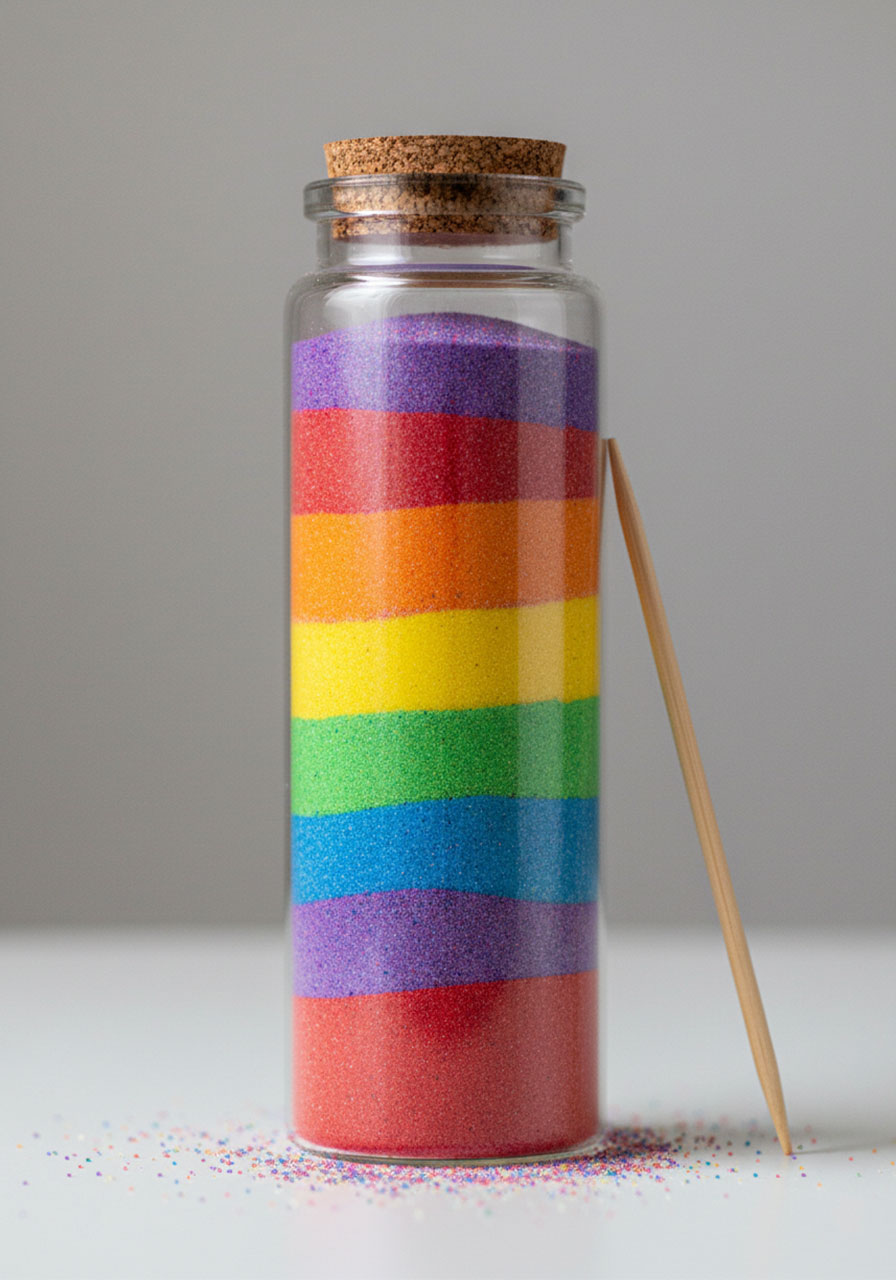
This craft is pure meditation – watching those perfect layers come together is oddly satisfying for kids and adults alike!
Best for: Ages 5+, patience practice, fine motor skills
Time to Complete: 30-45 minutes
What You’ll Need:
Clear jar or bottle
Colored craft sand or make your own (see Pro Tip!)
Funnel or rolled paper cone
Chopstick or skewer
How to Make It:
1. Start at the bottom: Using your funnel, pour the first color sand to create your base layer.
2. Add the next color: Carefully pour the second color, aiming for the center to keep layers even.
3. Create patterns: For angled layers, tilt the jar slightly as you pour.
4. Adjust as needed: Use a chopstick pushed down the side to create cool swooped effects.
5. Seal it up: Once full, cap tightly and admire your handiwork!
Pro Tip: Don’t have colored sand? Make your own! Mix white sand with chalk dust by scraping colored chalk with sandpaper. Works like a charm and costs next to nothing!
10. Rainbow Pom-Pom Sorting Game
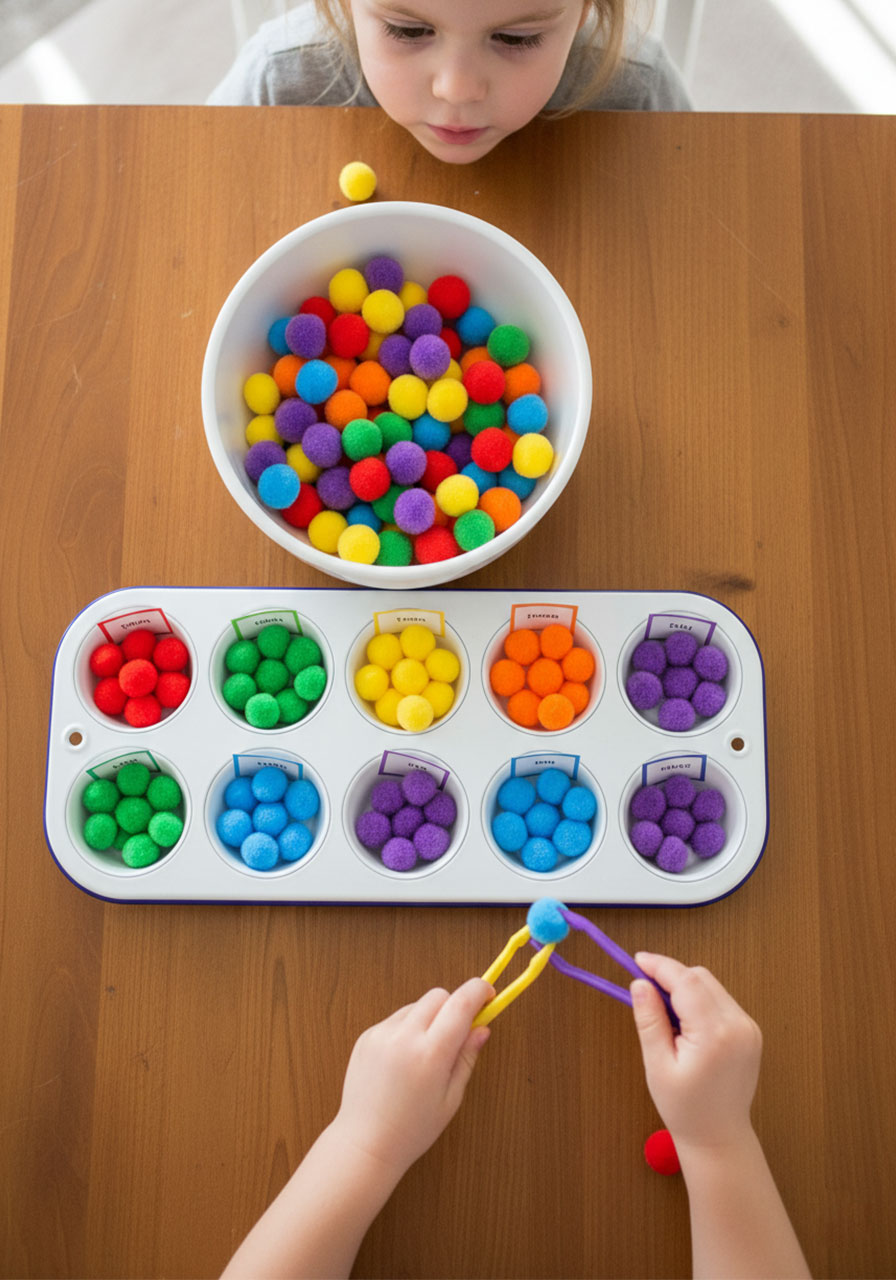
Who says crafts can’t be educational? This colorful game teaches color recognition while keeping little hands busy!
Best for: Ages 2-5, color learning, hand-eye coordination
Time to Complete: 20 minutes setup, hours of play!
What You’ll Need:
Small pom-poms in rainbow colors
Clear containers or muffin tin
Tweezers or tongs (kid-sized if possible)
Labels or colored tape
How to Make It:
1. Prep your containers: Mark each container with a different rainbow color using tape or stickers.
2. Mix the pom-poms: Put all the pom-poms in one big bowl.
3. Demonstrate sorting: Show your child how to pick up a pom-pom and place it in the matching colored container.
4. Let them play: Hand over the tweezers and watch them work their sorting magic!
5. Mix and repeat: Once everything’s sorted, dump it back and start again!
Pro Tip: This is brilliant for developing the pincer grasp that kids need for writing. The tweezers make it challenging enough to build strength without frustration!
11. Rainbow Slime Play

Get ready for the squishiest, stretchiest, most satisfying sensory experience your kids will ever have!
Best for: Ages 4+, sensory play, stress relief
Time to Complete: 20 minutes
What You’ll Need:
Clear or white school glue (4 oz per color)
Liquid starch or contact lens solution with baking soda
Food coloring or liquid watercolors
Glitter (optional but highly recommended!)
Mixing bowls
Large container for combining
How to Make It:
1. Make each color separately: In separate bowls, mix glue with a few drops of food coloring.
2. Activate the slime: Add your activator (liquid starch or contact solution) a little at a time, stirring constantly until it comes together.
3. Knead it: Once it’s no longer sticky, knead each color until smooth and stretchy.
4. Create the rainbow: Place each colored slime ball next to each other in rainbow order in your large container.
5. Play and explore: Let kids stretch, swirl, and mix the colors – watching them blend is half the fun!
Pro Tip: Store each color separately in airtight containers if you want to preserve the rainbow effect. Or let kids mix it all together for a spectacular marbled masterpiece!
12. Rainbow Streamer Windsock
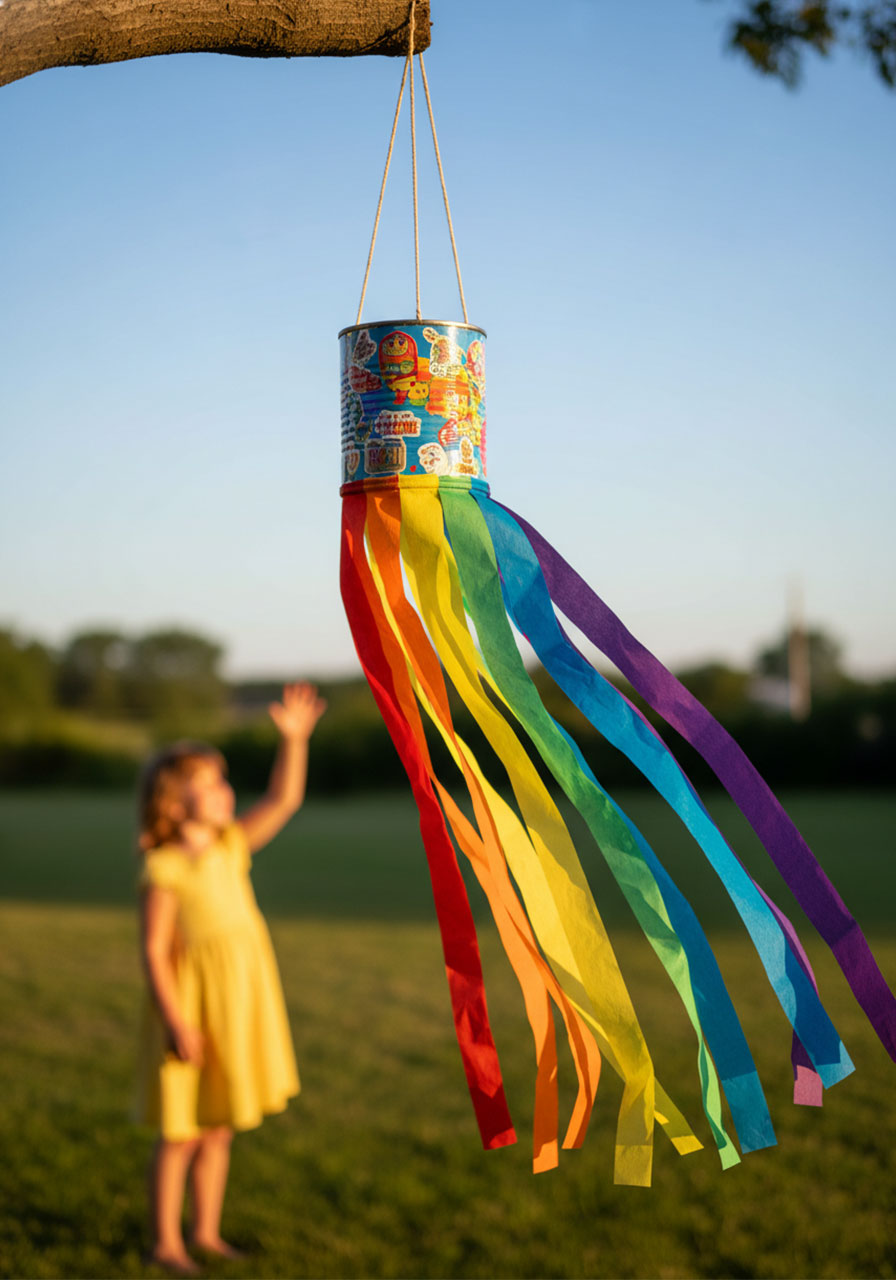
Watch these beauties dance in the breeze and bring joy to everyone who sees them fluttering!
Best for: Ages 4+, outdoor decor, movement exploration
Time to Complete: 30 minutes
What You’ll Need:
Empty can or cardboard tube
Crepe paper streamers in rainbow colors
Scissors
Glue or tape
Hole punch
String for hanging
Decorative materials (stickers, markers, etc.)
How to Make It:
1. Decorate the base: Let kids cover the can or tube with paper, stickers, or paint – make it uniquely theirs!
2. Cut the streamers: Cut ribbon or crepe paper into long strips (18-24 inches).
3. Attach the rainbow: Glue or tape streamers around the bottom rim in rainbow order.
4. Add the hanger: Punch two holes opposite each other at the top and thread string through.
5. Hang and enjoy: Find a breezy spot and watch those streamers dance!
Pro Tip: Hang several at different heights for a stunning outdoor display. They’re perfect for birthday parties or just adding everyday magic to your porch or patio!
13. Rainbow Paper Chain Garland
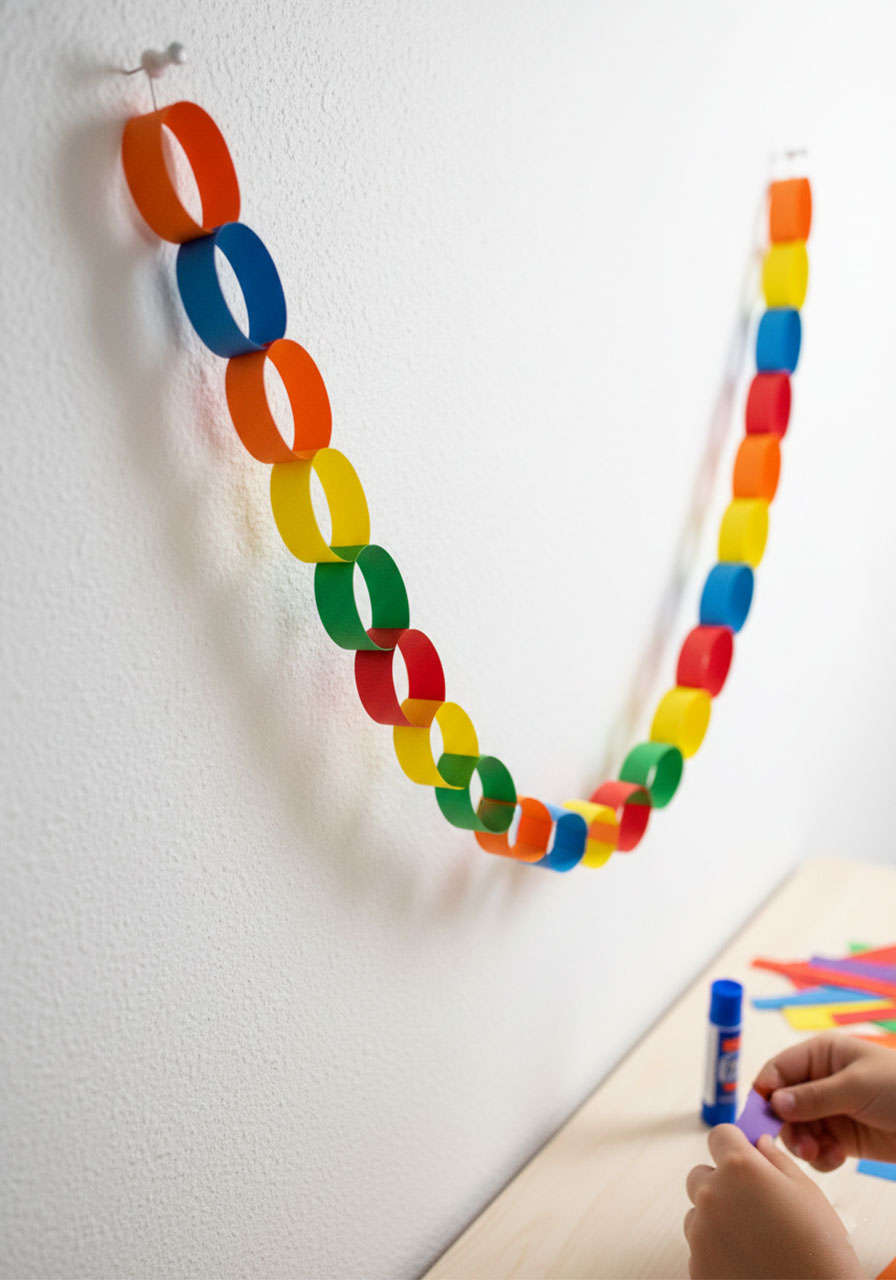
This classic craft never gets old, and it’s the perfect group activity for parties or family craft time!
Best for: Ages 3+, party decor, counting practice
Time to Complete: 30-45 minutes (depending on length)
What You’ll Need:
Construction paper in rainbow colors
Scissors or paper cutter
Glue stick or tape
Ruler (optional)
How to Make It:
1. Cut your strips: Slice paper into strips about 1 inch wide and 6 inches long.
2. Make the first link: Loop one strip into a circle and glue or tape the ends together.
3. Add the next color: Thread the next strip through your first loop, then close it to create a chain.
4. Keep the rainbow going: Continue linking colors in rainbow order (or mix it up for a scrappy look!).
5. Hang it up: Drape your finished garland across walls, doorways, or party tables.
Pro Tip: Challenge older kids to create a pattern – rainbow order, then reverse, then repeat! It’s sneaky math practice disguised as crafting fun.
14. Rainbow Mosaic Window Art
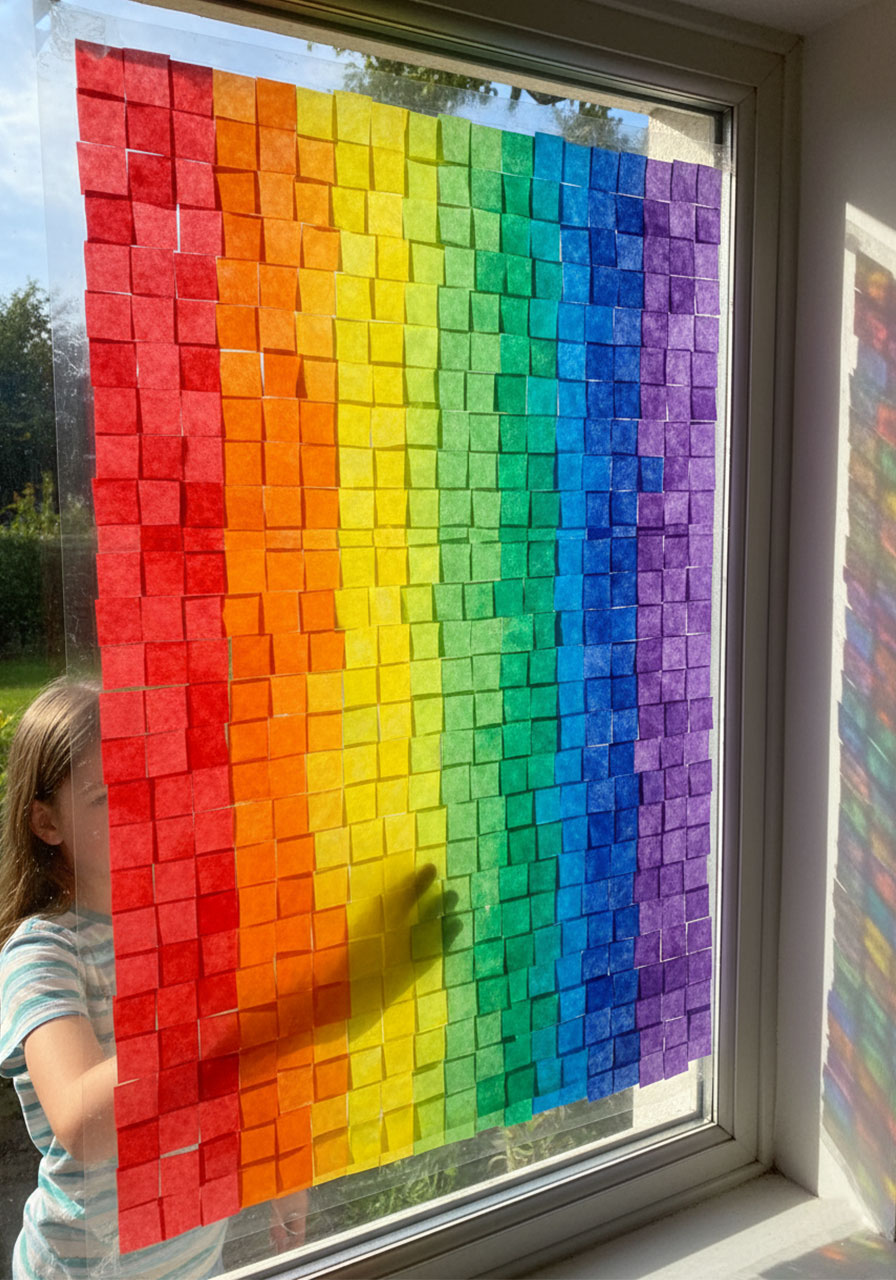
Transform plain windows into stained glass masterpieces that catch the light beautifully!
Best for: Ages 4+, window decoration, light exploration
Time to Complete: 45 minutes
What You’ll Need:
Clear contact paper
Tissue paper squares in rainbow colors
Black construction paper
Scissors
Tape
How to Make It:
1. Cut your frame: Cut a rainbow shape or other design from black construction paper, leaving a wide border.
2. Apply contact paper: Stick contact paper over the opening, adhesive side facing out.
3. Create the mosaic: Let kids press tissue paper squares onto the sticky surface in whatever pattern they choose.
4. Seal with another layer: Cover with a second piece of contact paper to sandwich the tissue paper.
5. Tape to window: Stick your finished masterpiece on a sunny window and wait for the magic!
Pro Tip: Stand back and watch how the sunlight transforms this craft! Different times of day cast different colored shadows – it’s like having a new decoration every hour.
15. Rainbow Sponge Painting

This forgiving painting technique is perfect for younger kids who want to create something spectacular without worrying about brush control!
Best for: Ages 2+, process art, color mixing
Time to Complete: 20-30 minutes
What You’ll Need:
Kitchen sponges cut into small pieces
Paint in rainbow colors
Paper plates (for paint)
White paper or canvas
Clothespins (optional, as handles for sponges)
How to Make It:
1. Set up your station: Pour each paint color onto separate plates and clip clothespins to sponge pieces for easy gripping.
2. Show the technique: Demonstrate how to dab (not swipe!) the sponge onto paper.
3. Paint the rainbow: Have kids create a rainbow arc by dabbing each color in order.
4. Experiment: Encourage trying different patterns – dots, lines, or totally abstract designs!
5. Let dry: Set aside to dry, then hang up this textured artwork.
Pro Tip: Sponge painting is incredibly forgiving! Overlapping colors create new shades, turning “mistakes” into learning opportunities about color mixing. Plus, cleanup is a breeze!
16. Rainbow Bead Necklace
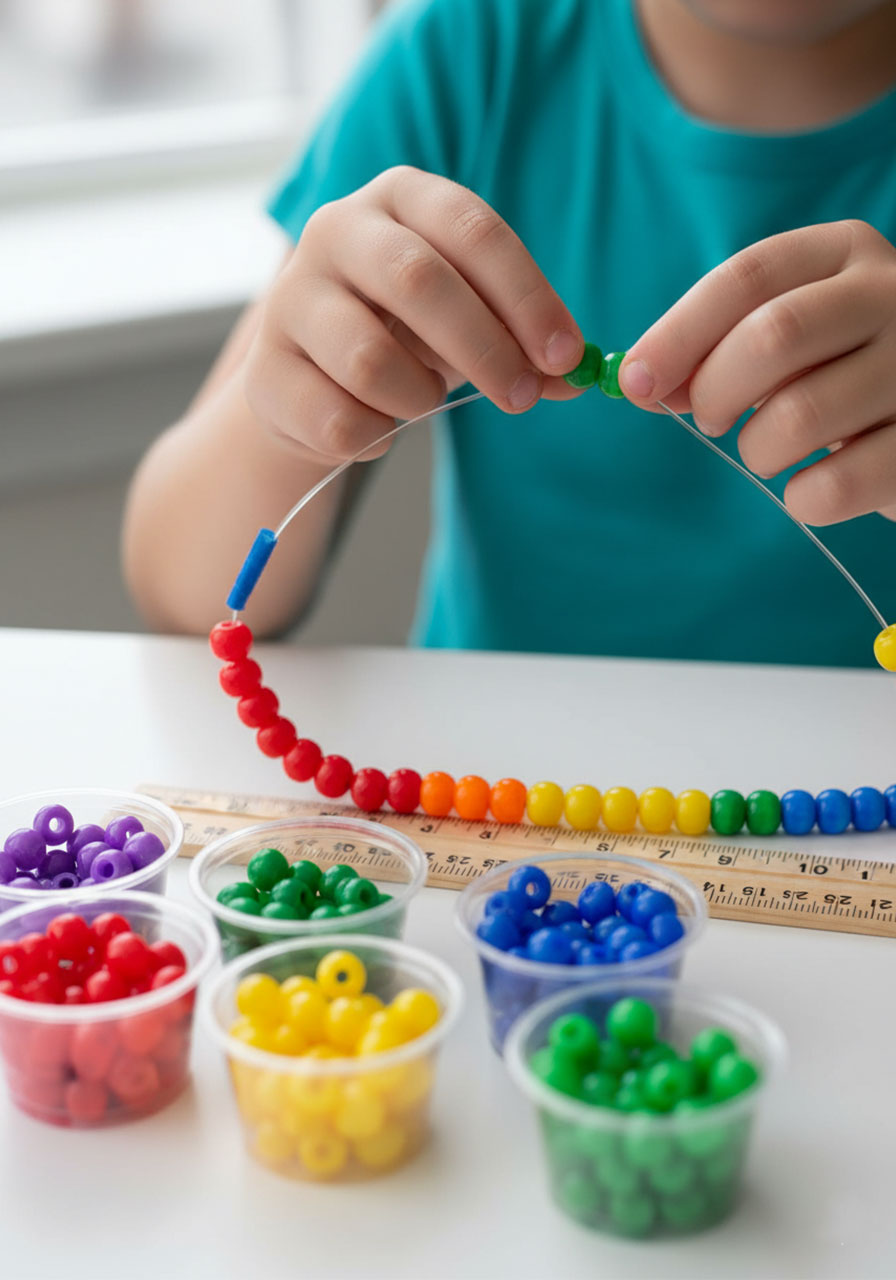
This wearable art project doubles as a gift-making activity – grandparents will treasure these handmade treasures!
Best for: Ages 4+, fine motor skills, pattern making
Time to Complete: 30-40 minutes
What You’ll Need:
Plastic pony beads in rainbow colors
Elastic cord or yarn
Tape (to create a “needle” on yarn end)
Scissors
How to Make It:
1. Prep your string: If using yarn, wrap one end tightly with tape to create a stiff threading end.
2. Plan the pattern: Lay out beads in rainbow order before threading so kids can see their pattern.
3. Start threading: Help younger kids thread their first few beads, then let them take over.
4. Keep the rainbow going: Continue threading in color groups until the necklace is long enough.
5. Tie it off: Secure ends with a strong knot (adult job!) and trim excess.
Pro Tip: Make matching bracelets or anklets for a complete jewelry set! Kids love coordinating accessories, and it’s great practice for perfecting their technique.
17. Rainbow Glitter Jar
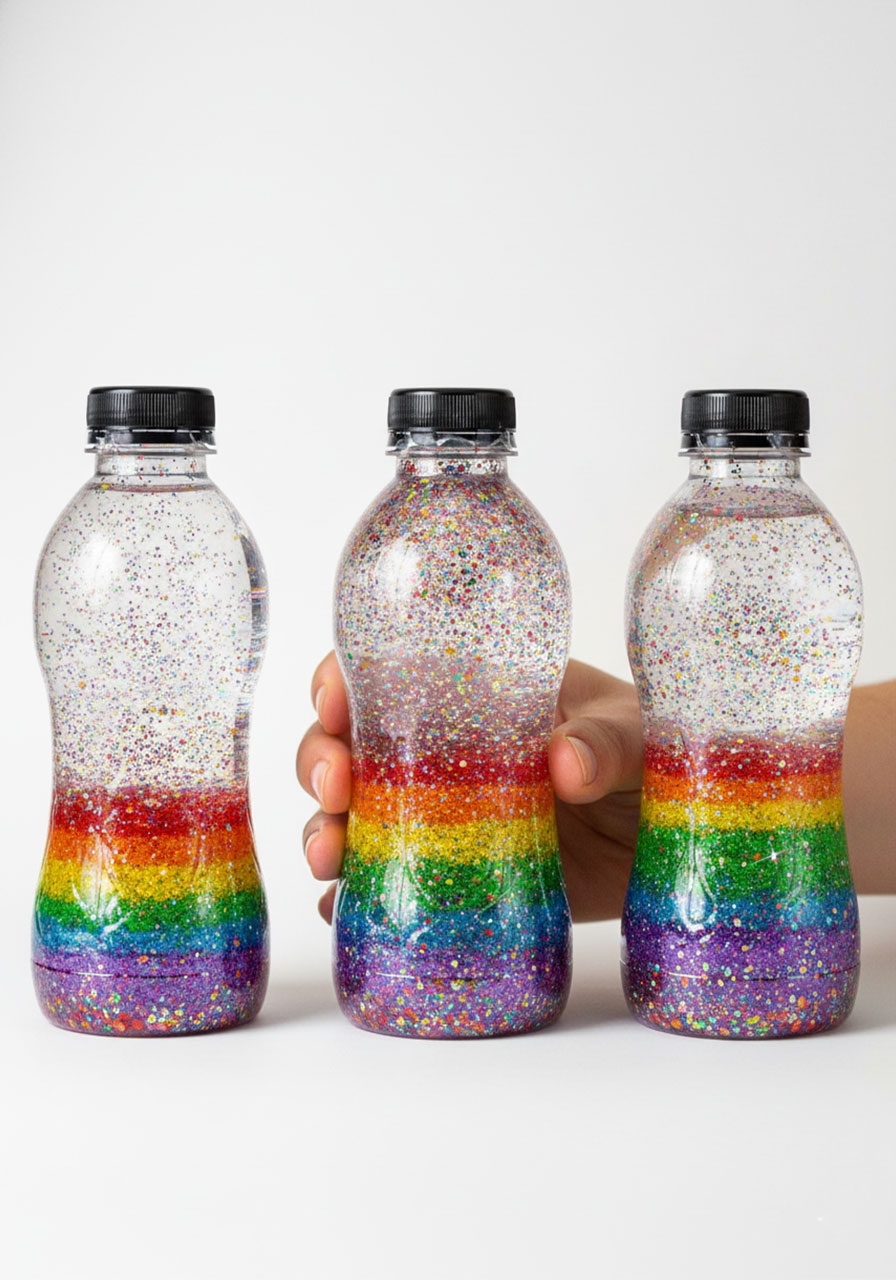
These mesmerizing calm-down bottles are perfect for moments when kids need a peaceful reset!
Best for: Ages 3+, sensory tool, mindfulness
Time to Complete: 15 minutes
What You’ll Need:
Clear plastic bottles with tight lids
Clear glue (1/2 cup per jar)
Warm water
Glitter in rainbow colors
Food coloring (optional)
Super glue (for sealing lid)
How to Make It:
1. Mix the base: Pour clear glue into your bottle, then fill halfway with warm water.
2. Add the magic: Pour in different colored glitters and a few drops of matching food coloring.
3. Fill and shake: Top off with more water, seal tightly, and shake to combine everything.
4. Test the flow: Give it a good shake and watch. If glitter settles too fast, add more glue. Too slow? Add water.
5. Seal permanently: Once perfect, use super glue around the lid rim to prevent spills.
Pro Tip: Keep one in your car, one at home, and one in the classroom. When emotions run high, shake it up and watch it settle – it’s amazing how calming this simple tool can be!
18. Rainbow Fish Craft With Scales

Channel your inner ocean artist with this scale-tastic fish that shimmers and shines!
Best for: Ages 4+, sea creature learning, texture exploration
Time to Complete: 45 minutes
What You’ll Need:
Fish template or freehand drawing
Construction paper in rainbow colors
Scissors
Glue stick
Googly eyes
Glitter or sequins (optional)
How to Make It:
1. Prep your fish: Draw and cut out a large fish shape from cardstock or construction paper.
2. Cut the scales: Cut small circles (about 1.5 inches) from each rainbow color – you’ll need lots!
3. Start at the tail: Glue scales starting from the tail, working forward with each row slightly overlapping the previous one.
4. Create the rainbow pattern: Arrange colors in rainbow order or create your own funky pattern.
5. Add finishing touches: Glue on a googly eye, add glitter to select scales, and draw a smiling mouth.
Pro Tip: Make this a group activity where each child creates one fish, then display them together as an entire rainbow school of fish swimming across your wall!
19. Rainbow Foam Dough Creations

This fluffy, sculptable dough feels like a cloud and sparks endless creative play!
Best for: Ages 3+, sensory play, open-ended creativity
Time to Complete: 20 minutes to make, hours to play!
What You’ll Need:
2 cups shaving cream (per color)
1 cup cornstarch (per color)
Food coloring
Mixing bowls
Measuring cups
How to Make It:
1. Mix each color separately: In a bowl, combine shaving cream with cornstarch until it forms a pliable dough.
2. Add color: Knead in food coloring until evenly distributed (this is messy fun!).
3. Adjust consistency: If too sticky, add cornstarch. Too dry? Add more shaving cream.
4. Make all colors: Repeat for each rainbow color.
5. Create and play: Let kids sculpt figures, mix colors, or just squish to their heart’s content!
Pro Tip: This dough doesn’t keep long, but that’s okay – the making is half the fun! Plan to create it fresh each time for maximum fluffiness and sensory satisfaction.
20. Rainbow Popsicle Stick Picture Frame
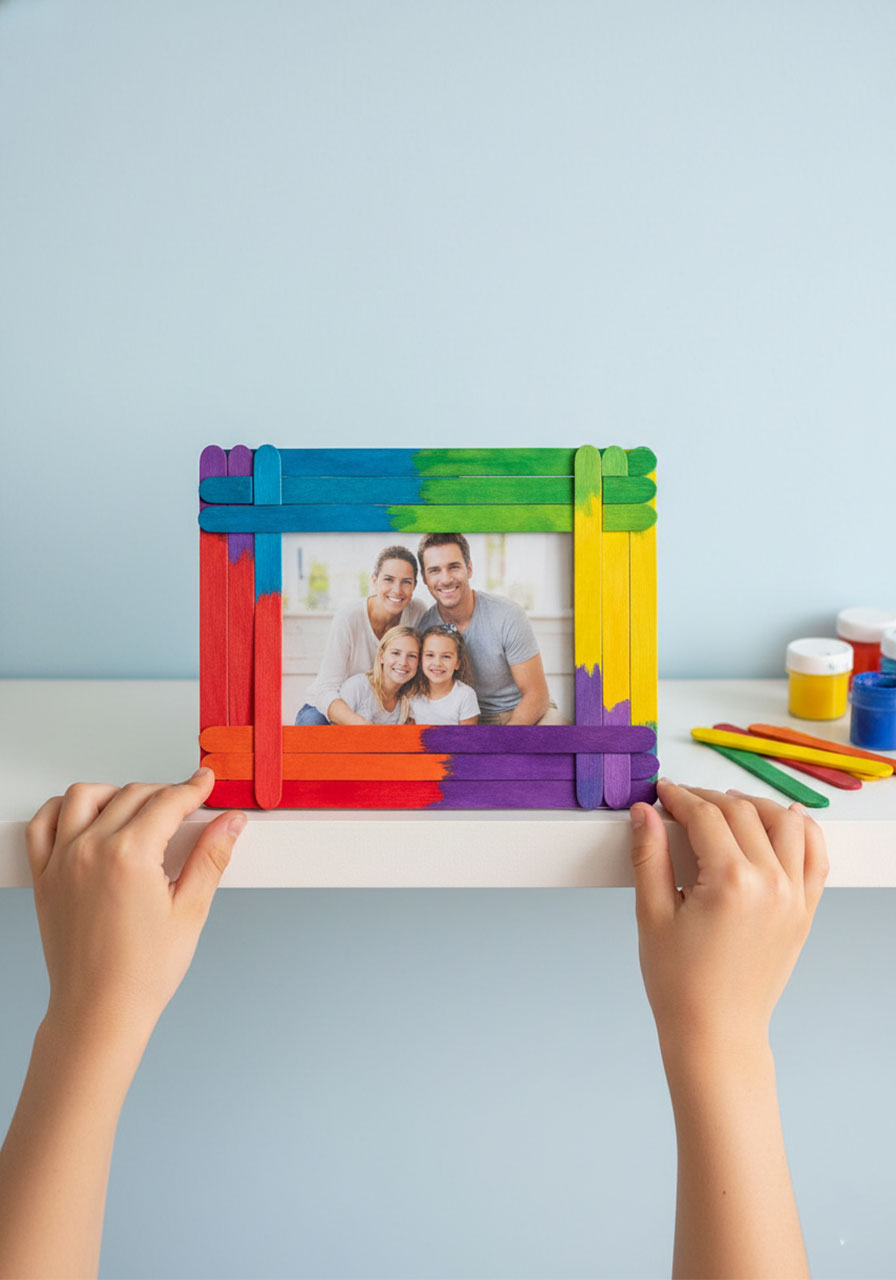
Turn ordinary popsicle sticks into a vibrant frame that’ll make any photo pop with personality!
Best for: Ages 4+, gift making, displaying favorite photos
Time to Complete: 30 minutes
What You’ll Need:
Popsicle sticks or craft sticks (at least 12)
Paint or markers in rainbow colors
Glue or hot glue gun (adult supervision)
Cardboard backing
Photo or artwork to frame
How to Make It:
1. Color your sticks: Paint each popsicle stick a different rainbow color and let them dry completely.
2. Create the frame base: Arrange 4 sticks in a square or rectangle shape and glue the corners together.
3. Layer on the rainbow: Glue additional colored sticks around the perimeter, alternating colors for maximum visual impact.
4. Add the backing: Cut cardboard to size and glue it to the back, leaving the top open to slide photos in and out.
5. Insert your masterpiece: Slide in a favorite photo or piece of your child’s artwork.
Pro Tip: Make several frames in different sizes to create a rainbow gallery wall! It’s an affordable way to showcase your little artist’s ever-growing portfolio.
21. Rainbow Coffee Filter Butterflies

Watch magic happen as watercolors bleed together on these delicate coffee filter butterflies!
Best for: Ages 3+, spring decor, science exploration
Time to Complete: 30 minutes (plus drying time)
What You’ll Need:
White coffee filters
Washable markers or liquid watercolors
Spray bottle with water
Clothespins
Pipe cleaners
Googly eyes (optional)
How to Make It:
1. Flatten your filter: Lay a coffee filter flat on a protected surface.
2. Add the color: Using markers, color bands of rainbow colors across the filter – don’t worry about being neat!
3. Activate the magic: Lightly spray with water and watch the colors bleed and blend together.
4. Let it dry: Allow filters to dry completely (this takes 20-30 minutes).
5. Create the butterfly: Pinch the dry filter in the middle and secure with a pipe cleaner, twisting to form antennae. Add googly eyes if desired!
Pro Tip: These are so easy and beautiful that they’re perfect for party crafts! Set up a butterfly-making station and let each guest create their own to take home.
22. Rainbow Tissue Box Guitar
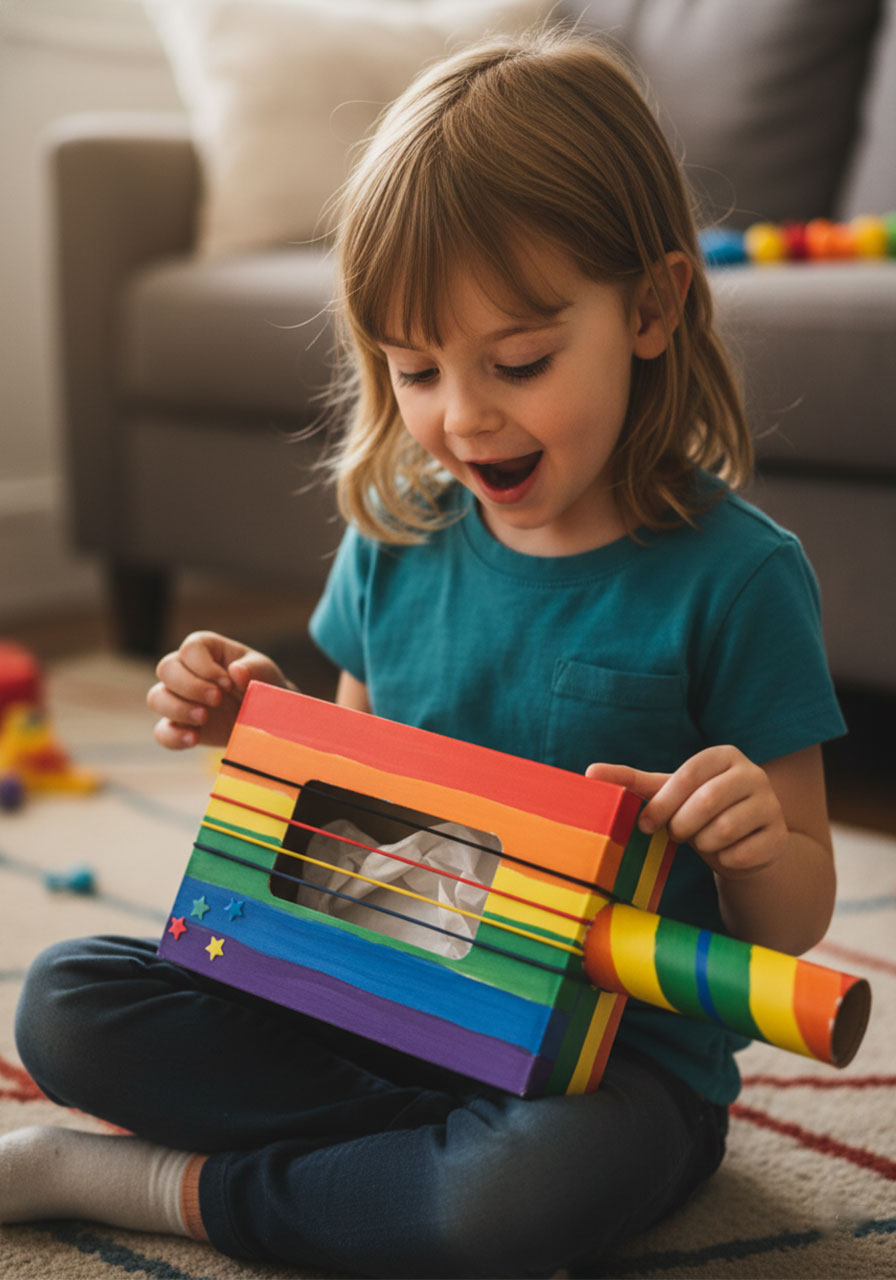
Rock out with this adorable DIY guitar that actually makes music!
Best for: Ages 4+, music exploration, recycling project
Time to Complete: 45 minutes
What You’ll Need:
Empty tissue box
Paint in rainbow colors
Rubber bands of varying thicknesses (4-6)
Paper towel tube
Scissors and tape
Decorative materials (optional)
How to Make It:
1. Paint the body: Cover your tissue box with rainbow stripes and let dry completely.
2. Create the neck: Cut a hole in one end of the box and insert the paper towel tube, securing with tape.
3. Add the strings: Stretch rubber bands around the box lengthwise across the opening – different thicknesses create different sounds!
4. Decorate it: Add stickers, glitter, or other embellishments to make it uniquely yours.
5. Strum away: Pluck the rubber bands and enjoy your homemade music!
Pro Tip: Experiment with rubber band tension and thickness to create different pitches. It’s a fun, hands-on lesson in how string instruments work!
23. Rainbow Egg Carton Caterpillars

These wiggly, giggly caterpillars are the perfect combination of cute and colorful!
Best for: Ages 3+, recycling craft, spring theme
Time to Complete: 30 minutes
What You’ll Need:
Cardboard egg carton
Paint in rainbow colors
Pipe cleaners
Googly eyes
Scissors
Glue
How to Make It:
1. Cut your segments: Slice the egg carton into strips of connected cups (5-7 cups per caterpillar).
2. Paint the rainbow: Paint each cup a different rainbow color and allow to dry.
3. Add the face: Glue googly eyes to the first cup and draw on a smiling mouth.
4. Create antennae: Poke two small holes in the top of the head cup and thread pipe cleaner pieces through, curling the ends.
5. Let it crawl: Bend your caterpillar into wiggly positions – it’s poseable fun!
Pro Tip: Read “The Very Hungry Caterpillar” while making these, then use your finished caterpillars to act out the story. Learning and crafting rolled into one!
24. Rainbow Painted Rocks

These cheerful stones spread joy wherever they land – perfect for rock hunting or garden decorating!
Best for: Ages 4+, outdoor decor, kindness rocks project
Time to Complete: 30-40 minutes (plus drying time)
What You’ll Need:
Smooth rocks (palm-sized works best)
Acrylic paint in rainbow colors
Fine paintbrushes
Clear sealer spray (adult use)
White paint or primer (optional base coat)
How to Make It:
1. Clean your rocks: Wash stones thoroughly and let them dry completely – paint won’t stick to dirty rocks!
2. Add a base coat: Paint rocks white first for brighter colors (optional but recommended).
3. Paint the rainbow: Create rainbow stripes, a full arc, or abstract rainbow swirls on each rock.
4. Add details: Dot on white highlights, draw clouds, or add inspiring words.
5. Seal the deal: Once dry, spray with clear sealer to protect your artwork from weather.
Pro Tip: Join the kindness rocks movement! Paint uplifting messages on the back and hide them around your community for others to find. It’s crafting that spreads joy!
25. Rainbow Cloud Mobile
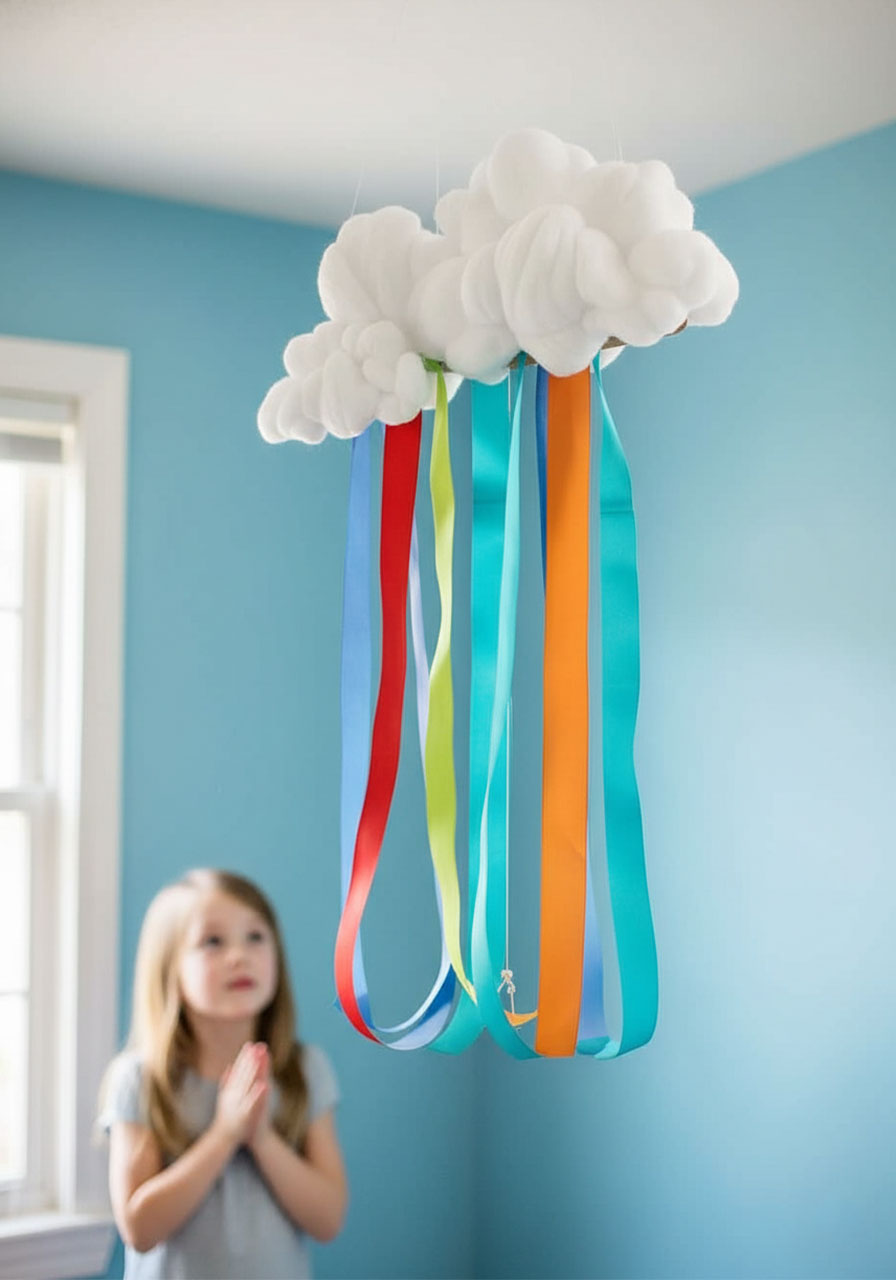
Create a dreamy hanging decoration that’ll float peacefully above beds or in play areas!
Best for: Ages 4+, nursery decor, weather learning
Time to Complete: 45 minutes
What You’ll Need:
Cotton balls or batting
White glue
Cardboard cloud template
Ribbon or crepe paper streamers in rainbow colors
String or fishing line
Scissors
How to Make It:
1. Build the cloud: Cut a cloud shape from cardboard and completely cover it with glued cotton balls for that fluffy effect.
2. Cut your rainbows: Slice ribbons or streamers into varying lengths (12-18 inches).
3. Attach the rain: Glue rainbow-colored ribbons to the bottom of your cloud in rainbow order.
4. Add the hanger: Attach string to the top of the cloud for hanging.
5.. Display it proudly: Hang your mobile where it can gently spin and catch the light!
Pro Tip: Make several clouds at different heights and string them together for a full rainbow rainstorm effect. It’s especially magical hung near a window where they catch the breeze!
26. Rainbow Paper Bag Kite

This easy-to-make kite brings rainbow magic to windy days – and it actually flies!
Best for: Ages 5+, outdoor play, wind exploration
Time to Complete: 30 minutes
What You’ll Need:
Paper lunch bag
Markers or crayons in rainbow colors
Crepe paper streamers
String or yarn
Hole punch
Tape or glue
How to Make It:
1. Decorate the bag: Color your paper bag with horizontal rainbow stripes – make them bold and bright!
2. Add the streamers: Cut several long pieces of crepe paper and attach them to the bottom of the bag with tape.
3. Create the handle: Punch two holes near the top opening of the bag and thread string through, knotting securely.
4. Open it up: Gently open the bag so it catches air – don’t crush it flat!
5. Take flight: Head outside and run with your kite trailing behind, watching those streamers dance!
Pro Tip: This works best on breezy but not super windy days. If it’s too windy, your kite might tear, but a gentle breeze is absolutely perfect for flying!
27. Rainbow Felt Board Story Kit

Create an entire rainbow world of characters and shapes for endless storytelling possibilities!
Best for: Ages 3+, imaginative play, language development
Time to Complete: 1 hour (but you’ll use it forever!)
What You’ll Need:
Felt sheets in rainbow colors
Scissors
Small fabric board or frame wrapped in felt
Permanent marker (for drawing details)
Storage bag for pieces
How to Make It:
1. Cut the shapes: From different colored felt, cut out basic shapes like circles, squares, triangles, hearts, and stars.
2. Create characters: Cut simple people, animals, houses, trees, and other storytelling elements.
3. Add details: Use marker to draw faces, windows, or other features on your felt pieces.
4. Organize everything: Store all pieces in a labeled bag or container.
5. Tell stories: Let kids arrange and rearrange pieces on the felt board to create their own colorful tales!
Pro Tip: Cut out letters and numbers too! This transforms into an educational tool for practicing spelling and math while keeping playtime fun and hands-on.
28. Rainbow Origami Stars

These tiny treasures are surprisingly addictive to fold – warning: you won’t be able to stop at just one!
Best for: Ages 8+, fine motor skills, mindful activity
Time to Complete: 5 minutes per star (but you’ll make dozens!)
What You’ll Need:
Origami paper or paper strips (1/2 inch x 11 inches)
Scissors
Clear jar (for collecting your stars)
How to Make It:
1. Prepare your strips: Cut paper into thin strips if using regular paper, or use pre-cut origami strips.
2. Make the knot: Tie a loose knot near one end of the strip, gently tightening and flattening to create a pentagon.
3. Wrap the strip: Wind the remaining paper around the pentagon, tucking in the end.
4. Create the star shape: Gently pinch each of the five corners inward to puff up the star.
5. Collect them all: Make one in each rainbow color and fill a jar with your collection!
Pro Tip: These make incredible gifts! Fill a jar with rainbow stars and attach a note that says “100 wishes” or “A jar full of luck.” It’s a heartfelt present that shows serious effort and love.
29. Rainbow Cupcake Liner Flowers

Transform ordinary baking supplies into a bouquet that’ll never wilt!
Best for: Ages 4+, Mother’s Day gift, spring decor
Time to Complete: 30 minutes
What You’ll Need:
Cupcake liners in rainbow colors
Green pipe cleaners or straws
Glue or tape
Buttons or pom-poms for centers
Green paper (for leaves, optional)
How to Make It:
1. Layer your petals: Stack 2-3 cupcake liners of the same color, slightly offsetting them for dimension.
2. Add the center: Glue a button or small pom-pom in the middle of your stacked liners.
3. Attach the stem: Poke a pipe cleaner or straw through the center and secure with glue or tape on the back.
4. Add leaves: Cut leaf shapes from green paper and attach to stems.
5. Create a bouquet: Make flowers in every rainbow color and arrange them in a vase!
Pro Tip: These are practically indestructible, which makes them perfect for little kids to gift to teachers, grandparents, or neighbors. It’s a craft that doubles as a kindness project!
30. Rainbow Pipe Cleaner Sculptures
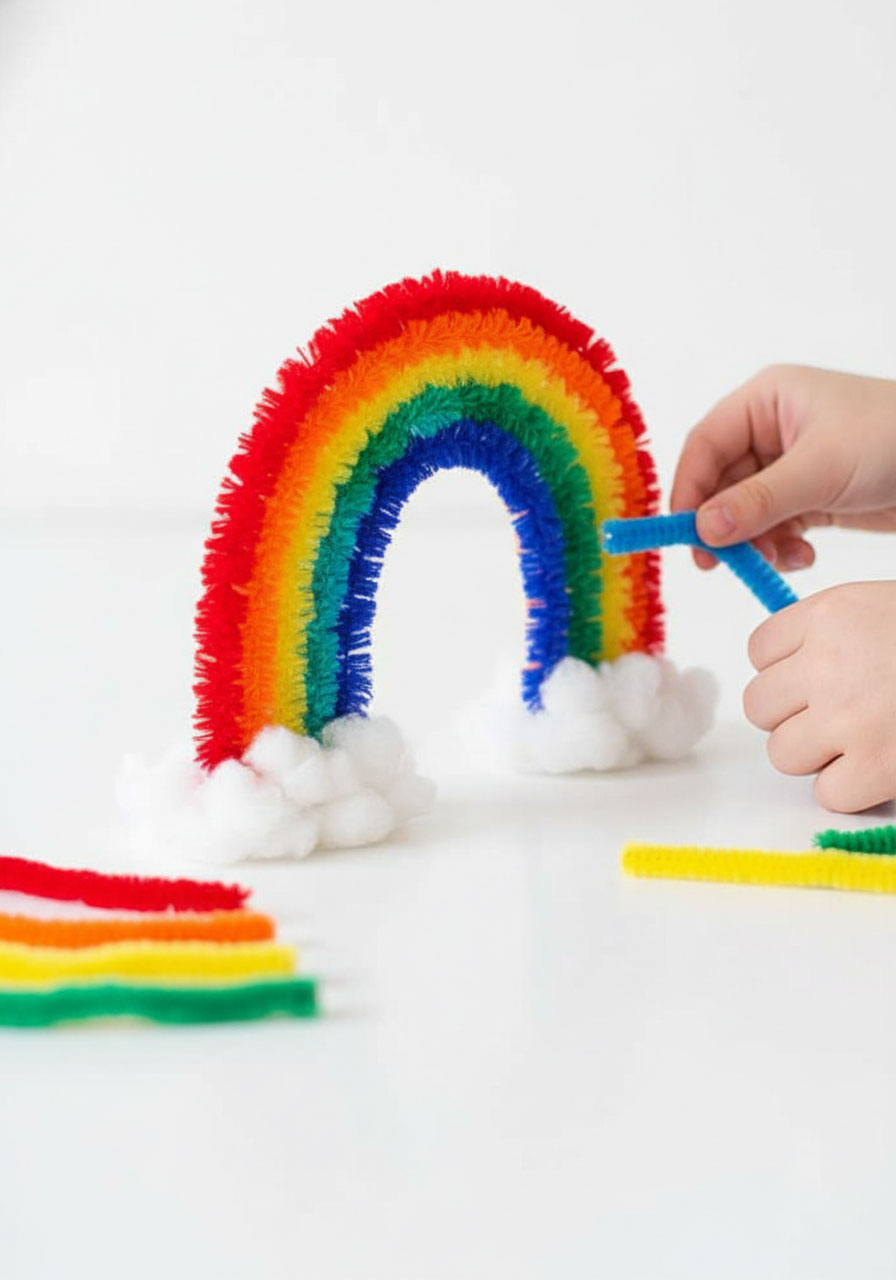
Bend, twist, and create three-dimensional rainbow art that’s limited only by imagination!
Best for: Ages 4+, open-ended creativity, fidget toy alternative
Time to Complete: 20-30 minutes
What You’ll Need:
Pipe cleaners in all rainbow colors
That’s literally it!
How to Make It:
1. Start with a base: Bend one pipe cleaner into an arc for your rainbow base.
2. Add the layers: Attach additional colors by twisting the ends around your base arc.
3. Create dimension: Bend each layer at slightly different angles for a 3D effect.
4. Experiment freely: Try making spirals, zigzags, or combine colors in unexpected ways.
5. Stand it up: Adjust the ends so your sculpture can stand on its own.
Pro Tip: Pipe cleaners are perfect for kids who need to keep their hands busy. Keep a stash of rainbow pipe cleaners in the car, waiting rooms, or at the dinner table for constructive fidgeting!
31. Rainbow Paper Spiral Snakes

These hypnotic spinners create a mesmerizing effect when they catch the breeze!
Best for: Ages 4+, spring/summer decor, movement exploration
Time to Complete: 20 minutes
What You’ll Need:
Paper plates or cardstock circles
Markers or crayons in rainbow colors
Scissors
String
Googly eyes (optional)
How to Make It:
1. Color your circle: Decorate a paper plate or circle with rainbow stripes, spirals, or swirls.
2. Cut the spiral: Starting at the outer edge, cut in a spiral pattern toward the center, keeping the spiral strip about 1 inch wide.
3. Add the face: Glue googly eyes to the center circle (which becomes the snake’s head).
4. Attach string: Poke a hole through the center and thread string for hanging.
5. Watch it spin: Hang your snake and watch it twirl and spiral in the air!
Pro Tip: Hang several at different heights from a tree branch for an incredible kinetic art display. When the wind catches them, they create a magical, hypnotic rainbow dance!
32. Rainbow Wool Felt Ball Garland

String together these squishy, colorful balls for decor that adds warmth and whimsy to any space!
Best for: Ages 5+, room decor, fine motor practice
Time to Complete: 30-45 minutes
What You’ll Need:
Wool felt balls in rainbow colors (craft store or online)
Embroidery needle
Strong thread or embroidery floss
Scissors
How to Make It:
1. Plan your pattern: Lay out your felt balls in the color order you want.
2. Thread the needle: Use a long piece of thread – measure twice the length you want your finished garland to be.
3. String ’em up: Carefully push the needle through the center of each ball in your chosen order.
4. Space them out: Leave small gaps between balls or push them together – your choice!
5. Hang with pride: Drape your garland across a wall, window, mantel, or around a door frame.
Pro Tip: These garlands are incredibly versatile! Use them for birthday decorations, nursery decor, or permanent bedroom styling. They’re durable enough to last for years!
33. Rainbow Loom Bracelets
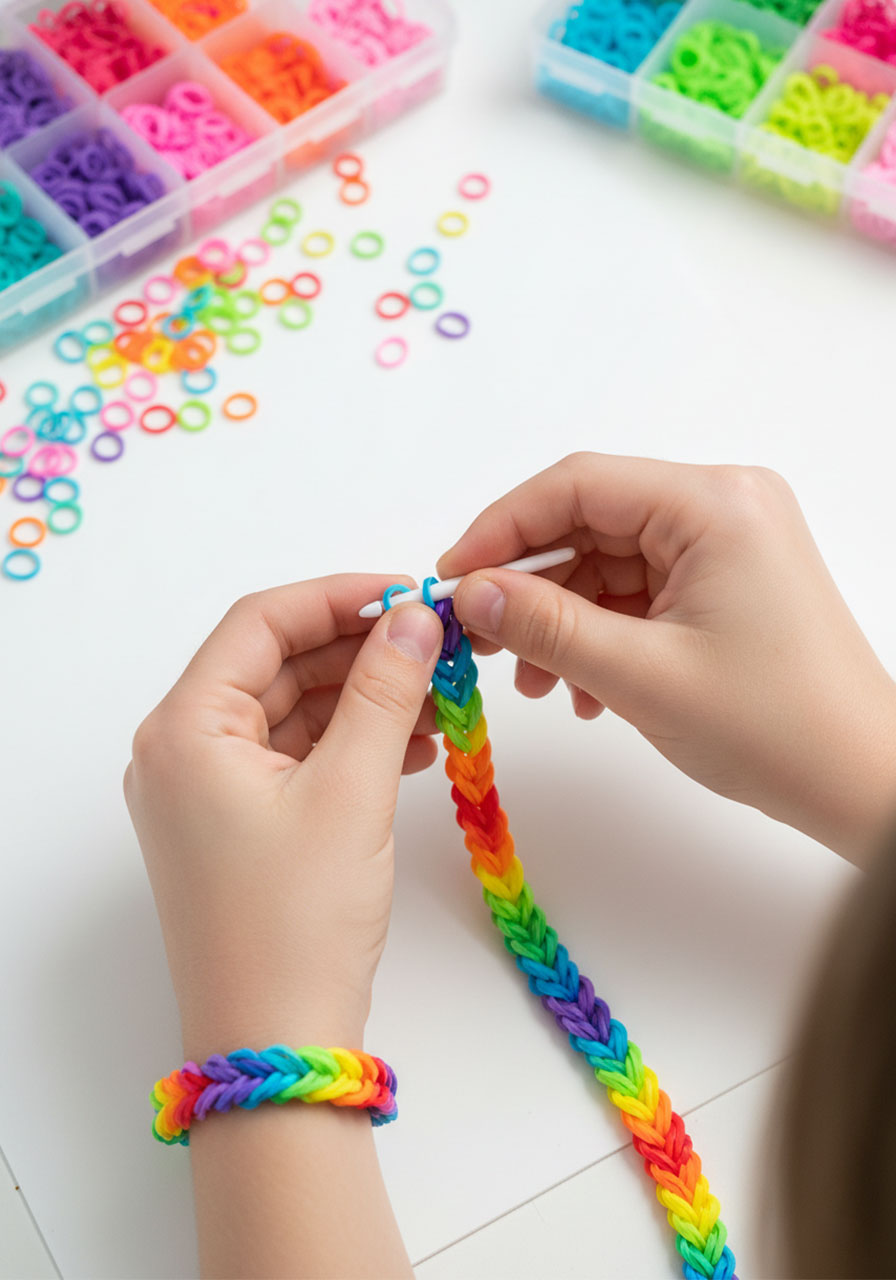
Create friendship bracelets with a rainbow twist using simple braiding techniques!
Best for: Ages 6+, friendship gifts, pattern practice
Time to Complete: 20-30 minutes
What You’ll Need:
Colorful rubber bands or embroidery floss in rainbow colors
Your fingers or a simple loom
Small hook or crochet hook
C-clips or ties
How to Make It:
1. Choose your technique: Use a simple fishtail, single chain, or more complex pattern depending on skill level.
2. Start with red: Begin your pattern with the first rainbow color.
3. Add each color: Work through the rainbow, creating a colorful gradient or striped pattern.
4. Keep tension even: Consistent tension creates a neater, more professional-looking bracelet.
5. Finish and secure: Use a C-clip or tie off the ends securely so it won’t unravel.
Pro Tip: Make matching bracelets for your whole friend group! Assign each friend a specific rainbow color pattern so you’re all connected but unique. It’s friendship goals in craft form!
34. Rainbow Dyed Flowers Experiment
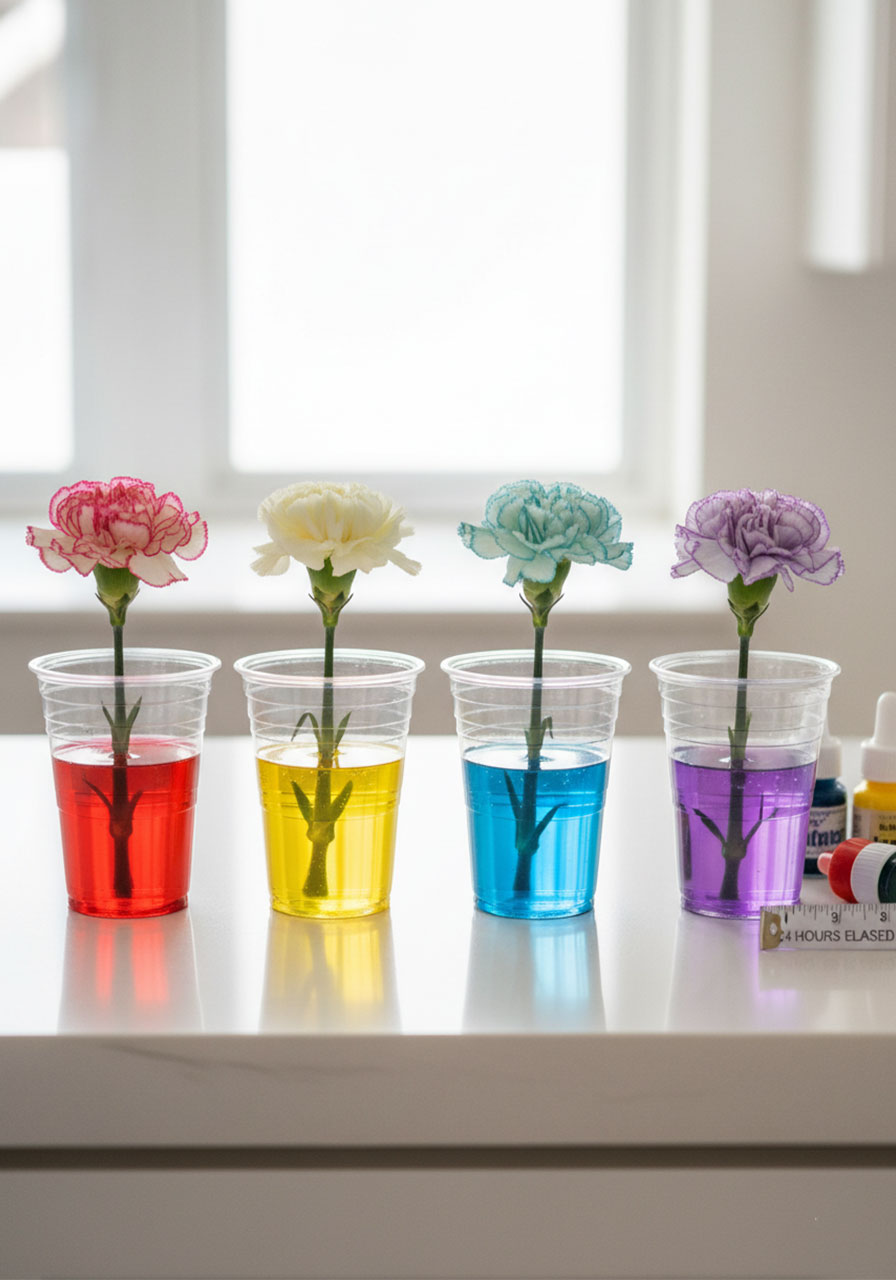
Watch science in action as white flowers magically transform into rainbow beauties!
Best for: Ages 4+, science experiment, color learning
Time to Complete: 15 minutes setup, 24 hours to see results
What You’ll Need:
White flowers (carnations work best)
Clear cups or vases
Food coloring in rainbow colors
Water
Sharp knife (adult use only)
How to Make It:
1. Prepare the water: Fill cups with water and add several drops of different food coloring to each cup.
2. Cut the stems: Trim flower stems at an angle to help them absorb water better.
3. Place in colored water: Put one flower in each colored cup.
4. Wait for magic: Check every few hours – you’ll start seeing color appear in 4-6 hours!
5. Observe the science: Watch as the petals change color as the flower drinks the colored water.
Pro Tip: For an even cooler experiment, split a stem lengthwise and place each half in different colored water. You’ll get a multi-colored flower – half blue, half red, for example! Science is so cool!
35. Rainbow Sticky Wall Mural
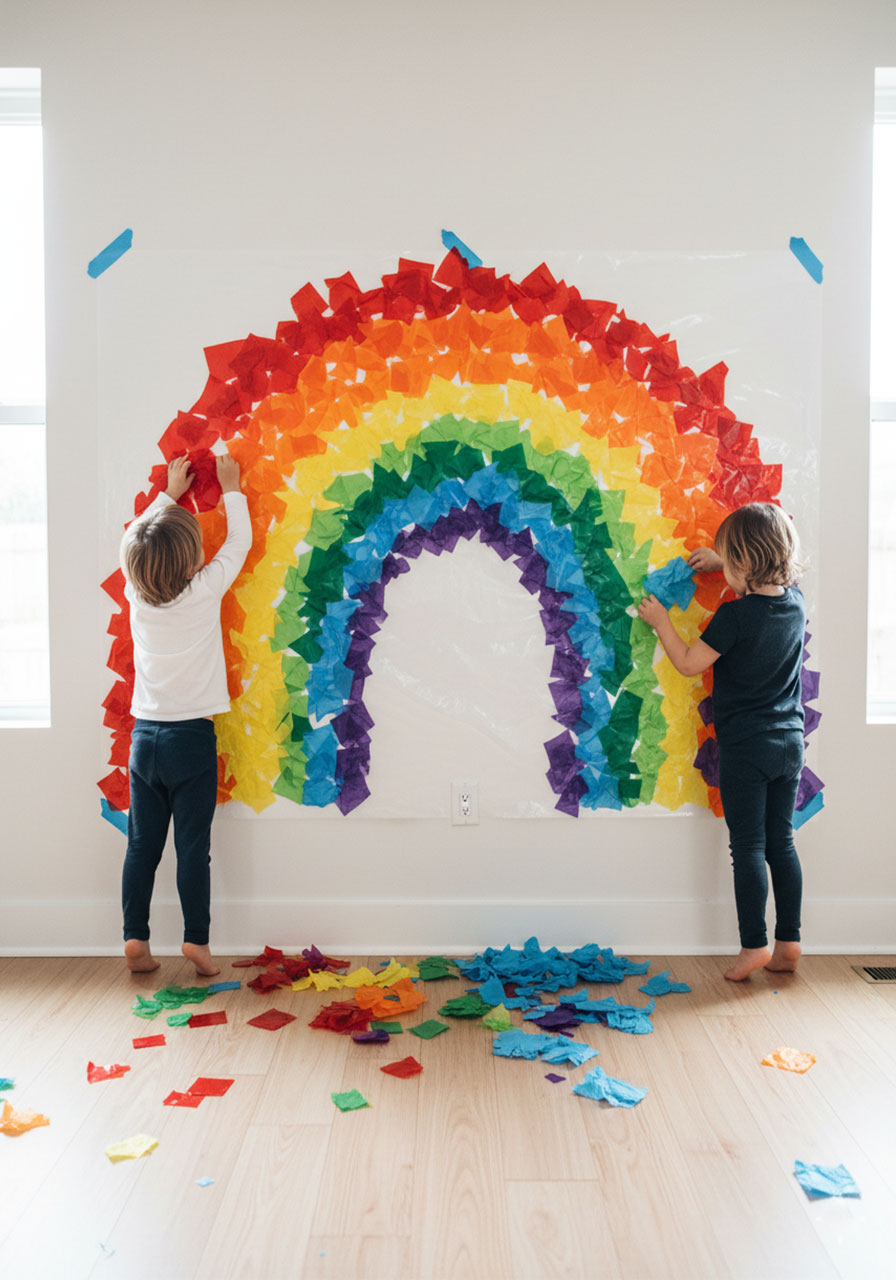
Turn any wall into a collaborative art canvas that’s endlessly rearrangeable!
Best for: Ages 2+, group activity, sensory play
Time to Complete: 20 minutes setup, hours of play!
What You’ll Need:
Clear contact paper (large piece)
Rainbow-colored cellophane, tissue paper, or plastic bags
Scissors
Tape
How to Make It:
1. Prep the wall: Tape contact paper to a wall section, sticky side OUT.
2. Cut your pieces: Pre-cut various shapes from colored cellophane or tissue paper.
3. Demonstrate the technique: Show kids how pieces stick to the sticky surface.
4. Create freely: Let kids stick, arrange, and rearrange pieces to their heart’s content.
5. Make it collaborative: This is perfect for multiple kids working together to create one big masterpiece!
Pro Tip: This is incredible for toddlers and preschoolers who are developing spatial awareness and fine motor skills. Plus, it’s mess-free and can be packed up and saved for another day!
36. Rainbow Ice Cube Painting

Cool off while creating art with this brilliant summer craft that’s part science, part art, all fun!
Best for: Ages 3+, summer activity, outdoor play
Time to Complete: 15 minutes active time (plus freezing time)
What You’ll Need:
Ice cube tray
Food coloring or liquid watercolors
Popsicle sticks
Water
White paper or cardstock
Towels (for the mess!)
How to Make It:
1. Make colored ice: Fill ice cube sections with water, add food coloring to each, and insert a popsicle stick in each cube.
2. Freeze overnight: Let the cubes freeze completely (at least 4-6 hours).
3. Set up outside: This gets messy, so work outdoors or protect your surfaces well!
4. Paint with ice: Let kids rub the colored ice cubes across paper, watching them melt and blend.
5. Create rainbow art: Use different colors together to see how they mix and blend on paper.
Pro Tip: This is the perfect hot-day activity! Kids stay cool, have fun, and learn about how ice melts and colors mix. Win-win-win!
37. Rainbow Layered Sand Art

Channel your inner patience as you create these gorgeous striped beauties!
Best for: Ages 5+, fine motor skills, color sequencing
Time to Complete: 30-45 minutes
What You’ll Need:
Clear bottles or jars
Colored craft sand (or make your own!)
Funnel or rolled paper cone
Chopstick or skewer
Lid or cork for sealing
How to Make It:
1. Start with red: Pour your first sand color into the bottle using a funnel.
2. Layer carefully: Add each subsequent rainbow color, pouring slowly into the center for flat layers.
3. Create angles: Pour sand against the side of the bottle for dramatic angled effects.
4. Add designs: Use a chopstick down the side to create swooped patterns (optional).
5. Seal it up: Once full, cap tightly and display your layered masterpiece!
Pro Tip: These make excellent gifts! Add a personalized label and give them to teachers, grandparents, or friends. They’re beautiful, meaningful, and show real effort!
38. Rainbow Tulle Skirt & Crown

Transform into rainbow royalty with this no-sew dress-up project!
Best for: Ages 3+, dress-up play, party outfit
Time to Complete: 45 minutes
What You’ll Need:
Tulle strips in rainbow colors (3 inches wide, 18-24 inches long)
Elastic waistband (measured to fit)
Scissors
Headband (for crown)
Optional: ribbon, embellishments
How to Make It:
1. Prepare the waistband: Cut elastic to fit comfortably around your child’s waist, tie the ends together.
2. Fold and loop: Fold each tulle strip in half, loop it under the elastic, and pull the ends through the loop.
3. Create the rainbow: Attach strips in rainbow order all around the waistband until it’s full and fluffy.
4. Make the crown: Repeat the process on a headband with shorter tulle pieces.
5. Twirl away: Put on your creation and spin to see the rainbow fly!
Pro Tip: This is a fantastic birthday party activity! Have kids make their own tutus to wear during the party and take home. Everyone becomes a rainbow princess or superhero!
39. Rainbow Paper Plate Tambourine

Shake things up with this noisy craft that’s equal parts music maker and art project!
Best for: Ages 3+, music play, party activity
Time to Complete: 30 minutes
What You’ll Need:
2 paper plates
Paint or markers in rainbow colors
Dried beans, rice, or jingle bells
Stapler or glue
Optional: ribbon, stickers
How to Make It:
1. Decorate both plates: Color the backs of both paper plates with rainbow designs – go wild!
2. Add the noise: Put a handful of dried beans or bells on one plate.
3. Seal them together: Place the second plate on top (decorated side out) and staple or glue around the edges, leaving a small opening.
4. Fill it up: Add more beans through the opening if needed.
5. Seal completely: Close up the opening and shake your new instrument!
Pro Tip: Make several tambourines and start a rainbow band! Put on music and have a dance party where everyone shakes their homemade instruments. It’s crafting that turns into entertainment!
40. Rainbow Crayon Art on Black Paper

Unlock the secret to making colors absolutely POP with this simple technique that creates stunning contrast!
Best for: Ages 4+, art exploration, color contrast learning
Time to Complete: 20-30 minutes
What You’ll Need:
Black construction paper or cardstock
Colored crayons or oil pastels in rainbow colors
Optional: white crayon or chalk for clouds
How to Make It:
1. Start with your base: Use black paper as your canvas – the dark background makes rainbow colors look incredibly vibrant!
2. Draw your rainbow: Create a bold rainbow arc using thick crayon strokes.
3. Add details: Draw rays of sunshine, sparkles, or swirling patterns around your rainbow.
4. Create clouds: Use white crayon or chalk to add fluffy clouds at the rainbow’s ends.
5. Fill the sky: Add stars, hearts, or whatever magical elements your imagination dreams up!
Pro Tip: The harder you press with crayons, the more vibrant the colors appear against the black. This is a fantastic lesson in color theory – kids can actually see how background color affects perception!
41. Rainbow Quilled Paper Heart

This delicate art form looks incredibly impressive but is surprisingly doable with a little patience!
Best for: Ages 8+, Valentine’s Day, fine motor challenge
Time to Complete: 1-1.5 hours
What You’ll Need:
Thin strips of colored paper (quilling paper or cut your own)
Toothpick or quilling tool
White glue
Heart template or freehand drawing
Cardstock base
How to Make It:
1. Cut your strips: Slice paper into thin strips (1/4 inch wide) in all rainbow colors.
2. Roll the coils: Wrap each strip tightly around a toothpick, then release slightly for a loose coil.
3. Pinch into shapes: Pinch the coils into teardrops, crescents, or leave them round.
4. Arrange on your heart: Following a heart outline, glue coils in rainbow order to fill the shape.
5. Pack them tight: Keep adding coils until your entire heart is filled with colorful swirls!
Pro Tip: This is one of those crafts that looks way harder than it actually is! Once you get the hang of rolling coils, it’s surprisingly meditative. Plus, the finished product is frame-worthy art!
42. Rainbow Clay Pot Planters

Transform plain terra cotta pots into cheerful plant homes that brighten up any space!
Best for: Ages 5+, gift giving, gardening project
Time to Complete: 45 minutes (plus drying time)
What You’ll Need:
Small terra cotta pots
Acrylic paint in rainbow colors plus green
Paintbrushes
Clear sealer (optional)
Small plants or succulents
How to Make It:
1. Paint the base: Cover the bottom of your pot with green paint as a “grass” base.
2. Add rainbow stripes: Paint horizontal rainbow stripes around the rim of the pot.
3. Paint the rainbow arc: On the pot’s body, paint a rainbow arc with fluffy white clouds at each end.
4. Add fun details: Dot on flowers, butterflies, or sunshine to personalize your creation.
5. Plant something special: Once dry, add a small succulent or herb plant.
Pro Tip: Make a whole rainbow garden! Line up multiple pots on a windowsill, each painted in a different rainbow color. They’re adorable grouped together and make fantastic gifts for teachers or grandparents!
43. Rainbow Paper Hot Air Balloon

Float away with this whimsical 3D decoration that adds instant charm to any room!
Best for: Ages 6+, nursery decor, 3D art
Time to Complete: 45 minutes
What You’ll Need:
Paper lantern (round)
Tissue paper or crepe paper in rainbow colors
Glue or mod podge
Small basket or paper cup
String
Scissors
How to Make It:
1. Prep your strips: Cut tissue paper into strips about 2 inches wide and 6 inches long.
2. Cover the lantern: Using mod podge or glue, attach strips in horizontal rainbow bands around the lantern.
3. Smooth as you go: Overlap strips slightly and smooth out wrinkles for a clean look.
4. Create the basket: Attach strings to a small basket or decorated paper cup.
5. Hang it up: Attach basket strings to the bottom of the lantern and hang from the ceiling!
Pro Tip: Hang several hot air balloons at different heights to create a floating rainbow fleet! They’re especially magical in a nursery or playroom where they catch natural light.
44. Rainbow Collage With Recycled Materials
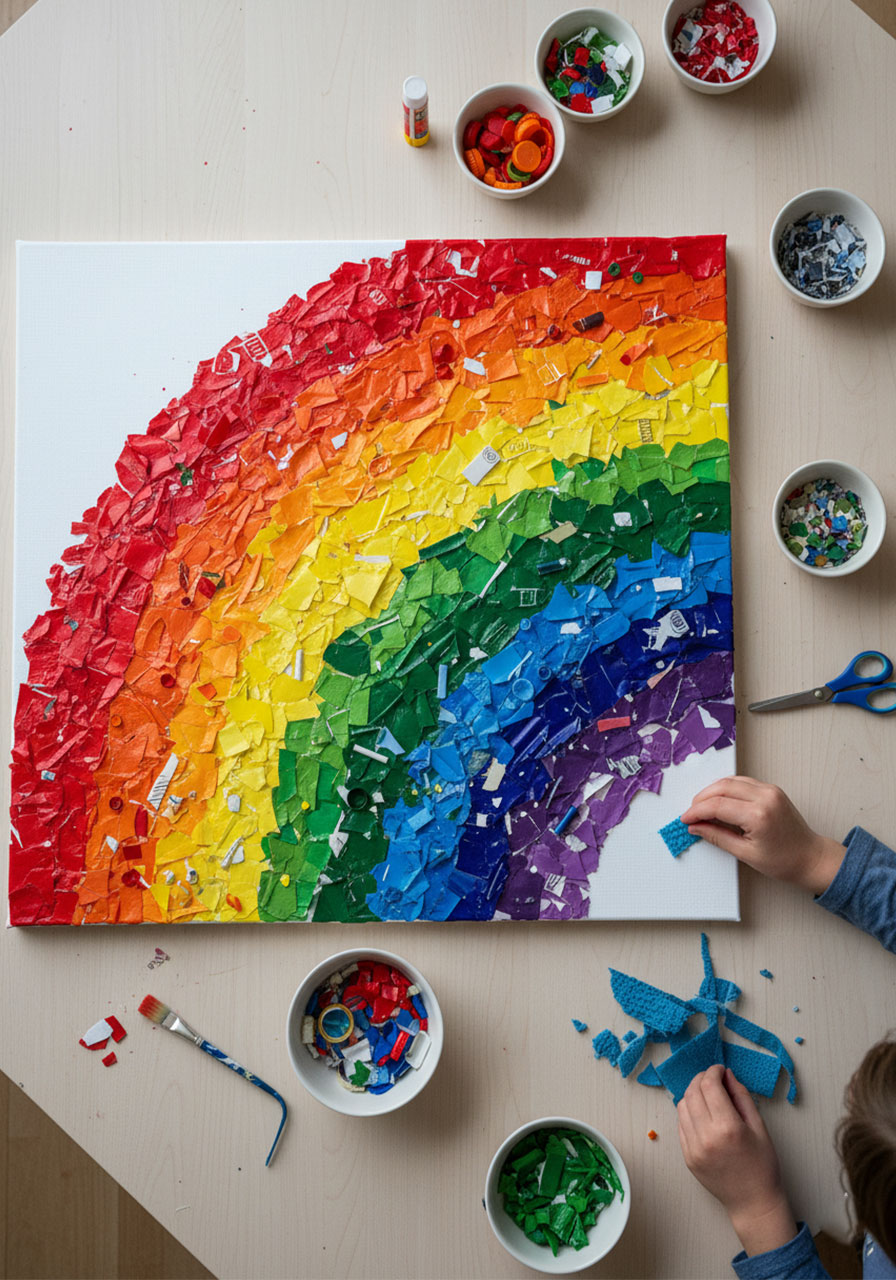
Turn trash into treasure with this eco-friendly craft that teaches sustainability while sparking creativity!
Best for: Ages 5+, recycling lesson, mixed media art
Time to Complete: 1 hour
What You’ll Need:
Old magazines, packaging, candy wrappers, fabric scraps
Canvas or heavy cardboard
Glue stick or mod podge
Scissors
Pencil for sketching
How to Make It:
1. Gather your materials: Hunt through recyclables for anything colorful – magazines, wrapping paper, old cards, fabric.
2. Sort by color: Organize materials into rainbow color piles.
3. Sketch your design: Lightly draw a rainbow or abstract design on your base.
4. Cut and tear: Slice or rip materials into various sizes and shapes.
5. Build your collage: Glue pieces onto your base in rainbow order, layering and overlapping for texture and depth.
Pro Tip: This is an awesome Earth Day project! Talk about how we can make beautiful things from items that might otherwise be thrown away. It’s creativity with a conscience!
45. Rainbow Sensory Bottle

Create a mesmerizing calm-down bottle that’s as soothing to watch as it is beautiful to display!
Best for: Ages 2+, sensory tool, anxiety relief
Time to Complete: 20 minutes
What You’ll Need:
Clear plastic bottle with tight lid
Clear hair gel or corn syrup
Food coloring in rainbow colors
Glitter (optional but recommended!)
Super glue (for permanent sealing)
Water
How to Make It:
1. Layer your colors: Starting with red, squeeze a layer of clear gel into the bottle and add drops of food coloring.
2. Add the sparkle: Sprinkle glitter into each colored layer for extra visual appeal.
3. Build the rainbow: Continue layering all rainbow colors, going slowly to keep layers somewhat distinct.
4. Fill completely: Leave just a tiny bit of space at the top, then add a splash of water.
5. Seal forever: Apply super glue around the inside of the lid before screwing it on tight.
Pro Tip: These bottles are absolute magic for meltdowns! When emotions run high, shake the bottle and watch it settle – it’s a visual representation of calming down. Keep one in the car, one at home, and one in your child’s backpack!
Make Every Day More Colorful With These Rainbow Crafts!
There you have it – 45 spectacular rainbow craft ideas that promise to fill your days with color, creativity, and unforgettable memories!
From simple projects perfect for toddlers to intricate designs that challenge older kids, this collection has something for every age and skill level. Whether you’re looking to brighten a rainy afternoon, plan an epic birthday party activity, or just add more joy to your everyday routine, these rainbow crafts deliver the goods.
The beauty of these projects isn’t just in the gorgeous finished products (though they definitely deserve a spot on the fridge or wall!). It’s in the giggles shared while painting, the pride on your child’s face when they complete something tricky, and those precious moments of focused creativity when the world fades away and only the rainbow matters.
So what are you waiting for? Grab those art supplies, pick your favorite project from this list, and let the rainbow creativity begin! Your little artists are about to discover that the best treasures aren’t found at the end of the rainbow – they’re created along the way.
More Kid’s Party Ideas to Keep the Fun Rolling:
How to Make Paper Claws: Turn Your Fingers Into Weapons in 5 Minutes
How to Play Help Your Neighbor: The Card Game That’ll Have Your Family Actually Wanting Game Night
28 Super Fun Dollar Store Crafts for Kids That Won’t Break the Bank
3 Easy Heart Painting Ideas That’ll Make You Look Like a Creative Genius
10 Easy Elementary School Indoor Party Games Kids and Room Moms Will Love
How to Make a Cardboard Loom Bracelet: Easy DIY Friendship Bracelets
15 Minions Party Ideas For The Ultimate Despicable Me Birthday Bash
