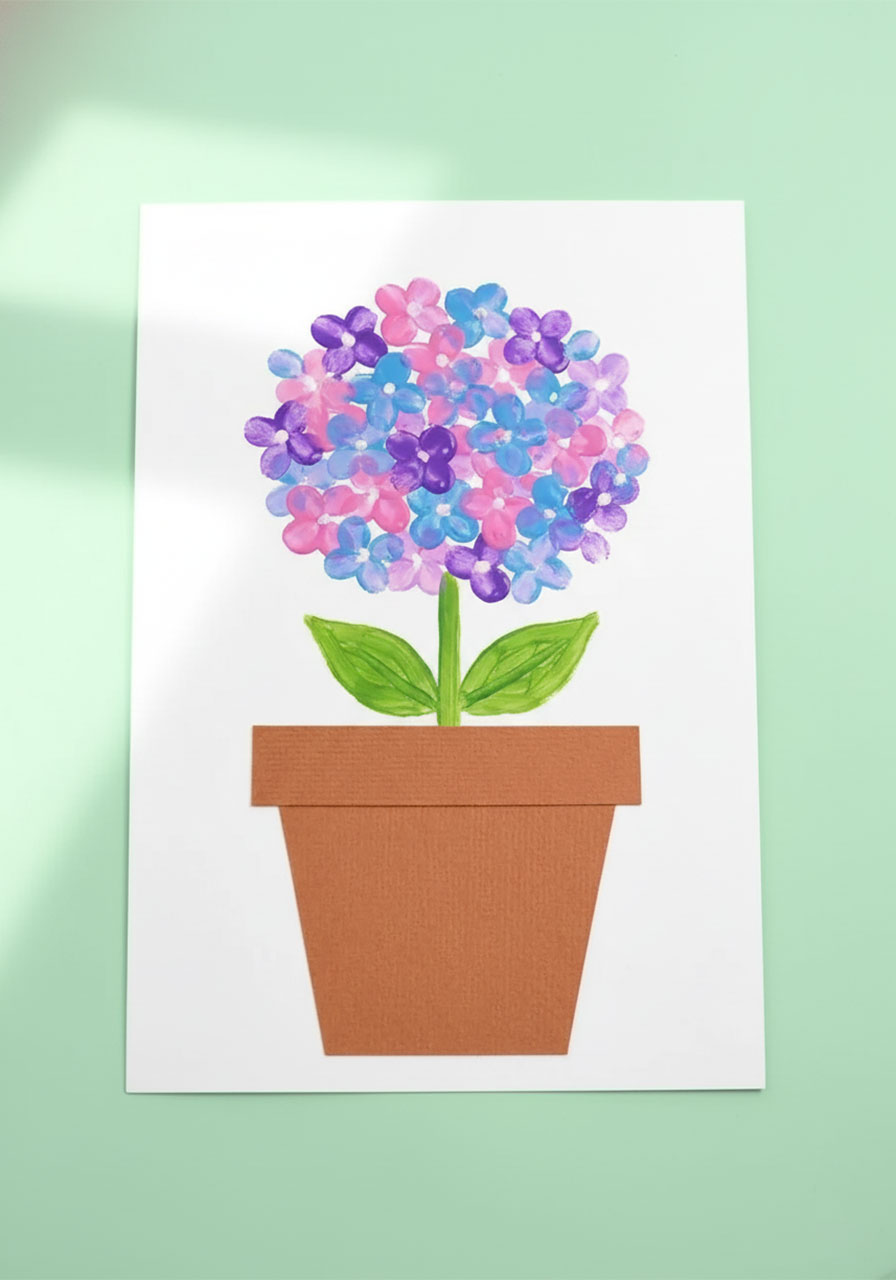
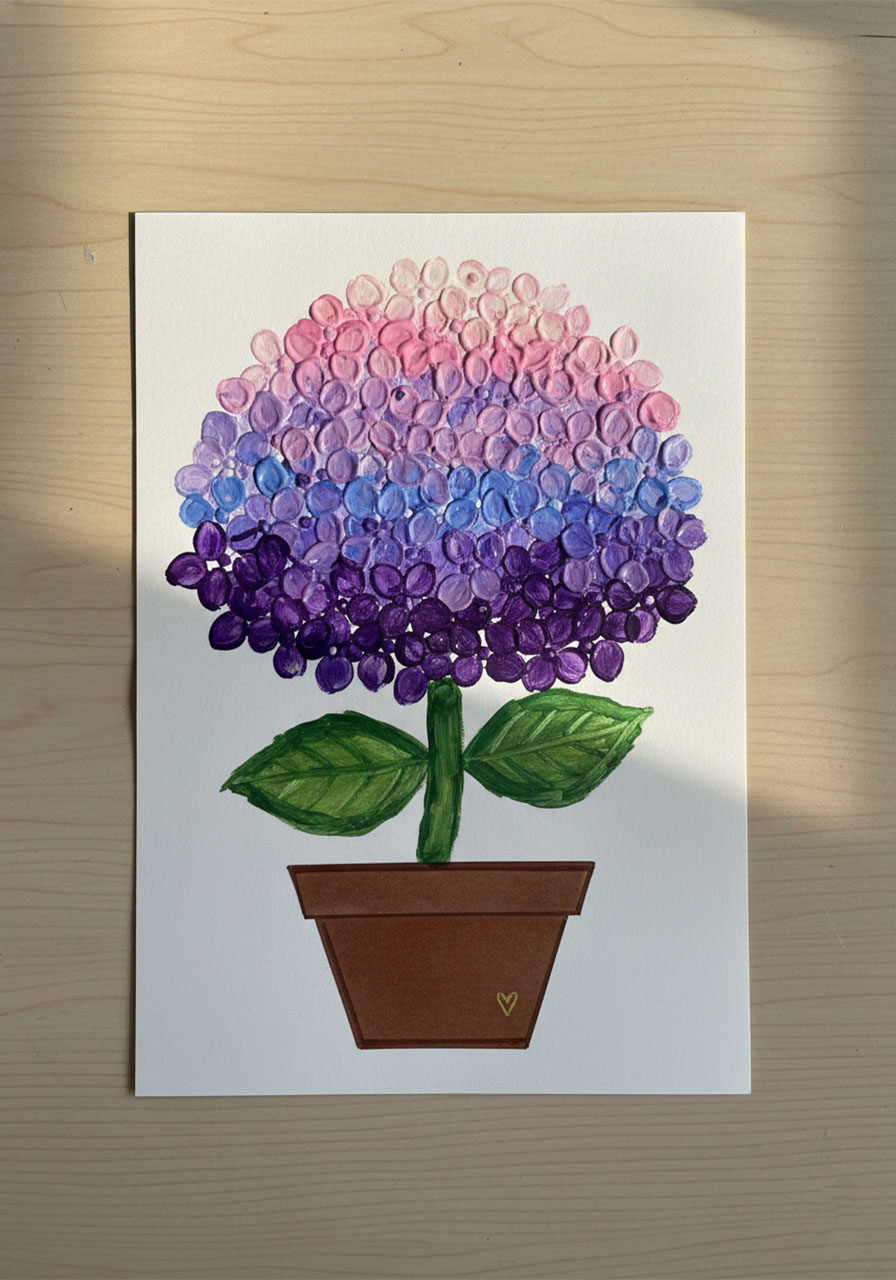
If you’ve ever stared at a gorgeous piece of floral wall art and thought, “There’s absolutely no way my kids and I could make that” – this project is about to prove you completely wrong. This dotted pastel hydrangea is one of those rare crafts that looks like it took serious skill but is actually so simple, even the most reluctant little artists will be begging to make a second one.
The secret weapon? Cotton swabs. That’s it. A few bundled Q-tips, some pastel paint, and about 15 minutes of focused fun is all it takes to create a Mother’s Day gift that genuinely looks stunning on a wall or fridge. Parents, teachers, and after-school program leaders – this one’s an absolute gem for your toolkit.
Difficulty: Easy
Time to Make: About 15–20 minutes (plus drying time)
Best For: Kids ages 4 and up, classroom art projects, Mother’s Day gifts
Estimated Cost: $10–$20 (most supplies you likely already have)

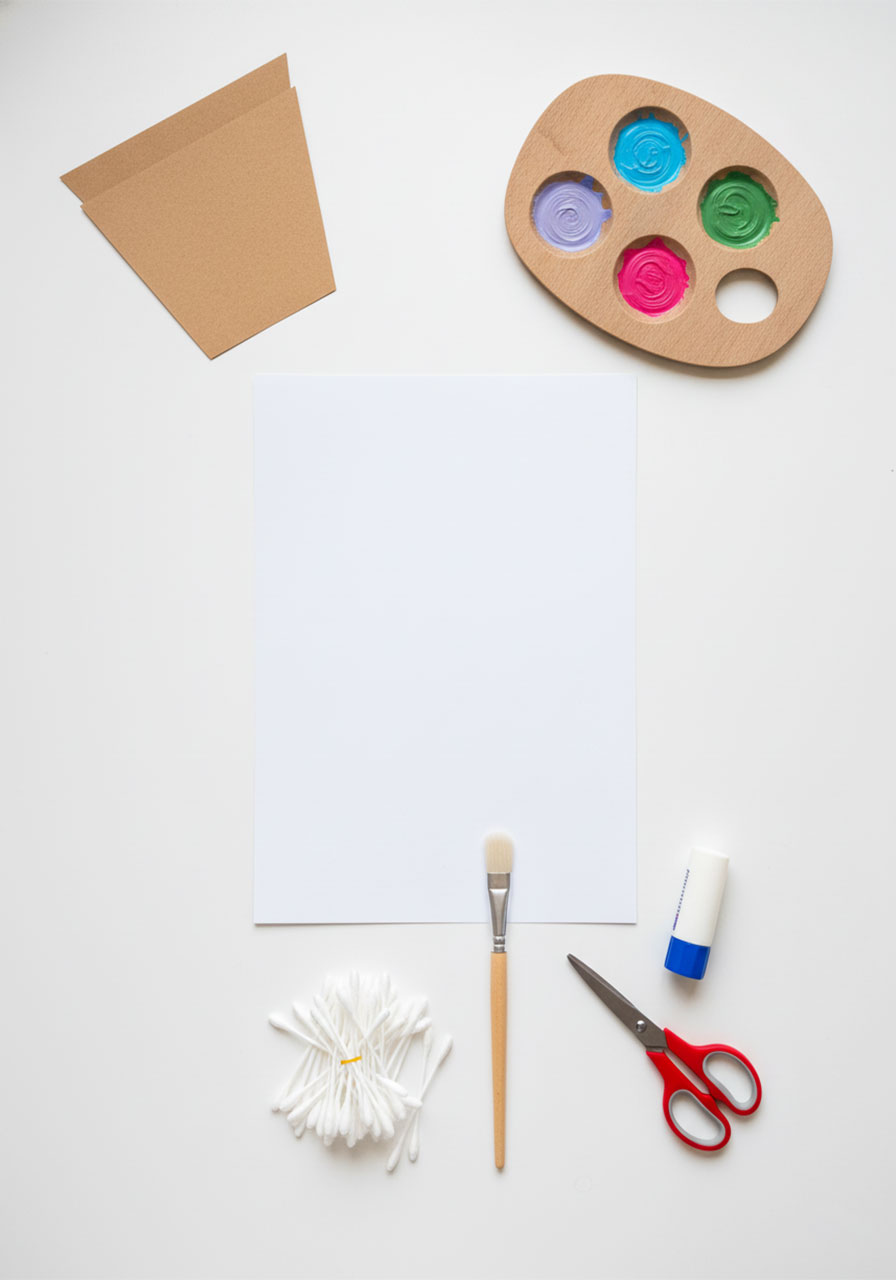
What You’ll Need
1 sheet of white cardstock or thick white paper (the bigger, the better – A4 or letter size works great)
Brown cardstock or construction paper (for the flower pot)
Acrylic or tempera paint in: lavender/purple, pink, and sky blue (plus green for the stem)
Cotton swabs / Q-tips (you’ll need about 9–12)
A rubber band
Scissors
A glue stick or craft glue
A medium paintbrush (for the stem and leaves)
A palette, paper plate, or tray to hold your paint


How to Make Your Dotted Pastel Hydrangea
Step 1: Build the Flower Pot
Cut a trapezoid shape from your brown cardstock – wider at the bottom, slightly narrower at the top, just like a classic clay flower pot. Don’t stress about perfection here; slightly uneven edges actually give it a charming, handmade look. Cut a thin rectangular strip from the same brown paper and glue it along the top edge of the pot to create the rim.
Glue your pot near the bottom center of your white paper, leaving plenty of space above for the flower to bloom. Press it down firmly and let it sit for a minute to set.
Step 2: Paint the Stem and Leaves
Using your medium paintbrush and green paint, paint a thick, confident stem rising up from the top of the pot. It doesn’t need to be perfectly straight – a slight curve gives it a natural, garden-fresh feel.
Now add two large leaves, one on each side of the stem. Paint them with bold, sweeping strokes, starting from where they meet the stem and fanning outward. Add a few quick lines through the center of each leaf to suggest veins. Set aside to dry while you prep your swabs.
Step 3: Bundle Your Cotton Swabs
This is the step that makes everything easier. Group 3 cotton swabs together and wrap a rubber band tightly around the middle so their tips are all clustered at the same end. This bundle is your “brush” for the flower – it stamps multiple petals at once, creating that gorgeous, full hydrangea cluster in a fraction of the time.
Pro Tip: Make two bundles – one dedicated to cooler tones (blue + purple) and one for warmer tones (pink + lilac). This way you won’t muddy your colors mid-project.
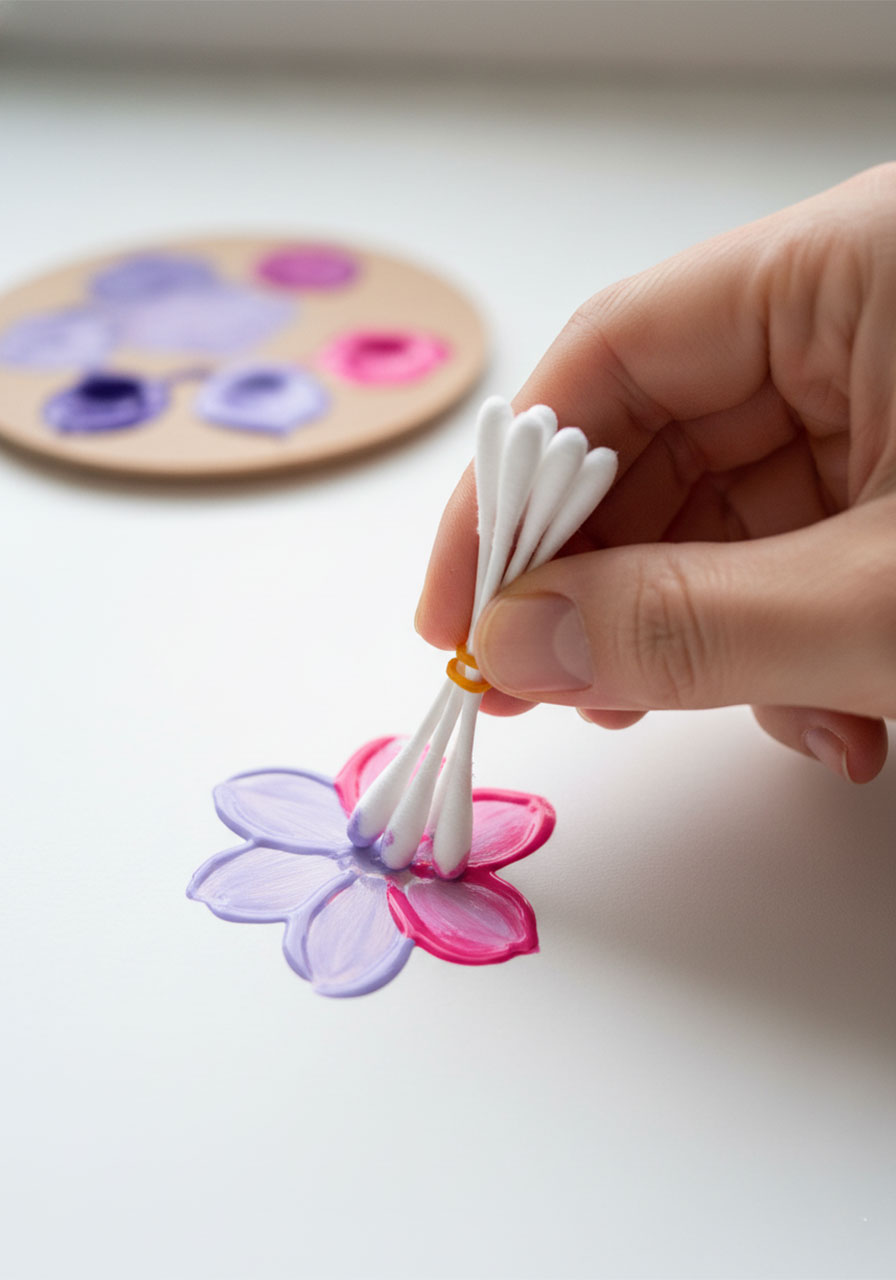
Step 4: Load Up the Paint
Pour small puddles of your three colors onto your palette or paper plate, keeping them slightly separate but close enough that you can easily dip between them. You want the colors to occasionally blend at the tips of your swab bundle – that’s what creates the beautiful, watercolor-like blending that makes this art look so professional.
Dip your swab bundle lightly into one color, then just barely touch the edge of a second color. Don’t overmix – a little overlap is magic, too much turns everything muddy.
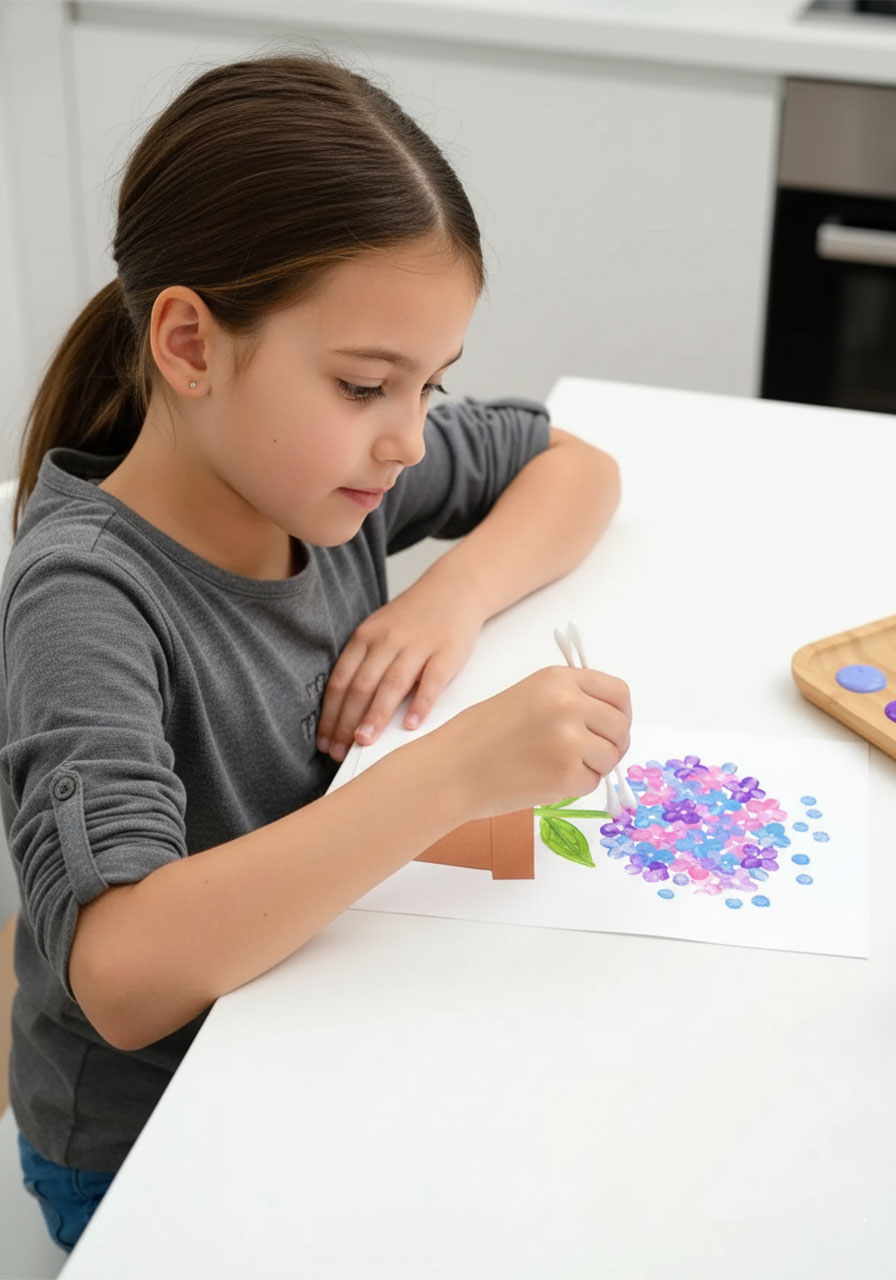
Step 5: Stamp Your Hydrangea Flower
Starting from the center of where your flower will be (just above where the stem ends), begin pressing your swab bundle straight down onto the paper with a light, confident press. Lift straight up – no dragging. Each press creates a little cluster of petals.
Work in a circular, dome-shaped pattern, building outward from the center. The goal is a full, round flower head. Alternate your colors as you go – a press of blue, then pink, then purple, then back to blue – so the colors are scattered naturally throughout, just like a real hydrangea bloom. Let the colors overlap slightly at the edges for that blended, layered look.
Keep stamping until your flower head looks full and lush. Step back occasionally to check the overall shape – you’re aiming for a satisfying, rounded dome of color.
Step 6: Let It Dry and Admire
Set your masterpiece flat to dry for 10–15 minutes. As the paint dries, the colors deepen slightly and the individual petal clusters become even more defined. Trust the process – it gets better as it dries!
Once dry, your dotted pastel hydrangea is ready to gift, frame, or display with serious pride.
Fun Variations to Try
Ombre Petal Layers
Want to take it up a notch? Start stamping at the base of the flower with deep purple or dark violet paint, then gradually shift to lighter pink and finally soft blue as you work toward the top. The result is a gorgeous ombre effect that looks like something straight out of a florist’s window. Each color should blend into the next rather than creating a sharp line – overlap them generously.
Illustrated Pot Details
Once the glued pot is fully dry, grab a gold paint pen or a yellow marker and draw a small heart, a star, or even a simple “Mom” right on the brown paper pot. It transforms a beautiful craft into a truly personal, one-of-a-kind gift that any mom or grandmother will treasure.
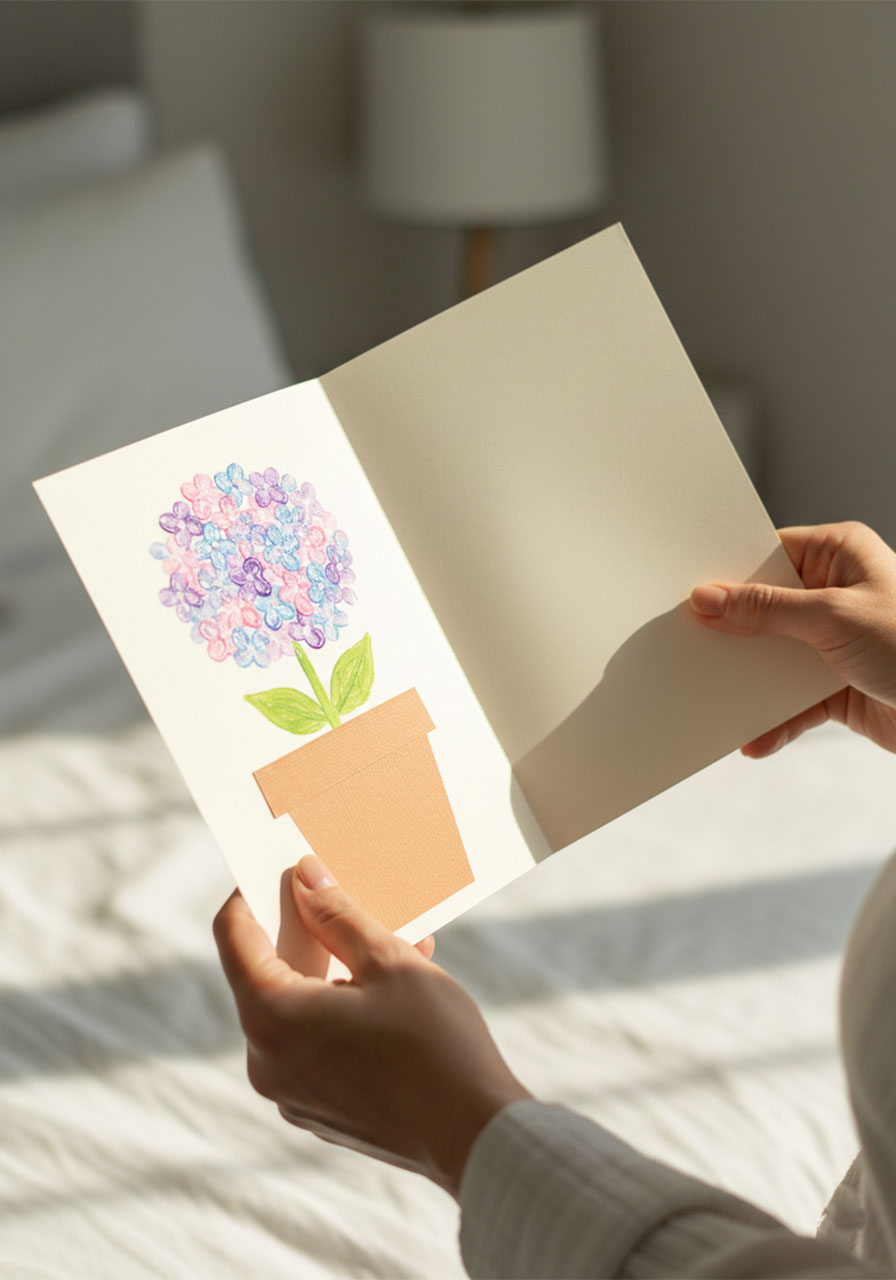
Turn It Into a Handmade Card
Fold a large piece of cardstock in half to create a card. Once your hydrangea painting is completely dry, trim it neatly and glue the entire artwork onto the front of the folded card. Write a heartfelt message inside, and you’ve just created a handmade floral card that puts every store-bought card to shame. For an extra touch, let kids write their own message inside in their own handwriting – that’s the part that truly makes moms cry happy tears.
3D Nature Accents (For the Adventurous)
Collect a few small dried twigs from outside and glue them directly on top of the painted stem once it’s dry. The contrast between the natural texture of the real twig and the soft painted petals above is unexpectedly beautiful. This works especially well for older kids or adult participants who want a more mixed-media, gallery-worthy result.
Teacher & Parent Tips
For classroom use: Pre-cut the cardstock pots in advance to save time. Set up shared paint palettes at each table cluster. Have paper towels on hand for swab switching.
For younger kids (ages 3–5): Skip the rubber band bundle and just use a single cotton swab. The result is a more delicate, looser flower cluster – equally beautiful and much easier for tiny hands to control.
For older kids and teens: Challenge them to design a full botanical scene – multiple flowers, a window sill, or a garden background. The same Q-tip technique works beautifully for cherry blossoms, wisteria, or lavender sprigs too.
Mess level: Low to medium. Tempera paint washes out easily. Put a layer of newspaper or a plastic tablecloth under the workspace and you’re golden.
There’s something genuinely special about handing someone a piece of art that you made with your own hands – and this dotted pastel hydrangea has that quality in spades. It’s the kind of gift that gets framed, not forgotten. Whether you’re making it in a classroom of 25 kids or at the kitchen table with one determined four-year-old, this project delivers every single time.
Happy creating – and happy Mother’s Day! 🌸
More Mother’s Day Ideas to Keep the Fun Rolling:
30+ Mother’s Day Crafts for Kids of All Ages
Blush Bloom Coffee Filter Roses – A Beautiful (and Surprisingly Easy!) Mother’s Day Gift Idea
Easy Thumbprint Heart Necklace DIY Kids Can Make for Mother’s Day
“You Are My Flower”: The Sweetest DIY Clay Trinket Dish Kids Can Make for Mother’s Day
The Cutest DIY 3D Tulip Bouquet Card for Mother’s Day (That Opens Like a Real Bouquet!)
The DIY “Forever Bouquet” Card That Will Make Mom Cry Happy Tears This Mother’s Day
How to Make a DIY 3D “MOM” Pop-Up Card She’ll Actually Keep Forever