If you’re looking for a gift that will make Mom (or Grandma, or a best friend, or a favorite teacher) tear up in the best possible way – you’ve found it. This thumbprint heart necklace is one of those rare crafts that looks impressive, feels incredibly personal, and is genuinely easy enough for kids to make from start to finish.
No special art skills required. No fancy equipment. Just a thumb, some ink, and a little love pressed into a tiny pendant. The result? A one-of-a-kind keepsake they’ll wear for years – and yes, every single person who receives one will absolutely treasure it.
I’ve seen classrooms of kids make these for Valentine’s Day, moms cry opening them on Mother’s Day, and grandparents carry them in their pockets like gold. These little necklaces carry a lot of heart – literally.

Why This Craft Is a Total Win for Parents and Teachers
Let’s be honest: most “handmade gift” crafts for kids either look messy, fall apart in a week, or require 47 supply runs to the craft store. This one is different. Here’s why it works so well:
It’s genuinely personal. No two fingerprints are the same. Every pendant is a tiny, irreplaceable piece of the child who made it.
It’s durable. Once assembled, these pendants hold up beautifully over time – especially with the right glue (more on that below).
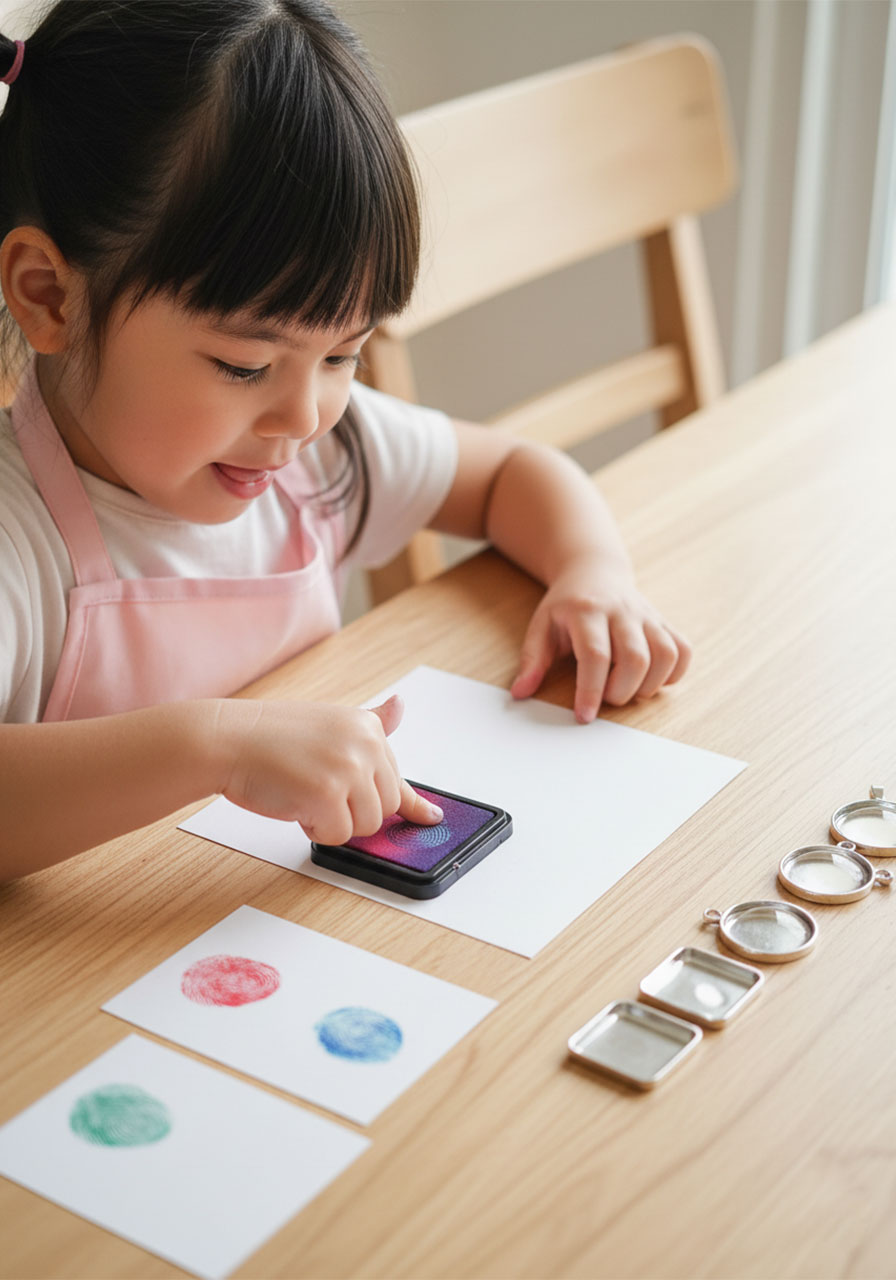
Kids can do it independently. With a little setup from you, even young kids (ages 4 and up) can make these from start to finish and feel SO proud of what they’ve created.
It works for any occasion. Mother’s Day, Father’s Day, Valentine’s Day, Grandparents’ Day, Christmas, birthdays, teacher appreciation – this craft fits every gift-giving moment on the calendar.
It scales beautifully for classrooms. One batch of supplies can make pendants for an entire class. Kids can each make one for a parent and one to keep for themselves.


What You’ll Need to Make a Thumbprint Heart Necklace
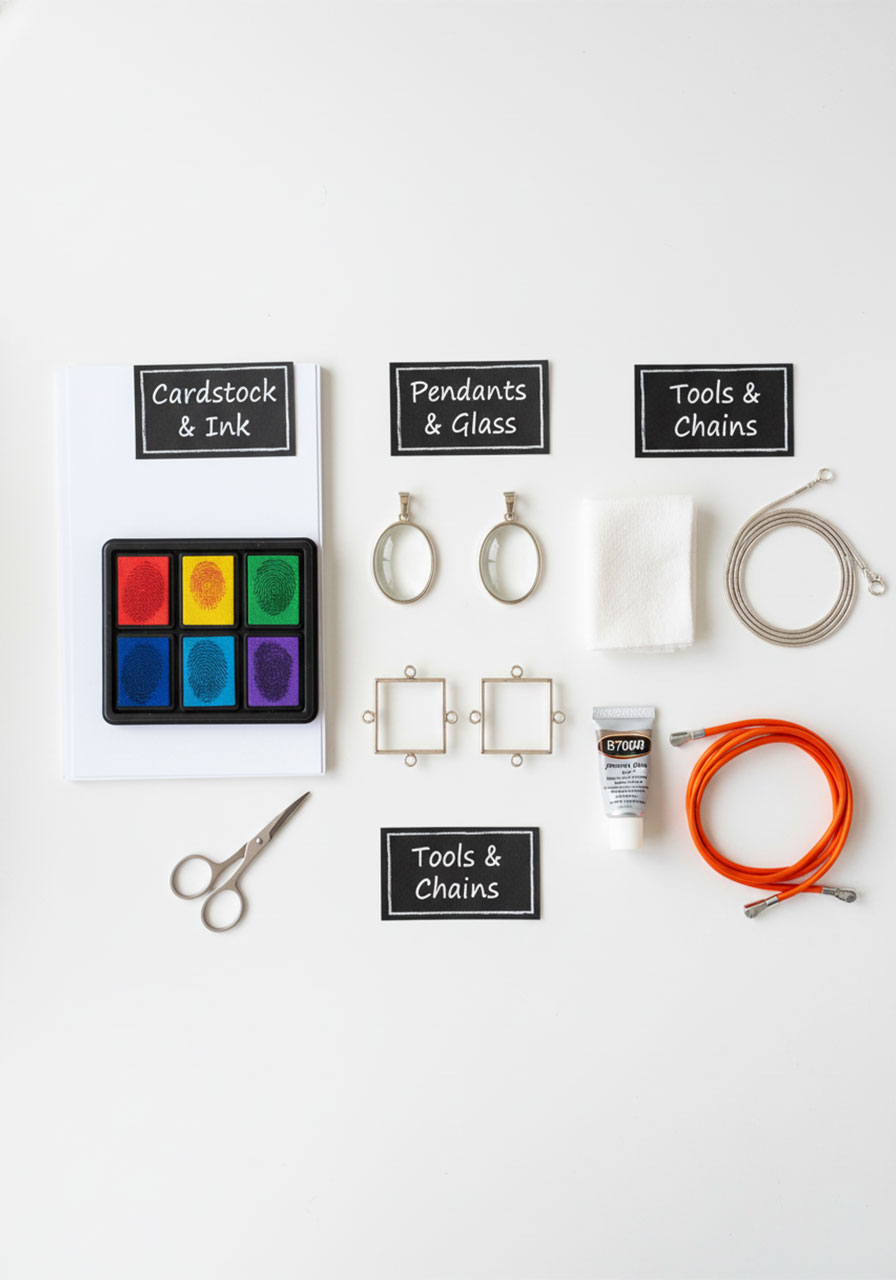
Gather these supplies before you sit down with the kids. Having everything ready ahead of time makes the whole process so much smoother.
Heavy white cardstock (bright white works best – thin paper won’t hold up)
Fingerprint ink pads or acrylic paint in fun colors
Small scissors
B7000 jewelry glue or B6000 adhesive (strongly recommended – these bond glass to metal beautifully and last)
Alternatively: Diamond Glaze Adhesive or Mod Podge work too
A damp cloth or baby wipe for cleanup
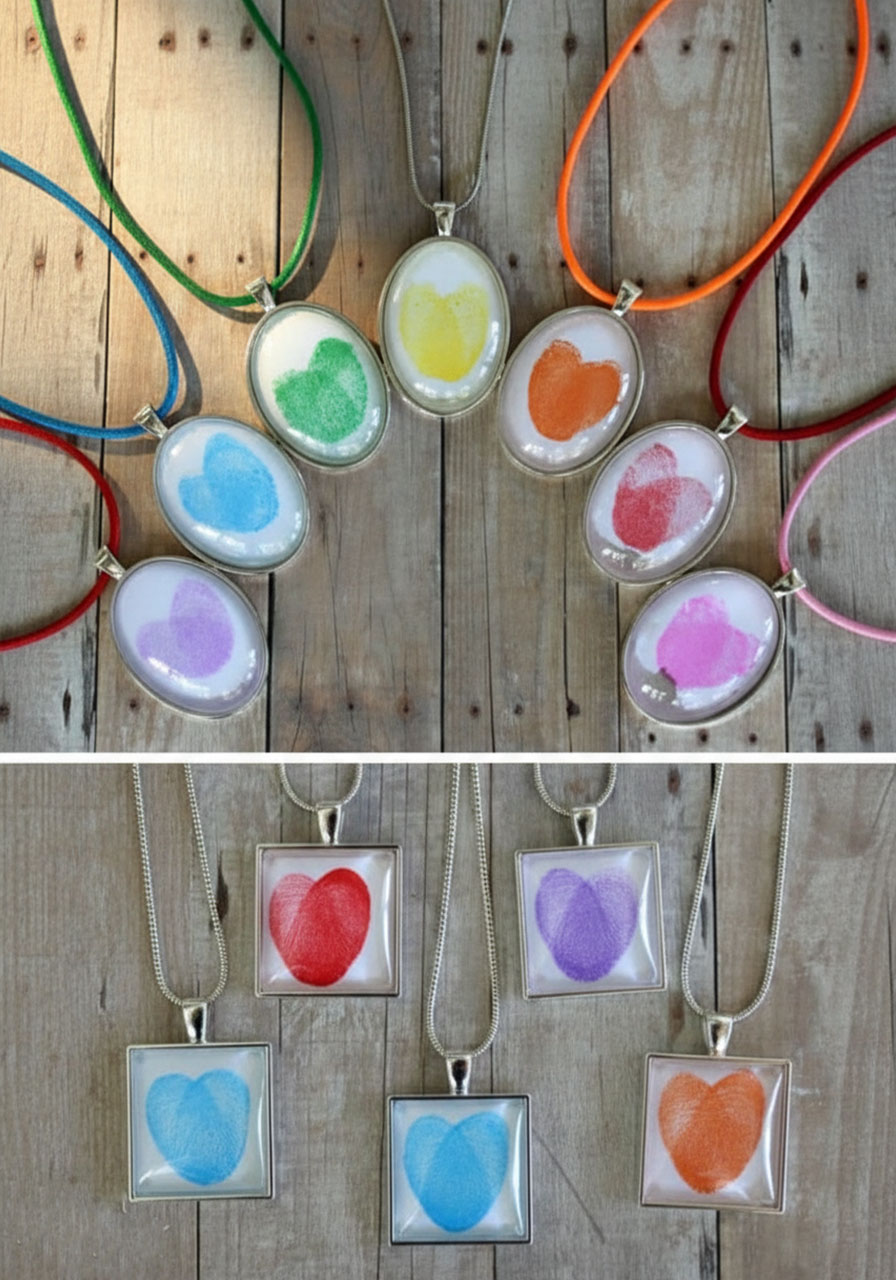
Pendant trays with matching glass cabochons – choose your shape:
- Oval pendant trays + oval glass cabochons (great for little ones – more forgiving shape)
- Square pendant trays + square glass cabochons (a clean, modern look)
Pre-made necklace chains or cords to string the pendant on:
- Sterling silver or silver-plated snake chains (fit all pendant shapes)
- Imitation leather cord necklaces (fit all pendant shapes)
- Multi-colored satin silk cords (fit oval pendants – a great pop of color!)
Pro Tip: Skip the hot glue gun entirely. It doesn’t bond glass to metal well and the pendant will likely fall apart over time. B7000 jewelry glue is the real MVP here – it’s made for exactly this kind of project.
How to Make a Thumbprint Heart Necklace: Step-by-Step
Read through all the steps before you start – it’ll help you set up the workspace and prep the kids so everything goes smoothly. This project has a few drying times built in, so plan for about 20–30 minutes of active crafting, plus overnight drying if possible.
Step 1: Set Up Your Workspace
Lay out a clean, flat surface. Cut your heavy white cardstock into small squares or ovals slightly larger than your pendant trays. (If you’re not sure of the size, just trace the glass cabochon directly onto the cardstock and cut along the line – that’s your template.)
Bright white cardstock is non-negotiable here. Thin paper absorbs glue and turns translucent, which will make the fingerprint look cloudy inside the pendant. Trust us on this one.
Step 2: Make the Thumbprint Heart
This is the magic step – and it’s easier than it looks! Here’s exactly how to get that adorable heart shape every time:
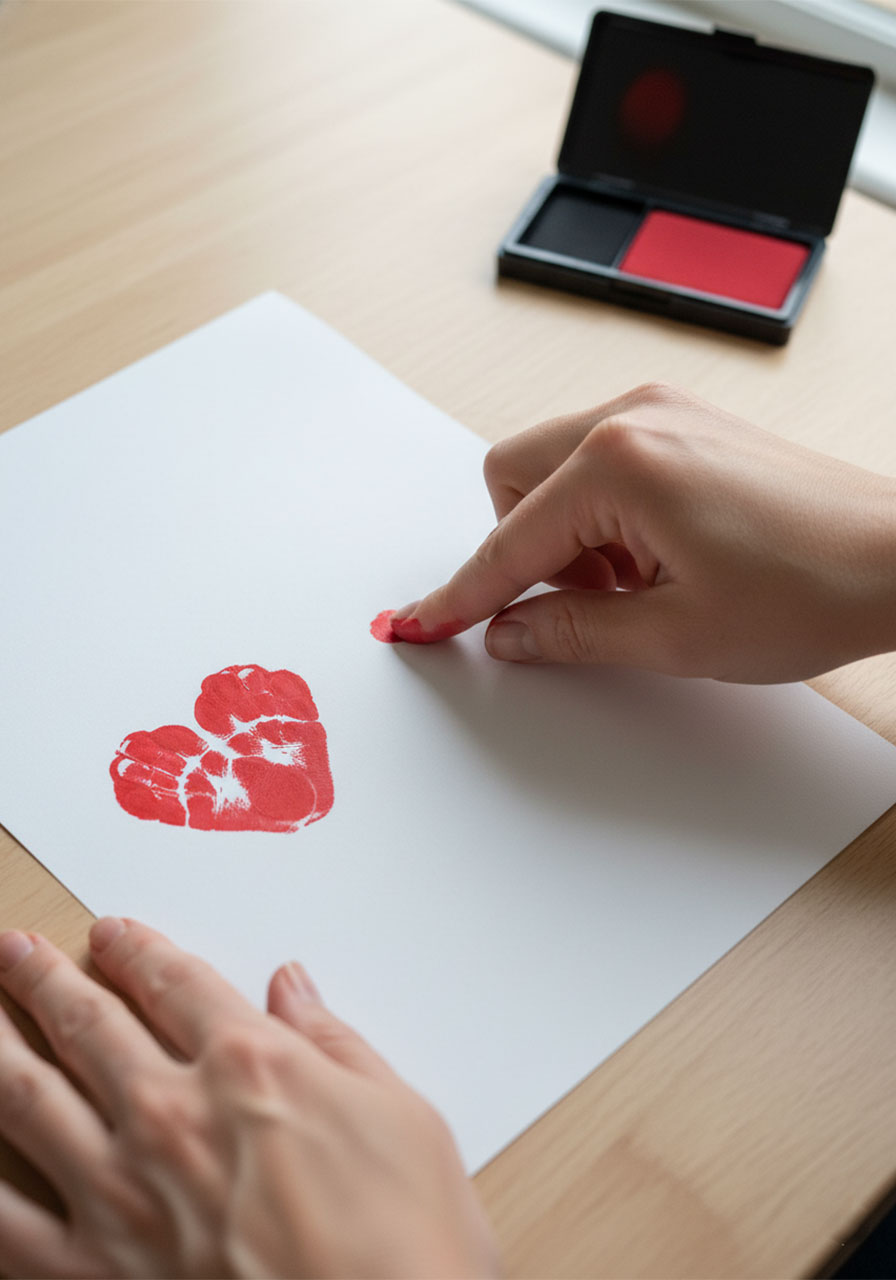
1. Press your child’s thumb (or finger, or pinky!) into the ink pad. You want a good, even coat of ink – but not so much that it’s dripping.
2. Press the inked thumb firmly down onto the cardstock at a slight angle, leaning to the LEFT. Lift cleanly – don’t smear.
3. Re-ink the thumb if needed, then press it down again right next to the first print, this time angling it to the RIGHT so the two prints lean together at the top.
4. Those two prints together form the two rounded lobes of the heart, meeting at a natural point at the bottom. That’s it – you’ve got a thumbprint heart!
Let the print dry completely before moving on. Wet ink smears when it meets glue and can ruin the pendant. Give it 5–10 minutes to be safe.
Fun Variation: Let kids use a black permanent marker or gel pen to draw little faces, names, or doodles on the heart once the ink is dry. My daughter did this for her whole class one Valentine’s Day – every pendant had a tiny smiling face – and the kids went absolutely wild for them.
Step 3: Attach the Glass Cabochon to the Fingerprint
1. Place a small drop of B7000 jewelry glue (or your chosen adhesive) on the flat back of the glass cabochon. A small drop is all you need – seriously, less is more here. Too much glue can seep under the glass and smear the fingerprint.
2. Carefully press the glass cabochon (glue side down) directly over the thumbprint heart on the cardstock. Press firmly for 30–60 seconds.
3. Set aside and let it dry. Overnight is ideal, but a few hours will work if you’re in a hurry.

Step 4: Trim the Cardstock
Once the glue is dry, use small scissors to carefully trim away any excess cardstock around the edge of the glass cabochon. You want it to fit neatly inside the pendant tray with no paper sticking out. Take your time here – a clean trim makes the finished pendant look polished and professional.
Step 5: Glue the Cabochon into the Pendant Tray
1. Apply a thin, even layer of jewelry glue inside the pendant tray.
2. Press the glass cabochon (with the thumbprint facing down into the tray) firmly into place. Press and hold for 30–60 seconds.
3. Use a slightly damp cloth or baby wipe to clean any glue that squeezes out around the edges. Be careful not to let water get between the glass and the tray – just wipe the outer rim.
4. Let the pendant dry completely according to your glue’s instructions. Overnight is always best for a strong, lasting bond.
Step 6: String Your Necklace
Thread your chosen chain or cord through the loop at the top of the pendant – and you’re done! If you’re making a hand-beaded necklace, make sure to thread the pendant on while you’re at the halfway point of beading, so it hangs centered and doesn’t get stuck behind larger beads.
Hold it up, admire it, then wrap it up – because someone is about to love this gift so much.
When to Make Thumbprint Heart Necklaces (Spoiler: Almost Any Time)
One of the best things about this craft is how versatile it is. Here are some of the best occasions to break out the ink pads:
Mother’s Day – The classic. Mom will wear it every day.
Father’s Day – Dads love these too, especially on a simple leather cord.
Grandparents’ Day – Grandma and Grandpa will cherish a pendant with their grandchild’s print.
Valentine’s Day – Kids can make one for each family member, classmates, or their best friend.
Teacher Appreciation – A heartfelt alternative to another mug or candle.
Christmas – Make a batch as ornaments or gifts for extended family.
Summer Camp – A sweet keepsake craft kids can bring home to their parents.
Memorials – A thumbprint pendant can serve as a deeply meaningful memory of someone we love. These are treasured for a lifetime.
Making These in a Classroom? Here’s How to Pull It Off Smoothly
This craft works beautifully as a classroom project – but a little prep goes a long way when you’re managing 20+ kids at once. Here’s how to set yourself up for success:
Pre-cut the cardstock by tracing the cabochons the night before. This saves a surprising amount of time and helps younger kids stay on track.
Use ink pads, not paint for classroom settings. They’re cleaner, dry faster, and create cleaner prints than acrylic paint.
Do the gluing in stations. Have kids make their prints at one table, then bring them to a “glue station” (supervised by an adult) to assemble the pendant.
Let pendants dry overnight before the kids take them home. A rushed dry time means pendants that fall apart – and disappointed kids.
Label the back of each cardstock piece with the child’s name lightly in pencil before they make their prints. It’s easy to mix up pendants in a busy classroom!
A Little Craft That Means a Lot
There’s something really special about a gift that carries someone’s actual fingerprint. It’s not just a necklace – it’s a tiny, permanent piece of a person, pressed into something beautiful that can be worn and held and treasured for years.
Whether you’re a parent sitting down at the kitchen table with your kids on a Saturday afternoon, or a teacher looking for a meaningful end-of-year craft, this thumbprint heart necklace delivers every time. It’s the kind of gift that makes people say, “I’m never taking this off.”

So grab an ink pad, pull up a chair, and get those little thumbs ready. You’ve got some seriously heartfelt gifts to make.
More Mother’s Day Ideas to Keep the Fun Rolling:
30+ Mother’s Day Crafts for Kids of All Ages
“You Are My Flower”: The Sweetest DIY Clay Trinket Dish Kids Can Make for Mother’s Day
The Cutest DIY 3D Tulip Bouquet Card for Mother’s Day (That Opens Like a Real Bouquet!)
The DIY “Forever Bouquet” Card That Will Make Mom Cry Happy Tears This Mother’s Day
How to Make a DIY 3D “MOM” Pop-Up Card She’ll Actually Keep Forever
Bloom Her Away: How to Make a DIY Mother’s Day Flower Pop-Up Card