

Got a box of LEGOs, a straw, and a kid who needs something to do? That’s literally all it takes to create one of the most surprisingly addictive rainy day activities out there. The LEGO Pom Pom Maze is part building challenge, part STEM experiment, and 100% guaranteed to keep kids entertained – while they secretly learn physics without even realizing it.
And the best part? They build it themselves. That means less work for you and way more pride for them.
I’ve seen kids spend hours on this one – building, rebuilding, racing their siblings, and experimenting with different maze designs. It hits that sweet spot between creative play and friendly competition that keeps everyone happily occupied.
What Is the LEGO Pom Pom Maze?
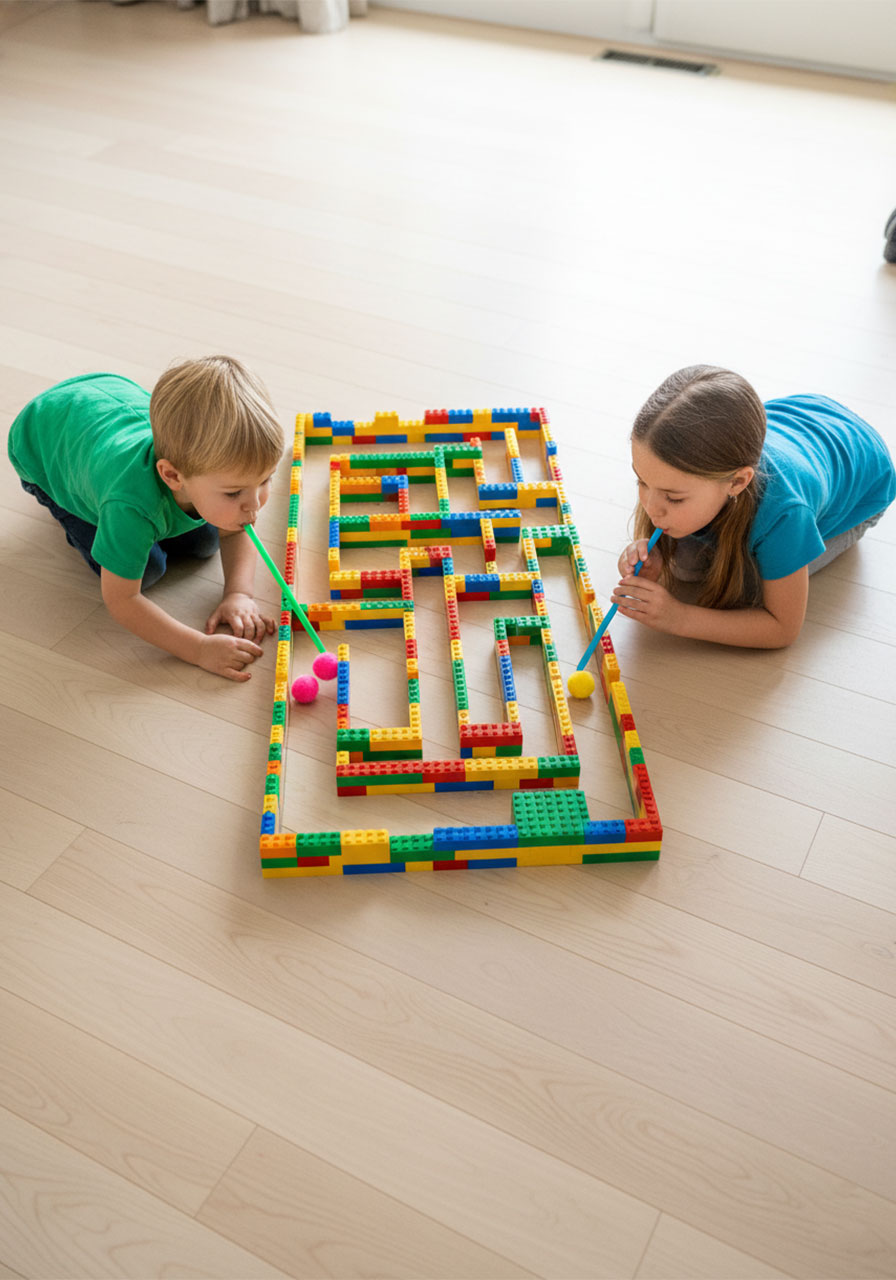
The concept is beautifully simple: kids build a maze out of LEGO bricks, place a pom pom at the start, and then use a straw to blow the pom pom through the entire maze to the finish line. No hands allowed – only breath!
It’s a wonderful activity for kids ages 4 and up, and it naturally develops:
Engineering and design thinking (planning and building the maze)
Fine motor skills (controlling the straw and directing airflow)
Basic physics concepts (force, direction, and airflow)
Problem-solving (figuring out how to navigate tricky turns)
Patience and persistence (because some corners will NOT cooperate)
Whether you’re a parent looking for an afternoon activity or a teacher planning a hands-on STEM lesson, this one delivers big results with minimal setup.

What You’ll Need
LEGO bricks (the more, the better – you want enough for two parallel walls)
Pom poms (1–2 per player; medium-sized work best)
Straws (one per player)
A flat surface – the floor or a table both work great
Pro Tip: Medium pom poms (about 1 inch) are the sweet spot. Too small and they fly out of control; too large and they won’t move easily through tight turns.

How to Build Your LEGO Pom Pom Maze
Step 1: Choose Your Surface
Decide whether you’re building on the floor or a table. Both work, but here’s what to keep in mind:
Floor: Great for younger kids (ages 3–5) or if you have multiple children playing together. Everyone can easily reach all parts of the maze by moving around it.
Table: Better for older kids and keeps the maze contained. Just make sure the maze doesn’t extend to the middle of a large table – kids need to reach every section with their straw. Build closer to the edges and keep the maze footprint manageable.
Step 2: Plan Your Maze Layout (Optional but Helpful)
Younger kids can dive straight into building, which is half the fun. For older kids or classrooms, a quick sketch on paper first makes the build go faster and avoids hitting a dead end halfway through.
Think about including: straight stretches, sharp 90° turns, wide curves, and maybe one or two dead-end branches for extra challenge.
Step 3: Build Both Walls at the Same Time
This is the most important building tip. Always lay down both sides of each track section as you go – don’t complete one entire wall and then try to build the second. You’ll run out of bricks at the worst moment and end up with half a maze.
Keep the channel (the space between the two walls) about 2–3 LEGO studs wide. That gives the pom pom enough room to move but keeps it from bouncing around too wildly.

Step 4: Stack Extra Bricks on Top of the Walls
Add an extra layer of bricks on top of the maze walls wherever possible. This locks the structure together so it doesn’t collapse the moment someone’s elbow gets too close. Trust us – one accidental bump that destroys 20 minutes of building is all it takes for the tears to start.
Step 5: Mark a Clear Start and Finish
Use a specific color brick at both ends to mark the Start and Finish. This makes the goal obvious and adds a satisfying moment when the pom pom finally crosses the finish line.
How to Play
1. Place the pom pom at the Start of the maze.
2. Pick up the straw and get into position near the pom pom.
3. Blow through the straw to push the pom pom forward through the maze. No hands on the pom pom!
4. When you reach a turn, physically move to a new position so you can blow the pom pom in the new direction.
5. Keep blowing until the pom pom reaches the Finish line. Victory!
Key Rule: You can only touch the straw – never the pom pom or the maze walls. If the pom pom escapes the maze, place it back at the nearest section and keep going.

The Physics Behind the Fun (For Teachers & Curious Parents)
Here’s what kids naturally discover as they play – and it’s genuinely impressive STEM learning in action:
Direction matters: Blowing directly behind the pom pom moves it forward. Blowing from the side barely moves it at all. Kids figure this out quickly – and it’s a perfect intro to the concept of force and direction.
Straw angle changes everything: Tilting the straw at an angle lets kids redirect the pom pom without always moving their whole body. A little experimentation reveals a lot about how airflow works.
Don’t bend the straw too much: Bend it past a certain point and no air gets through – so blowing harder does absolutely nothing. This is a great real-world lesson in flow and resistance.
Distance from the pom pom affects power: Closer = more force, farther = less. Kids instinctively test this out.
If you’re using this in a classroom, these are all excellent talking points for a post-activity discussion. Ask kids: “What did you notice about when the pom pom moved the most?”

Make It More Fun: 4 Ways to Play
1. Solo Speed Run
Time how long it takes to get the pom pom from Start to Finish. Write it down. Then try to beat your own record. Can you do it faster the second time now that you know the maze?
2. Head-to-Head Race (2+ Players)
Build two parallel mazes side by side – or use opposite ends of the same maze. Both players start at the same time. First pom pom to reach the finish wins!
3. Pom Pom Tug of War (2 Players)
Place one pom pom in the center of a straight track. One player blows from each end. Who can blow the pom pom to their opponent’s side? This one gets hilariously competitive.
4. Maze Designer Challenge
One person builds the maze, a different person has to navigate it. Then swap! The builder always thinks their maze is harder than it actually is – until they have to do it themselves.
Tips to Make This Activity Go Smoothly
Build on a smooth, hard floor – carpet creates friction that makes the pom pom much harder to blow.
Keep the maze width consistent – if some sections are too narrow and some too wide, the pom pom will behave inconsistently and get frustrating.
Have spare pom poms on hand – they will fly out of the maze, roll under the couch, and disappear. A small backup stash keeps the activity going without interruption.
For very young kids (ages 3–4): Build a shorter, simpler maze with just 2–3 gentle turns. Long straight sections with one or two easy curves keep it achievable and fun.
For older kids (ages 8+): Challenge them to design a maze with dead ends, sharp 180° turns, or multiple branching paths. Let them test each other’s designs.
Classroom Tips for Teachers
This activity works beautifully as a STEM station or a whole-class challenge. Here are a few ways to set it up effectively:
Group activity: Assign teams of 2–3 students. Give each team a set number of LEGO bricks and challenge them to build the longest maze they can within a time limit.
Design challenge: Give students graph paper to sketch their maze plan first, then build it. Compare the plan to the final build – what changed and why?
Reflection prompt: After playing, ask students to write or share: “What did you change about how you blew the straw once you figured out it wasn’t working?”
Cross-curricular: Tie it to a lesson on force and motion, map reading (the maze as a map), or measurement (how long is your maze in LEGO studs?).

Why Kids (and Parents) Love This Activity
What makes the LEGO Pom Pom Maze special is that it grows with your child. A 4-year-old will delight in blowing a pom pom through three gentle turns. An 8-year-old will spend 45 minutes engineering a multi-level challenge course with dead ends and surprise detours. And a competitive group of tweens will turn it into an Olympic event.
It’s also one of those rare activities where the building is just as fun as the playing – which effectively doubles your entertainment time. Win-win for everyone.
Best of all, there’s no screen, no batteries, and no setup beyond “go find the LEGO box.” That’s our kind of activity.
More Kid’s Party Ideas to Keep the Fun Rolling:
16 Genius Colour Sorting Activities for Toddlers & Preschoolers
22 Pinterest Ideas Every Parent (and Teacher!) Will Actually Want to Try
The Easiest Math Activity for Preschoolers (All You Need Is a Cardboard Box!)
15 Cup Stacking STEM Challenges That Will Keep Preschoolers Busy for Hours
5 Domino Math Games Kids Actually Want to Play (No Worksheets Required!)
The Coolest Morse Code Activity for Kids (Using Lego!)
The Straw Maze Activity Kids Will Beg to Play Again and Again
7 Fun Hand-Clapping Games Kids and Adults Will Absolutely Love
