Ready to blow some young minds? This DIY robot hand is the kind of hands-on STEM project that gets kids genuinely excited about science. We’re talking wide eyes, aha moments, and the kind of learning that sticks because it’s just too cool to forget.
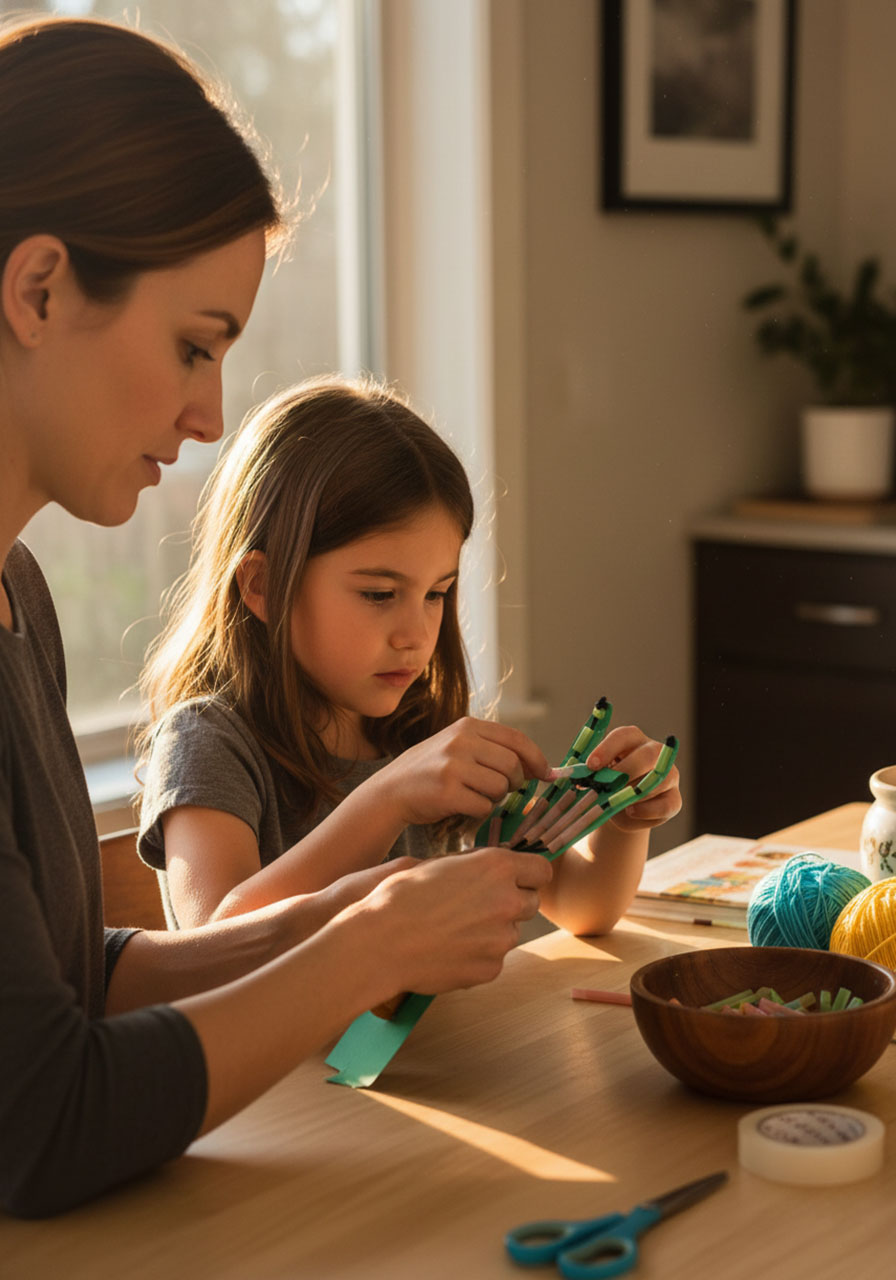
Whether you’re a parent looking for an engaging weekend activity or a teacher planning your next science lesson, this mechanical hand model brings anatomy to life in the most spectacular way. Your students will build a working model that demonstrates exactly how bones, muscles, and tendons work together to create movement. And the best part? They’ll be so busy having fun, they won’t even realize how much they’re learning.
Why This Robot Hand Activity is a Total Winner
Here’s what makes this project absolutely brilliant for classroom or home learning:
Hands-on learning at its finest: Kids learn by building, not just reading about it
Budget-friendly brilliance: You probably already have everything you need at home or in your classroom
Visual impact: Watching those paper fingers move is genuinely mesmerizing
Real science connection: This isn’t just craft time- it demonstrates actual biomechanics
Perfect for multiple ages: Works great for elementary through middle school with minor adjustments


What Kids Actually Learn (The Good Stuff)
The anatomy of our hands is seriously complex. We’ve got bones, muscles, ligaments, and tendons all working in perfect harmony to create the incredible range of motion we take for granted every single day.
This model robot hand demonstrates just how important it is for all these different parts to work together. As kids build and play with their mechanical hand, they’ll discover how:
- The straws represent bones (the rigid structure)
- The yarn acts like tendons (connecting and pulling)
- The joints (where you bend the paper) mirror our knuckles
- Each finger can move independently or work together as a team
It’s one thing to read about tendons in a textbook. It’s another thing entirely to pull a string and watch a paper finger curl up. That’s the magic of experiential learning!
What You’ll Need to Get Started
Gather these simple supplies and you’re ready to roll:
Cardstock paper (construction paper works too, but cardstock is sturdier)
Regular drinking straws (the bendy kind work great)
One jumbo straw (think smoothie or boba tea size)
Yarn or string (different colors make it easier to track which string controls which finger – trust us on this!)
Scissors
Tape (clear tape or masking tape both work)
Pencil

How to Build Your Robot Hand (Step-by-Step)
Follow these steps and you’ll have a working mechanical hand in about 20-30 minutes. It’s easier than it looks, we promise!
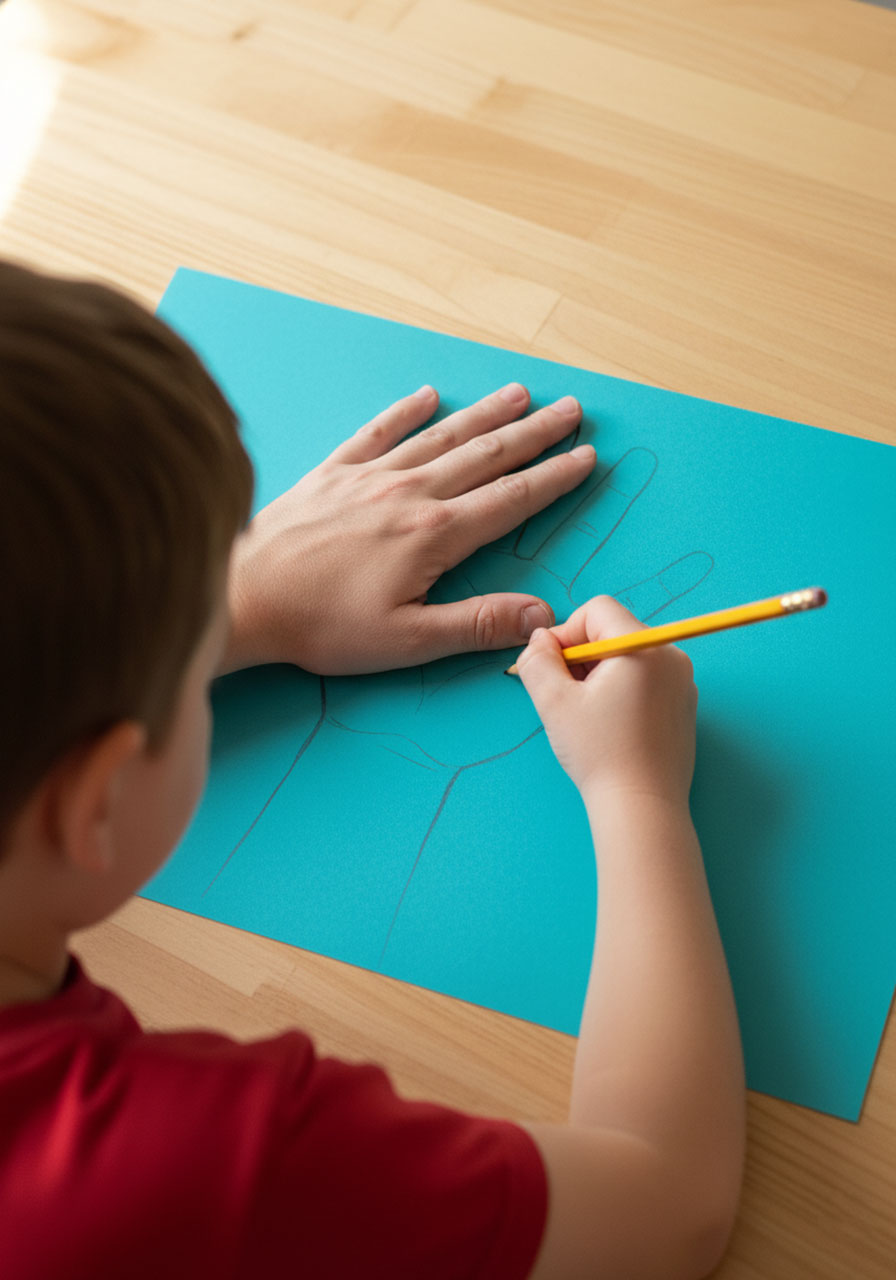
Step 1: Trace Your Hand
Place your hand (or your child’s hand) flat on the cardstock paper and trace around it with a pencil. Make sure to include the wrist – you’ll need that lower section!
Quick tip: While you can use a child’s hand for this project, starting with an adult-sized hand makes the construction process much easier. The larger size gives you more room to work when you’re taping those tiny straw pieces. You can always scale down once everyone gets the hang of it!
Step 2: Cut Out Your Hand
Carefully cut out your hand outline. Take your time – clean edges will make everything easier later on.
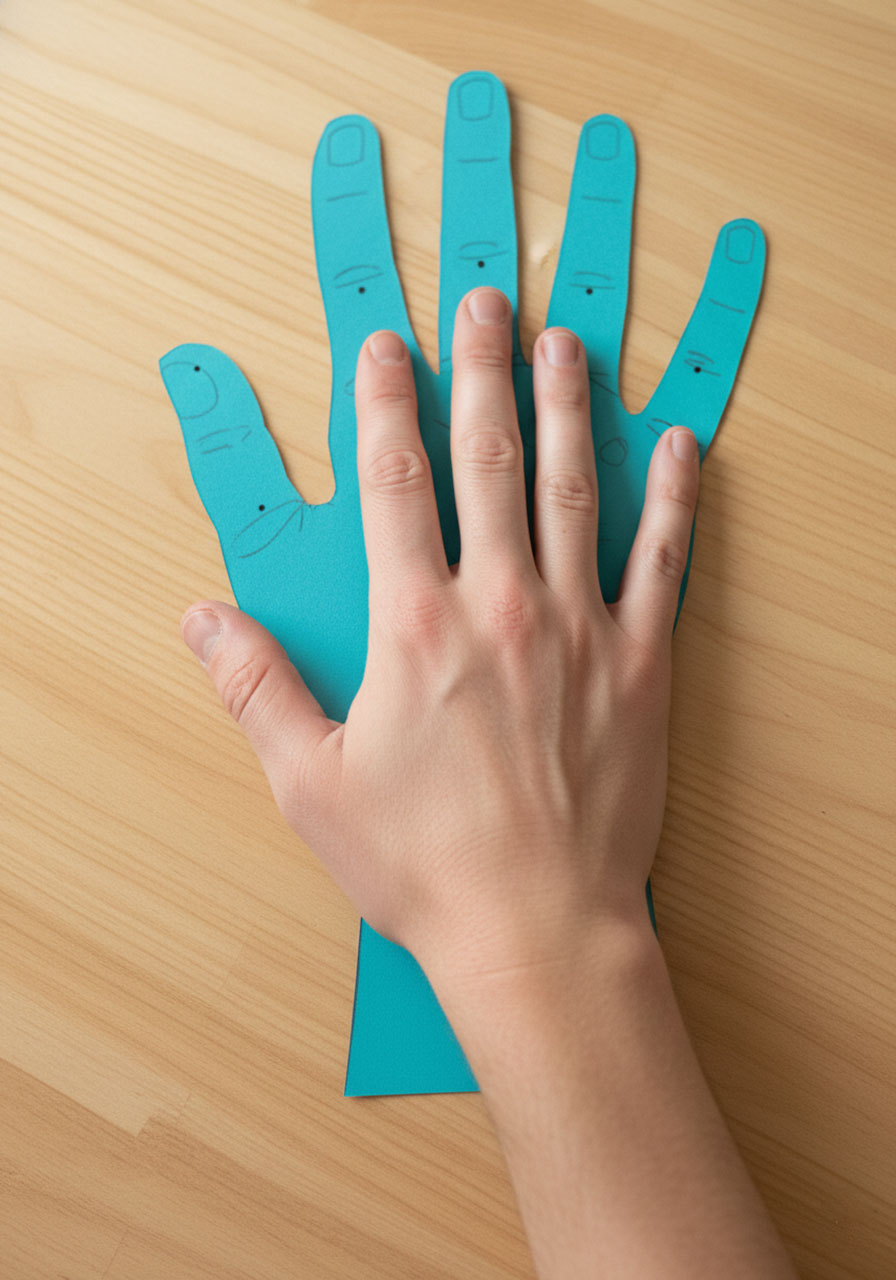
Step 3: Mark the Joints
Here’s where the anatomy lesson kicks in! Place your real hand back on top of the paper cutout and lightly mark where each joint sits:
- Three joints on each finger (tip, middle, and base)
- Two joints on the thumb
These marks show you exactly where your fingers naturally bend. Cool, right?
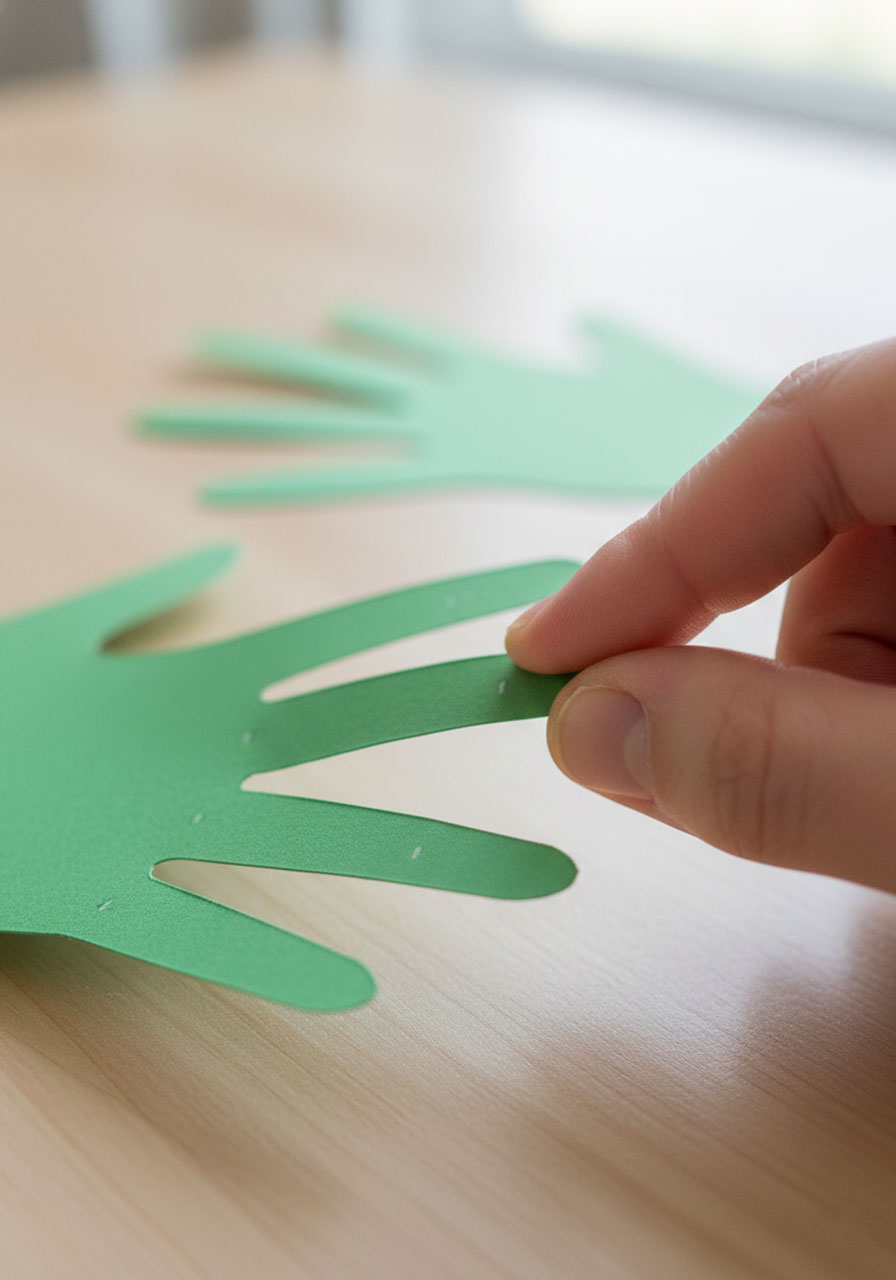
Step 4: Create the Joints
Gently fold the paper at each joint mark. You’re not trying to make sharp creases – just create a natural bend that mimics how your real fingers move. Once you’ve made all the folds, you can erase those pencil marks if you want a cleaner look.
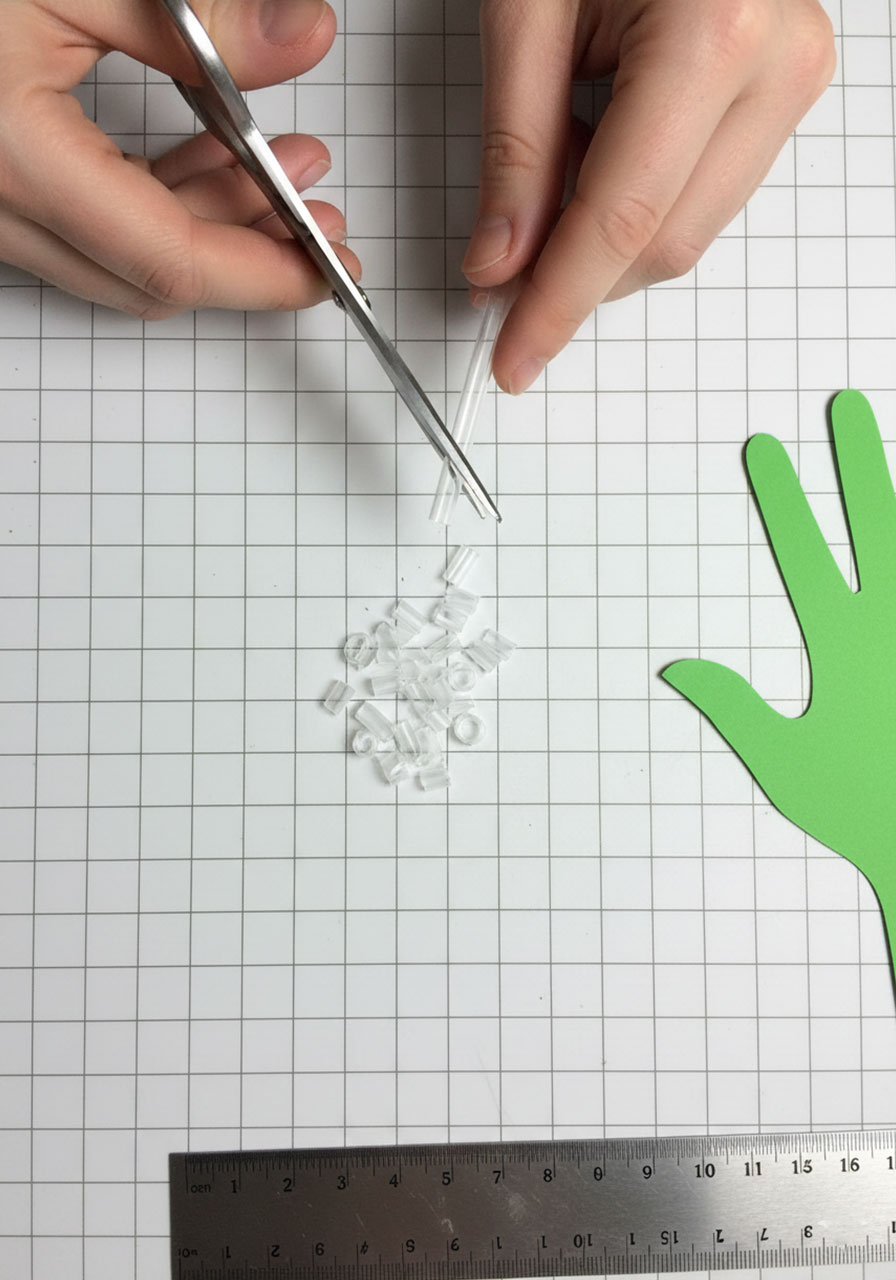
Step 5: Cut the Straws for Fingers
Time to create the “bones”! Cut your regular drinking straws into small pieces that fit in the space between the joints. Each finger segment (the part between two joints) needs its own straw piece.
Why this matters: These straw segments represent the bones in your fingers. Just like real bones, they’re rigid and provide structure!
Step 6: Attach the Straws to Each Finger
Tape each straw piece onto the paper fingers in the spaces between the joints. Here’s the critical part: leave a small gap between each straw piece at the joint. This gap is what allows your robot hand to bend, just like the space at your knuckles lets your real fingers flex.
Troubleshooting tip: If you’re working with smaller hands, this step can get a bit fiddly. A delicate touch with the tape makes all the difference. You’ve got this!
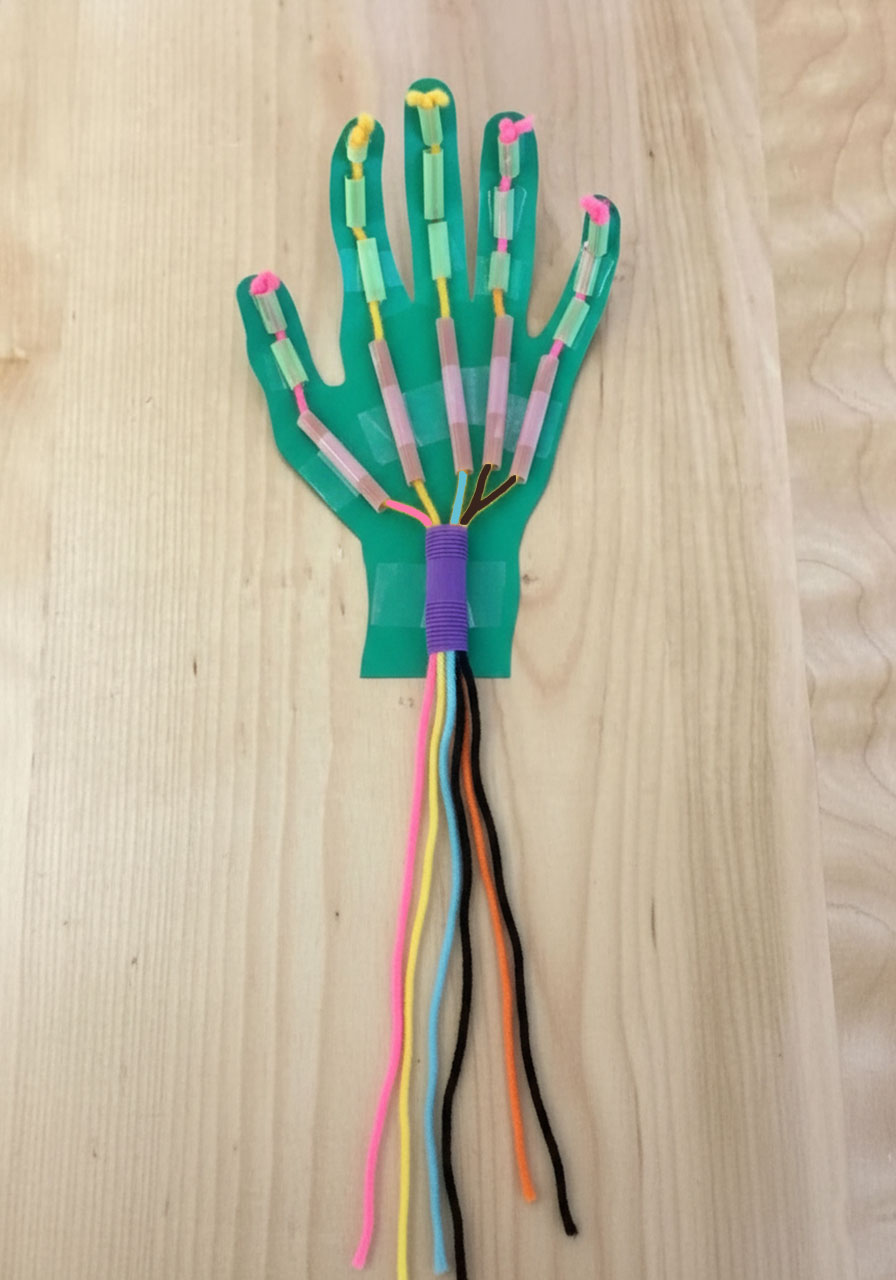
Step 7: Add Straws to the Palm
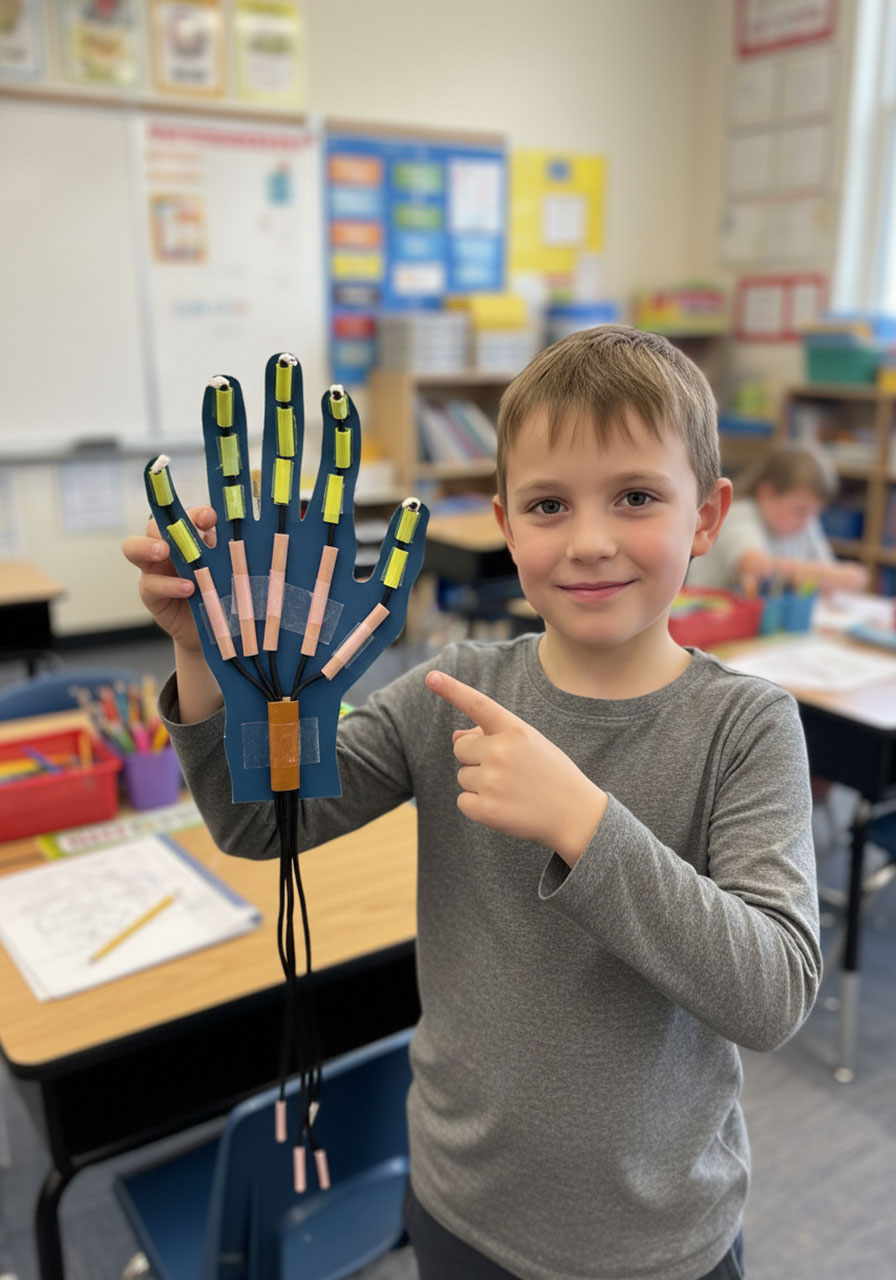
Cut five longer straw pieces – one for each finger’s path across the palm. Tape these straws onto the palm area, running from the base of each finger down toward the wrist. These act as guides for the yarn you’ll add next.
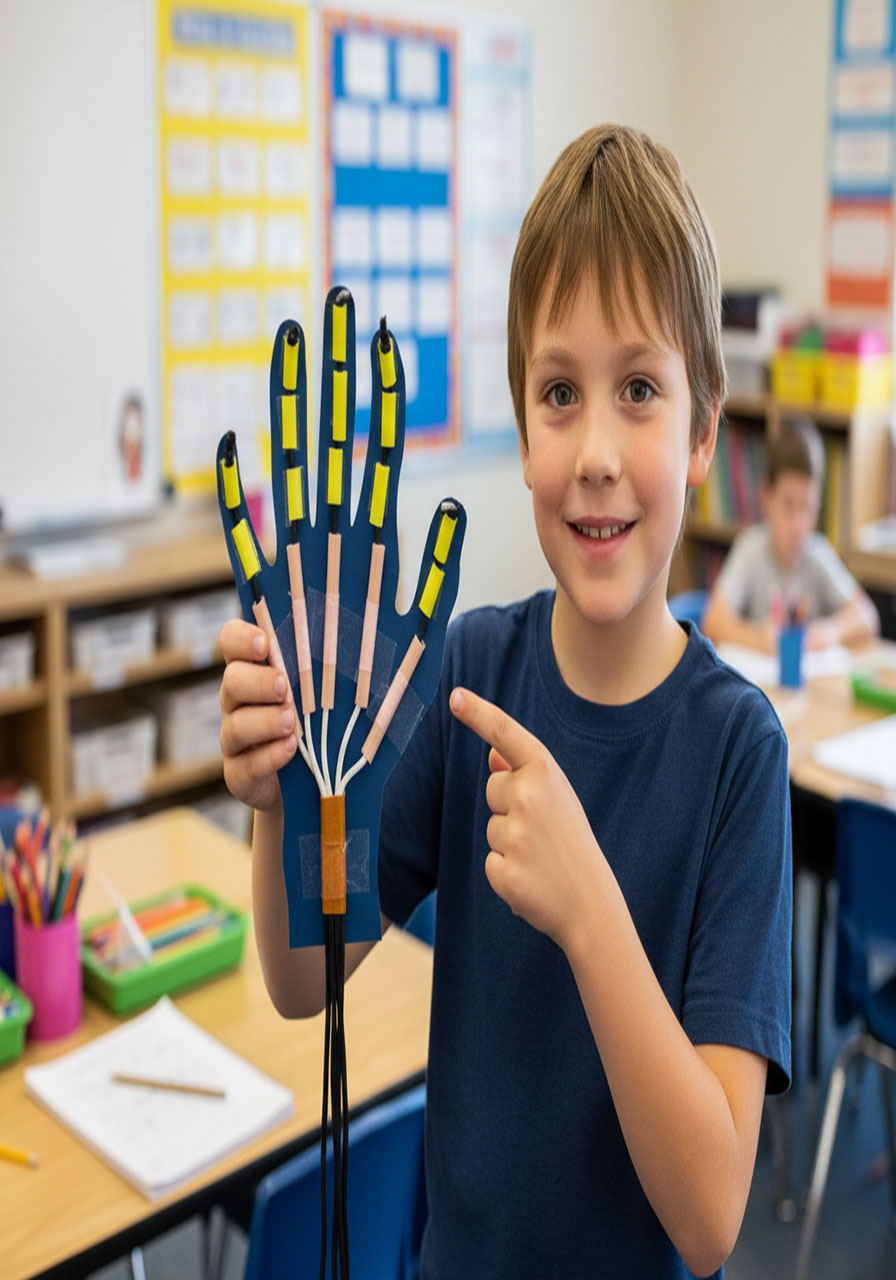
Step 8: Add the Wrist Straw
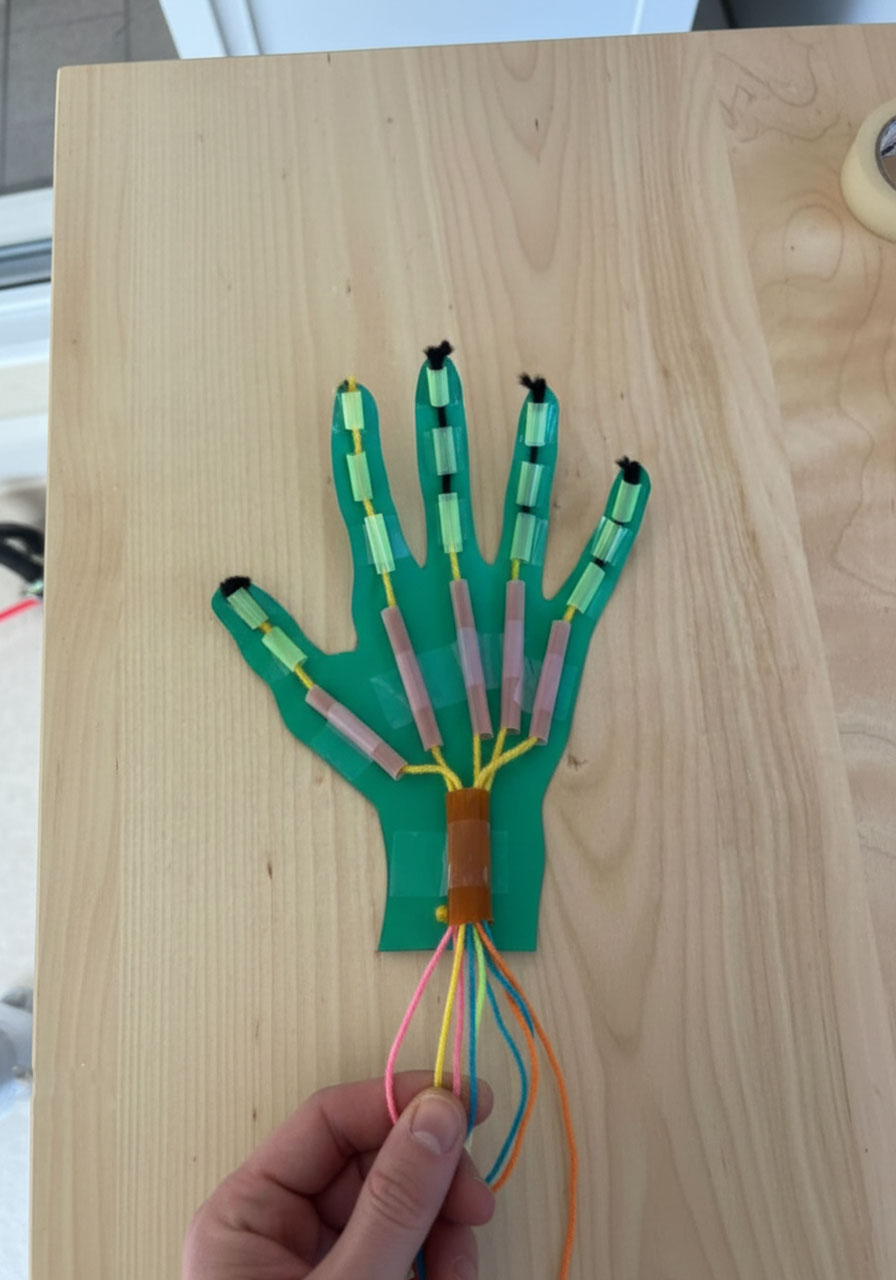
Cut a section from your jumbo straw and tape it across the wrist area. This bigger straw will serve as the collection point where all five finger strings come together – kind of like how all your tendons run through your wrist!
Step 9: Thread the First Finger
Cut a piece of yarn long enough to run from the fingertip, through all the finger straws, down through the palm straw, through the wrist straw, and still have plenty hanging out the end (you’ll need that extra length to pull). Thread the yarn through all the straws for one complete finger.
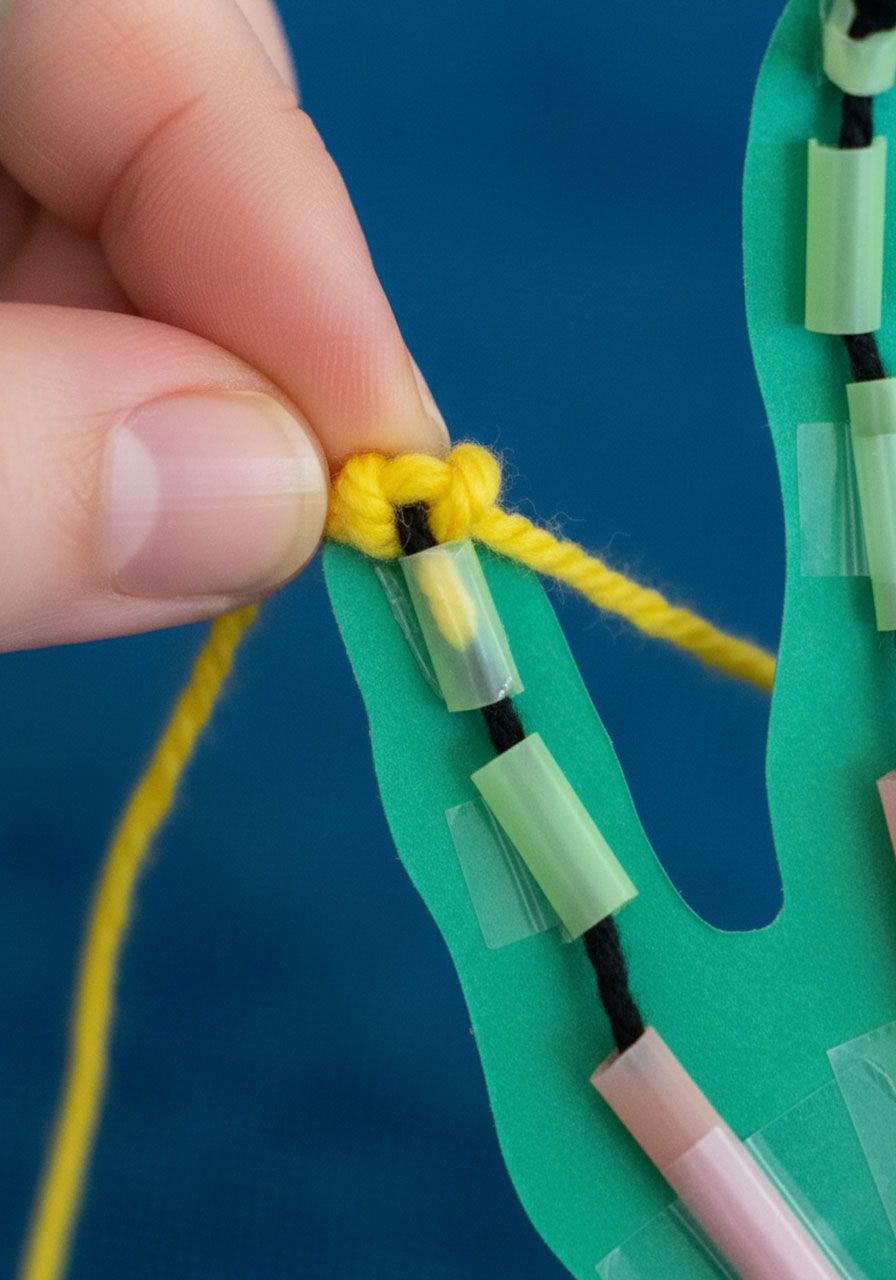
Step 10: Secure the Fingertip
Tie a knot at the very tip of the finger to anchor the yarn. This knot represents where a tendon attaches to the bone at your fingertip!
Step 11: Repeat for All Fingers
Thread and knot yarn through each remaining finger, following steps 9 and 10. This is where using different colored yarn for each finger becomes super helpful – you’ll instantly know which string controls which finger!
Color-coding hack: If you only have one color of yarn, make small tags or tie different colored ribbons to the end of each string. Future you will thank present you!
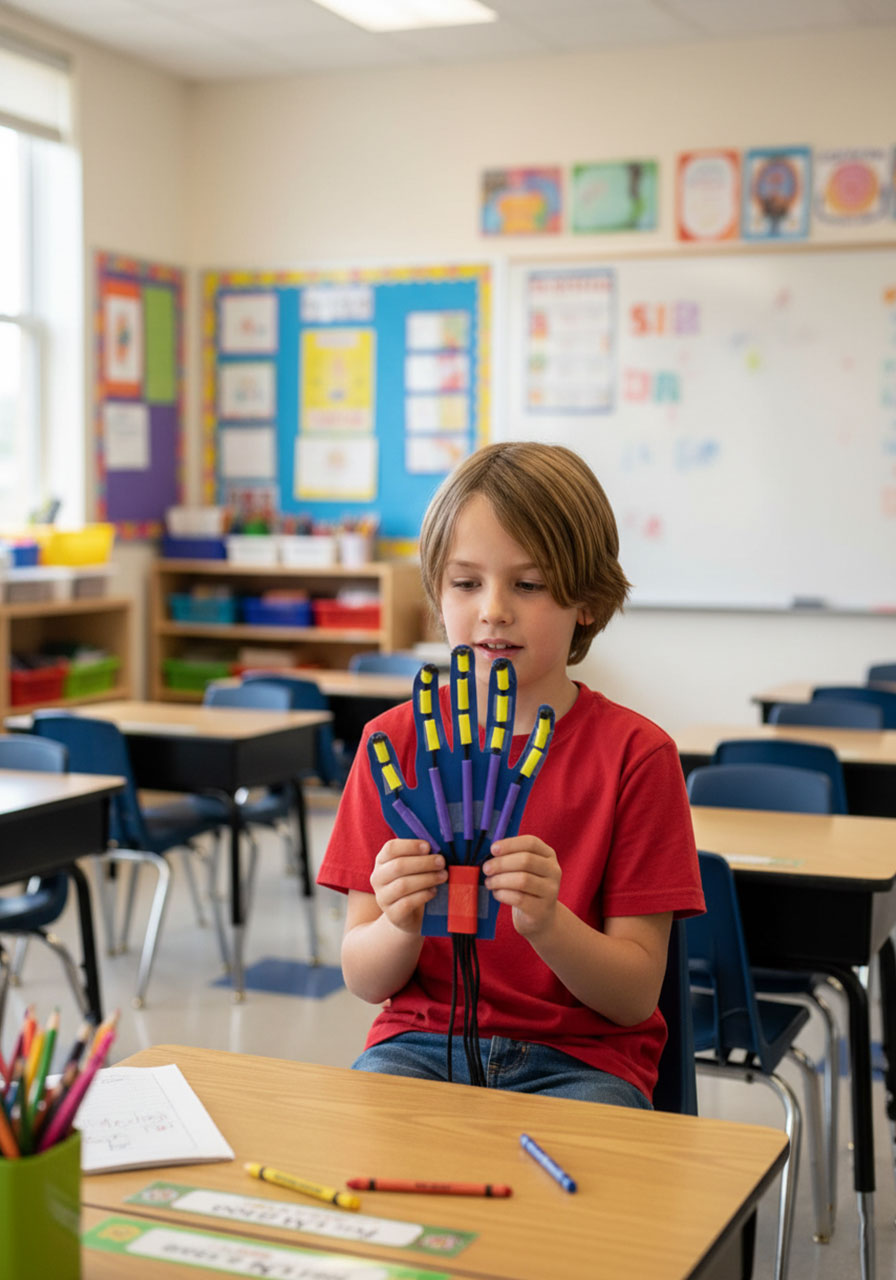
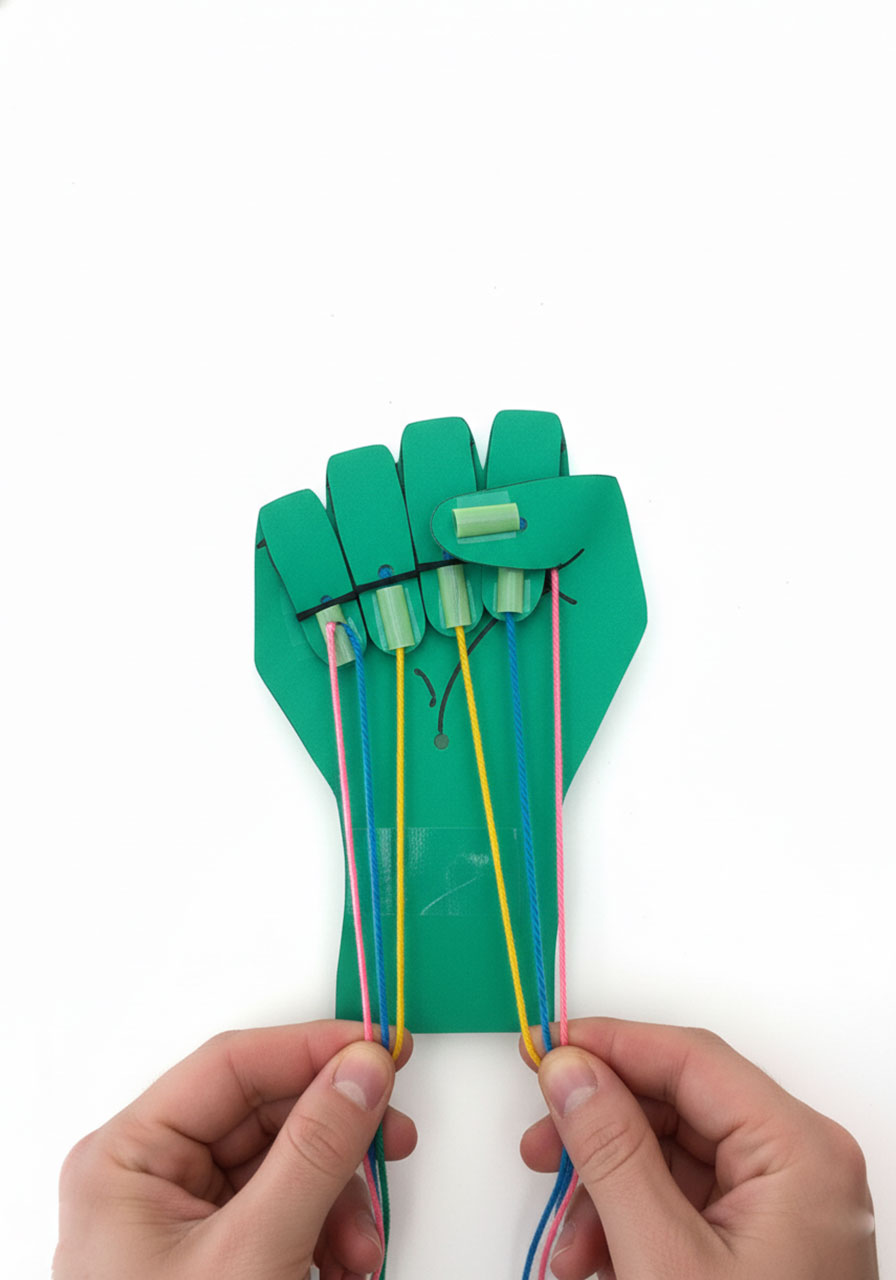
Step 12: Test Your Robot Hand!
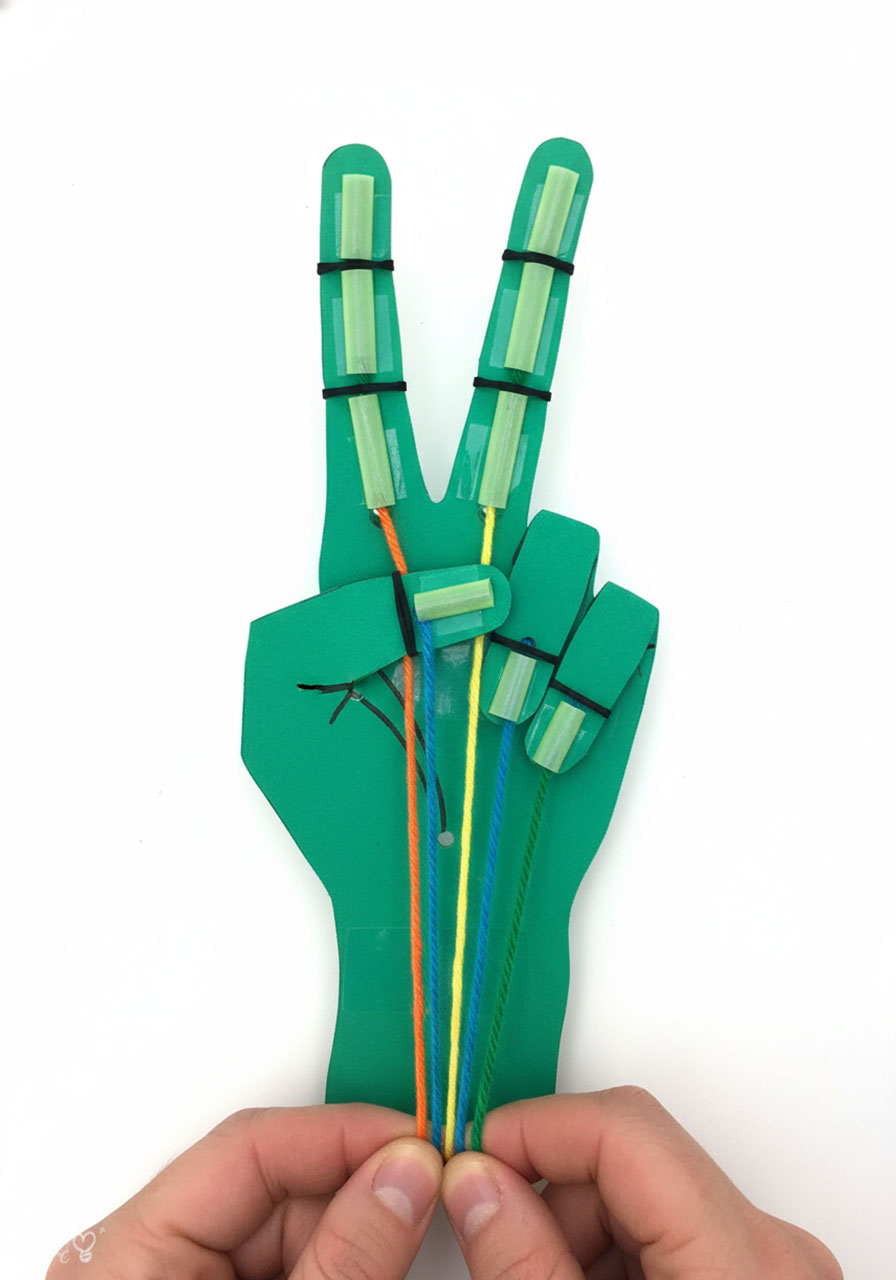
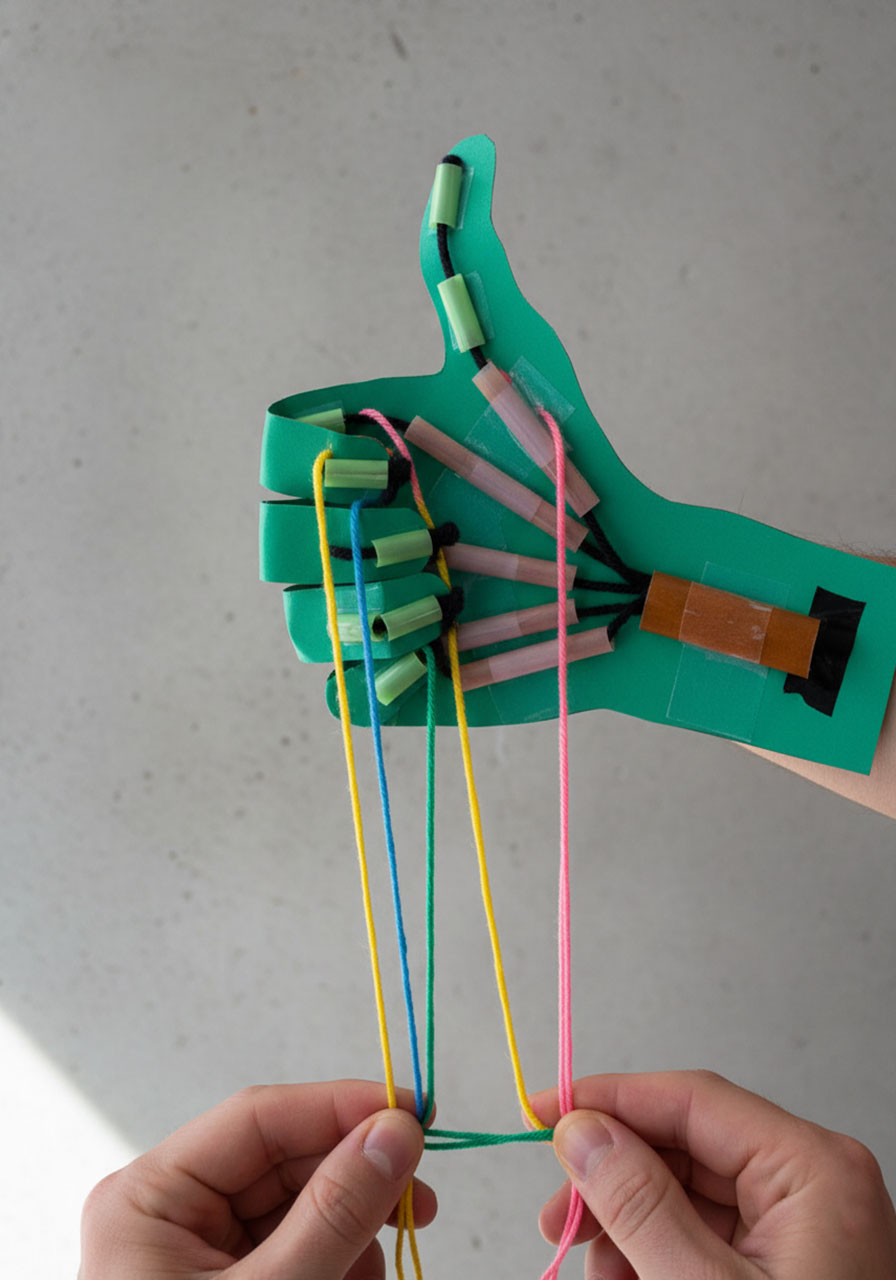
This is the moment everyone’s been waiting for! Gently pull on one string at a time and watch the magic happen. Your paper finger will curl up just like a real finger. Pull multiple strings and you can make a fist, give a thumbs up, throw up a peace sign, or even hang ten like a surfer!
What Can Your Robot Hand Do?
Once your mechanical hand is up and running, the fun really begins! Challenge your kids or students to:
Make different hand gestures: Thumbs up, peace sign, rock-on, or “hang loose” are all achievable
Practice coordination: Can they pull just the right strings to make specific finger combinations?
Create a wave: Pull the strings one at a time in sequence to make a wave motion
Spell words in sign language: This is an amazing opportunity to introduce basic sign language!
The robot hand turned out super cool when we tested it! We made ours hang ten, give a thumbs up, and even rock out. Watching kids figure out which string controls which movement is absolutely priceless.
Pro Tips for Success
Start Big, Go Small Later
If you’re doing this project with younger kids or it’s your first time building a robot hand, start with an adult-sized hand template. The bigger size gives you way more wiggle room when attaching those straw segments and threading the yarn. Once everyone masters the technique, you can challenge them to make smaller versions!
Color-Code Those Strings
We can’t stress this enough: using different colored yarn for each finger makes the whole experience so much better. If you’re stuck with single-color yarn, attach small paper tags or colored tape to the end of each string. Label them “thumb,” “pointer,” “middle,” “ring,” and “pinky.” Your future self will be so grateful!
Mind the Gaps
When taping down the straw segments, those little gaps at the joints are absolutely crucial. Too close together and your fingers won’t bend. Too far apart and the movement gets sloppy. Aim for about the width of a fingernail – just enough space for the paper to fold naturally.
Thread Smart, Not Hard
Threading the yarn through those straws can be tricky, especially the smaller segments. Here’s a life hack: slightly flatten the end of the yarn or wrap a tiny piece of tape around the tip to make it stiffer. This creates a makeshift “needle” that slides through the straws much more easily!
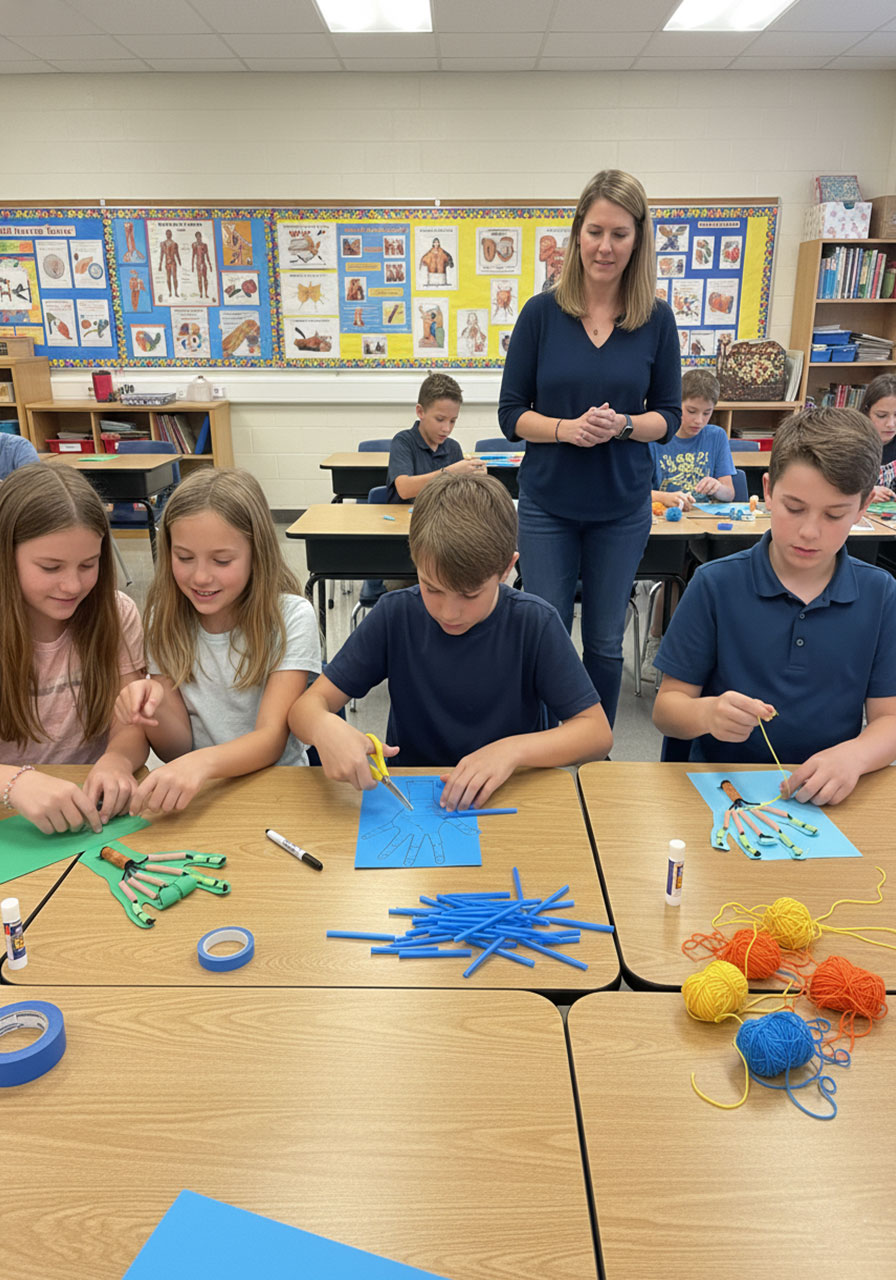
Make It a Group Challenge
In a classroom setting, have students work in pairs or small groups. One person can hold the hand steady while the other threads and tapes. This builds teamwork skills and makes the fiddly parts way less frustrating!
Discussion Questions to Deepen Learning
Turn this craft into a rich learning experience by asking questions that get kids thinking:
“What part of your real hand does the yarn represent?” (Answer: tendons)
“Why do we need gaps between the straw pieces?” (Answer: just like our knuckles, the gaps allow for bending)
“What would happen if the yarn wasn’t attached at the fingertip?” (Answer: pulling wouldn’t create movement – tendons need anchor points)
“Can you think of any machines or robots that use similar mechanics?” (This opens up discussions about robotics and engineering)
“How is your robot hand different from your real hand?” (Talk about limitations – can’t move sideways, can’t spread fingers apart, etc.)
Take It Further: Extension Ideas
Ready to level up? Try these extension activities:
Design Challenge: Improve the Model
Ask students to identify limitations of the robot hand and brainstorm improvements. Could they add rubber bands for automatic finger extension? Could they create a way to move fingers sideways? Let them experiment!
Research Real Prosthetics
Connect this project to real-world applications by researching modern prosthetic hands. How do engineers solve the same problems students encountered? What technologies make prosthetics even better than this simple model?
Make It Functional
Challenge students to actually pick something up with their robot hand. Can they grab a pencil? A lightweight ball? What modifications would make it stronger?
Cross-Curricular Connection: Art
Have students decorate their robot hands before assembly. They could create superhero hands, monster claws, or elegant decorative designs. This adds a creative element while reinforcing that science and art work beautifully together!
Math Integration: Measure and Compare
Have students measure the length of each finger segment and compare ratios. Are all fingers proportioned the same? How does hand size affect the measurements? This sneaks in some practical geometry!
Troubleshooting Common Hiccups
My fingers won’t bend: Check those gaps! If your straw pieces are taped too close together at the joints, there’s no room for bending. Peel up the tape, adjust the spacing, and try again.
The yarn keeps slipping out: Make sure your fingertip knots are nice and chunky. If the knot is too small, add another knot on top of it, or tie the yarn around a small piece of straw at the fingertip before knotting.
I can’t tell which string controls which finger: This is exactly why we recommend color-coding! If it’s too late for that, try labeling the strings with small pieces of tape or tying different colored ribbons at the ends.
The paper hand is too flimsy: Switch to cardstock if you haven’t already. It’s sturdy enough to hold the straws but still flexible enough to bend at the joints. Regular construction paper is just a bit too floppy for this project.
The straws keep falling off: Use more tape! Seriously, don’t be stingy with it. Make sure each straw piece is secured along its entire length, not just at the ends.
Ready to Build Some Robot Hands?
This DIY robot hand is the perfect blend of fun and learning. It’s tactile, it’s visual, and it creates those lightbulb moments when kids suddenly understand how their own bodies work. Plus, let’s be honest – pulling those strings and watching paper fingers curl is just plain cool!
Whether you’re a teacher looking for your next science lesson or a parent hunting for a meaningful weekend activity, this project delivers. It’s budget-friendly, it’s engaging, and it teaches real science in a way that sticks.
So grab those straws, round up some yarn, and get ready for some serious “aha!” moments. Your young scientists and engineers are about to discover just how amazing the human hand truly is.
Happy building, and may your robot hands rock out with the best of them!
More Kid’s Party Ideas to Keep the Fun Rolling:
DIY Toilet Roll Knitting for Kids: The Ultimate Beginner Craft That Actually Works
11 Ridiculously Simple Fine Motor Activities That’ll Keep Toddlers Busy for Hours
Sticker Lines: The Ridiculously Simple Activity That Keeps Kids Busy for Hours
101+ Fun Questions To Ask Kids That’ll Get Them Talking (FREE Printable!)
15+ Brilliant Games You Can Play With UNO Cards (Way Beyond the Rules!)
Cup Stacking Tower Challenge: The Epic Building Game That’ll Keep Kids Busy for Hours
Build a LEGO Slingshot Car: The Epic Racing Activity Your Kids Will Beg to Do Again
Muffin Tin Coin Counting Activity: The Sneakily Brilliant Math Game Kids Actually Want to Play