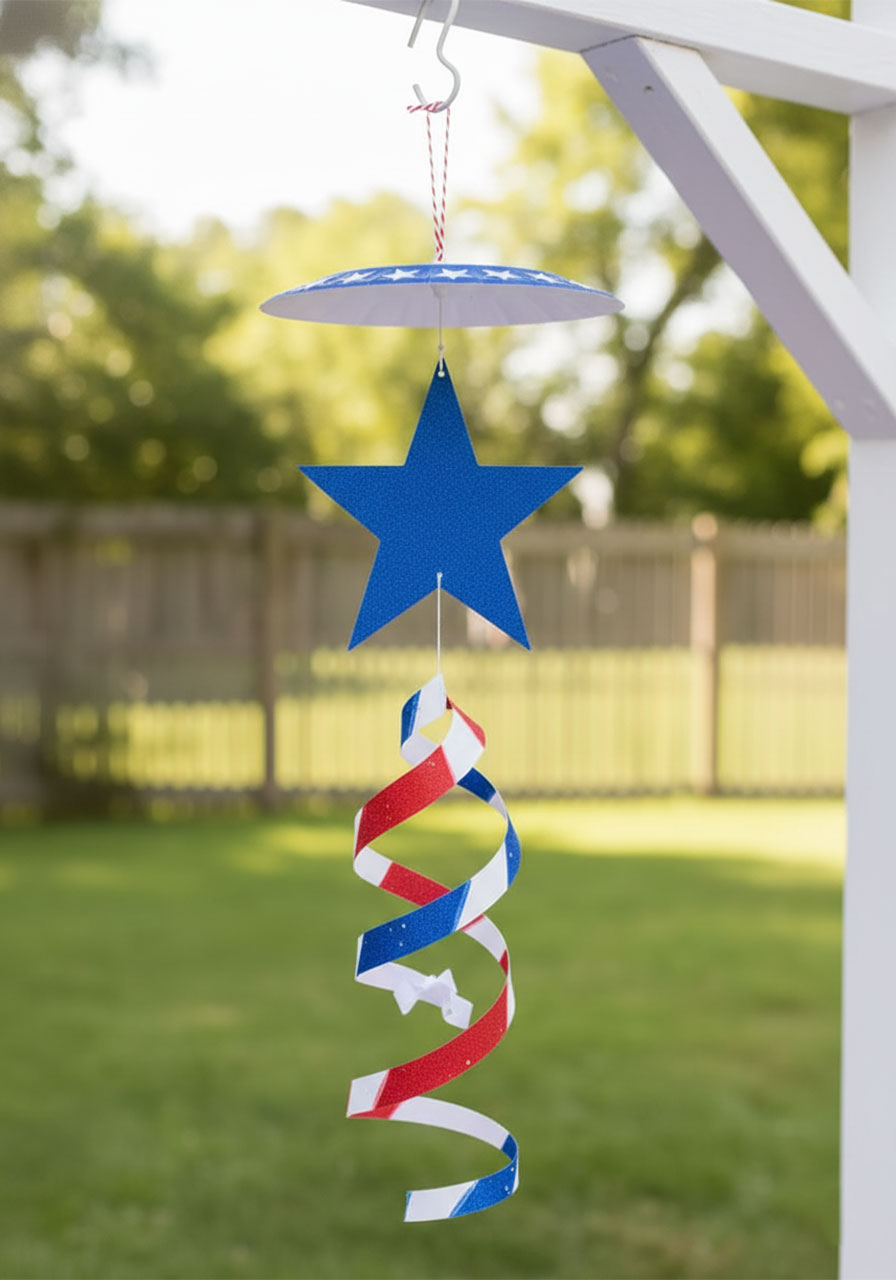
Looking for a fun, festive activity that’s actually easy enough to do with the kids – and looks adorable hanging on your porch? This Patriotic Paper Plate Wind Catcher is your answer.
It’s red, white, and blue. It spins in the breeze. And you can put it together in under 30 minutes with supplies you probably already have at home. Honestly, it might be the most satisfying craft you make all summer.
Whether you’re gearing up for the 4th of July, Memorial Day, or any patriotic celebration, this little wind catcher adds a cheerful, handmade touch that store-bought decorations just can’t match. There’s something special about seeing something you made twirl in the summer wind.
Let’s dive in!

What You’ll Need
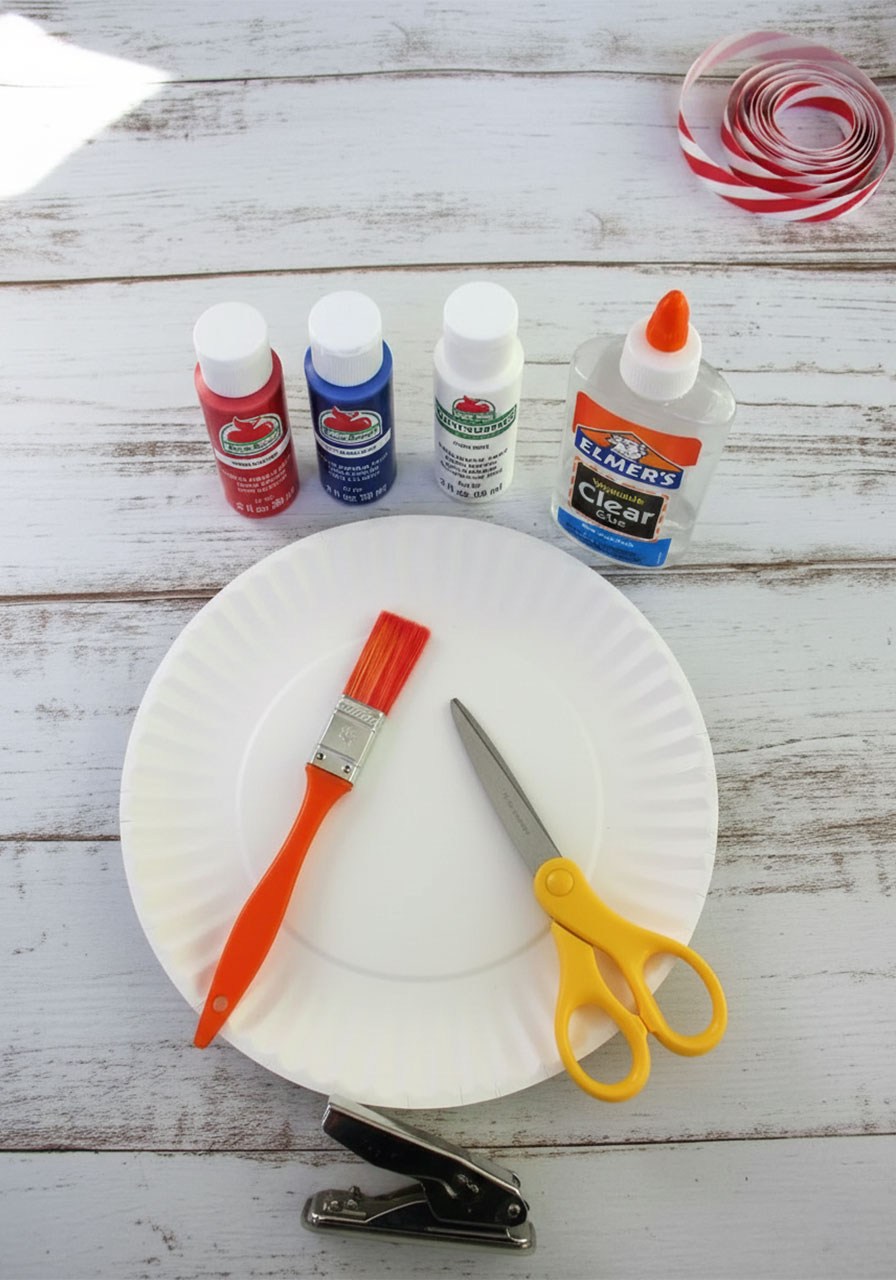
The supply list is wonderfully short – no special trips to the craft store required.
2 paper plates
Red, white, and blue acrylic paint
A paintbrush
Scissors
A hole punch
Clear glue (like Elmer’s)
Red and white ribbon or string (about 12–18 inches)
That’s it! Simple, affordable, and totally doable on a weekday afternoon.

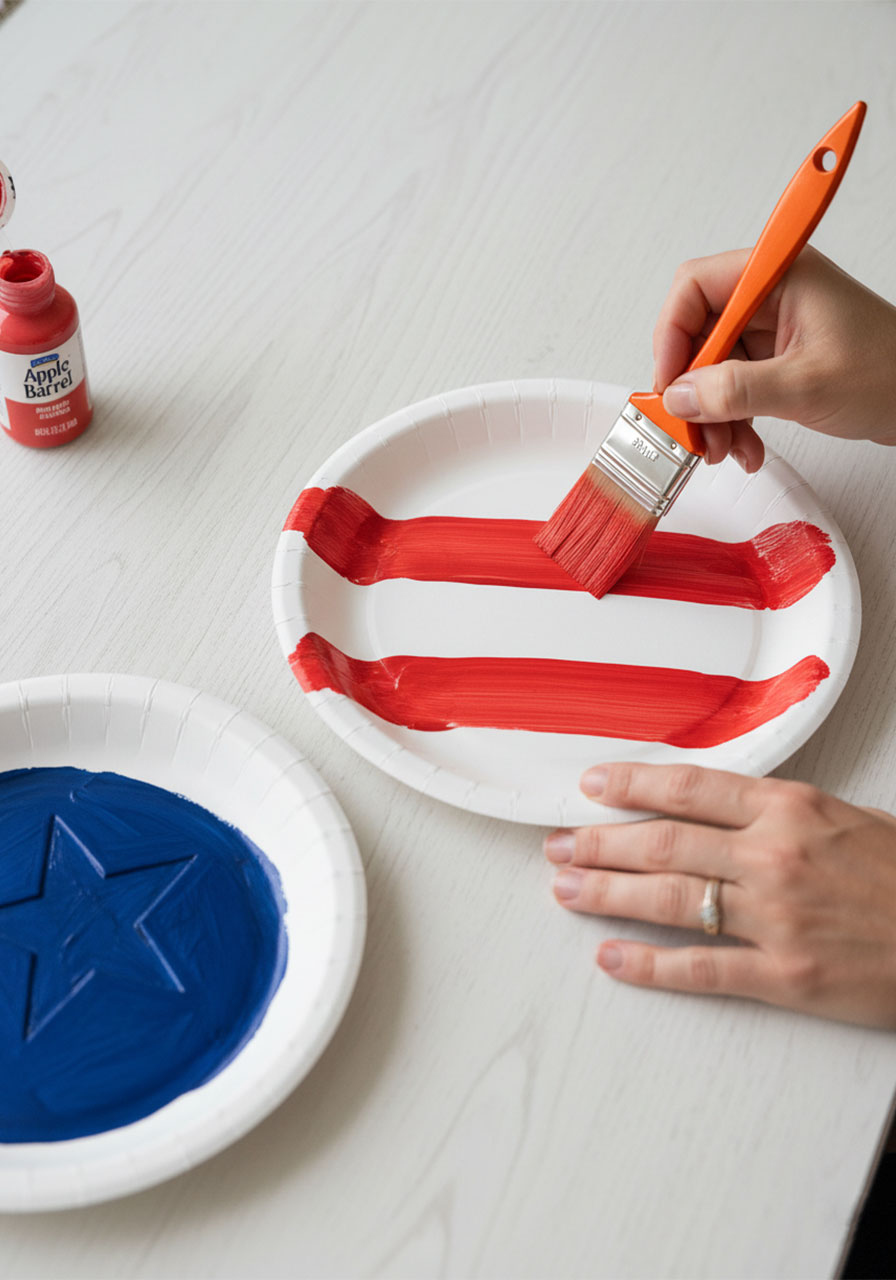
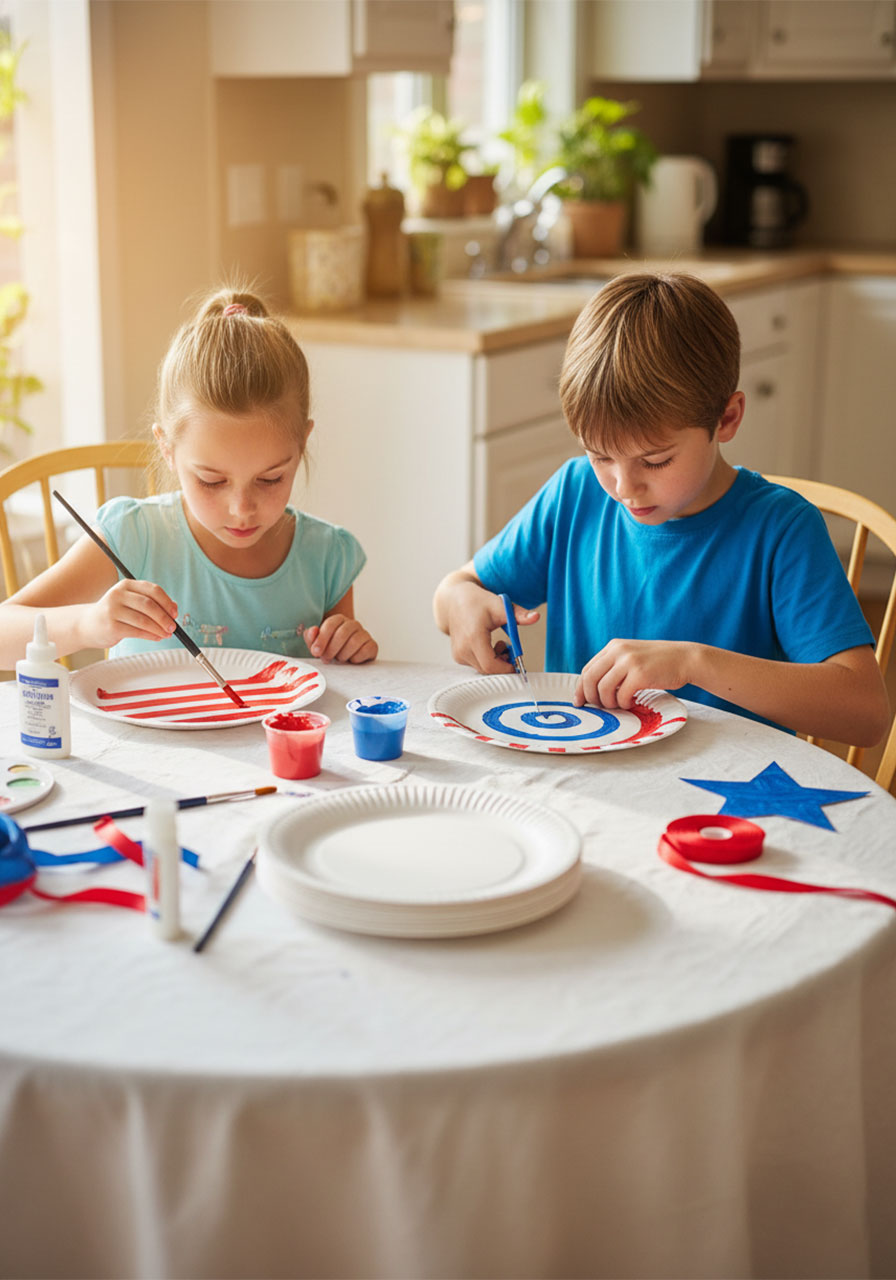
Step 1: Paint Your Paper Plates
Start by grabbing your two paper plates and setting up your paint station. This is the most fun part – especially if you have little ones helping!
On the first plate, paint bold red and white stripes across the entire surface – front and back. Don’t stress about making them perfectly even. Slightly imperfect stripes actually look charmingly handmade and festive. Let it dry completely before moving on.
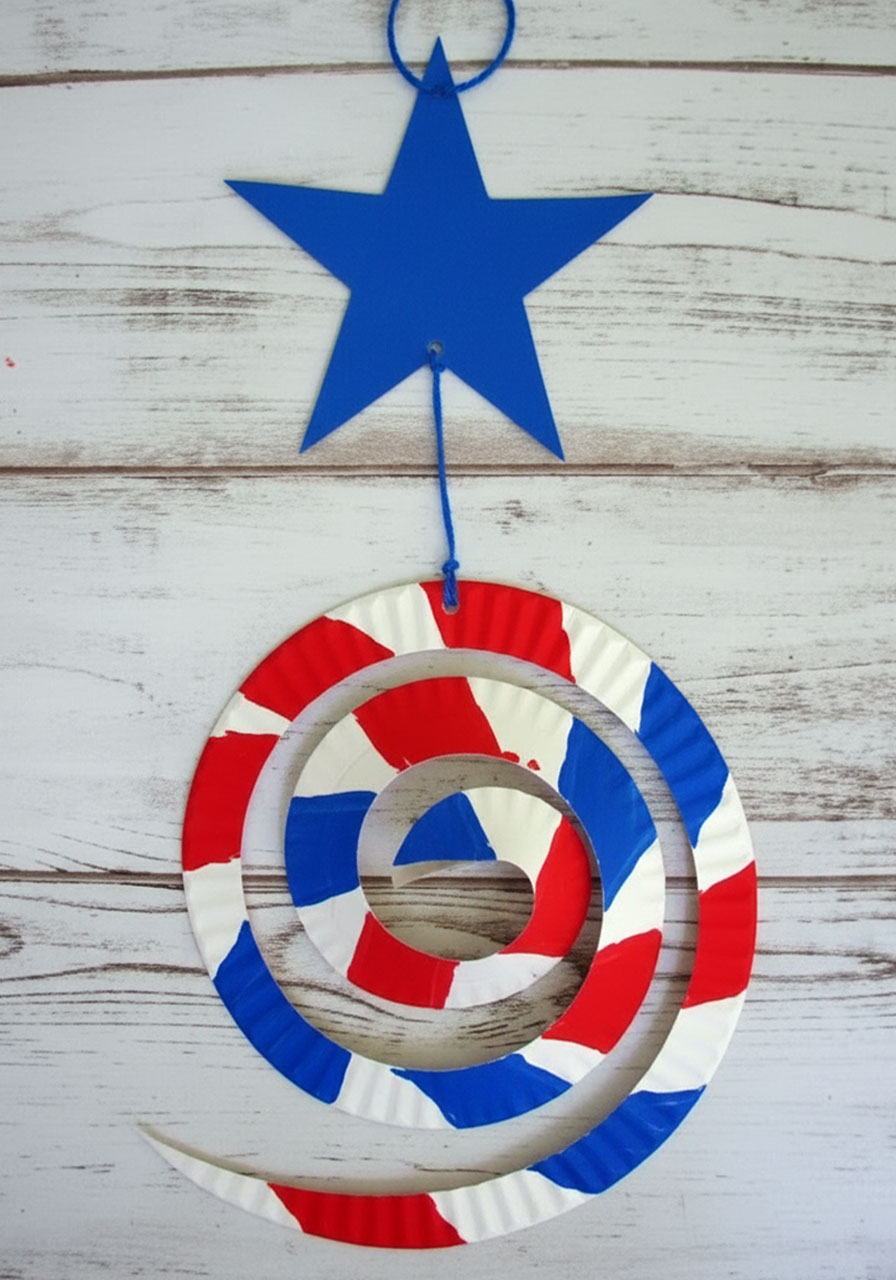
On the second plate, you won’t paint the whole thing. Instead, you’ll cut a large star shape from it (more on that in the next step) and paint just the star solid blue. Two coats will give you a nice, rich patriotic blue.
Pro Tip: If you want a deeper, more vibrant red, do two coats on your striped plate as well. Red paint can sometimes look a little washed out on the first pass.
Step 2: Cut the Star
Once your blue paint is dry, it’s time to cut out your star from the second paper plate. You can freehand it (which gives it a sweet, homemade feel) or lightly sketch a star shape first with a pencil if you’d like more precision.
Aim for a star that’s large enough to sit prominently at the top of your wind catcher – about 4 to 5 inches from point to point works well.
Go ahead and paint the star blue on both sides if you haven’t already. Set it aside to dry.
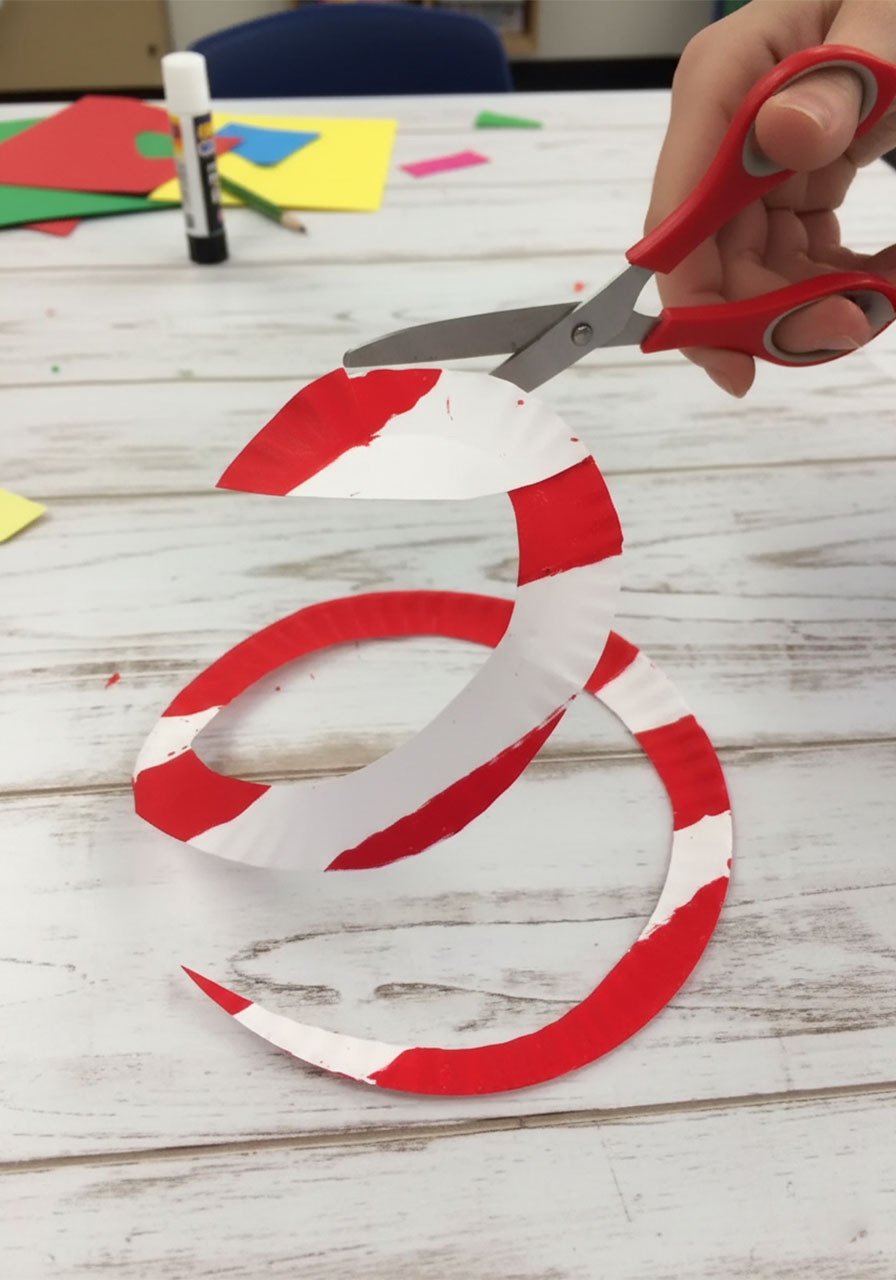
Step 3: Cut the Spiral
Here’s where the magic happens! Take your fully dry striped plate and cut it into a spiral.
Start at the outer edge of the plate and cut in a continuous circular motion – like you’re peeling an apple – working your way toward the center. The goal is one long, connected spiral strip.
Don’t worry if it’s not perfectly uniform. The natural variation in width actually adds to the movement and visual charm when it catches the breeze. When you hold it up and let it dangle, you’ll see it stretch out into a beautiful swirly shape. It’s so satisfying!
Pro Tip: Cut slowly and steadily. Rushing can cause the spiral to tear where it’s thin near the center.
Step 4: Punch the Holes
Now grab your hole punch. You’ll need to make three small holes:
One hole at the top of the star – for hanging
One hole at the bottom of the star – for attaching the spiral
One hole at the very top (largest) end of the spiral – to connect to the star
Take your time placing these holes so everything lines up nicely when assembled. A centered hole on the star looks the cleanest.
Step 5: Assemble Your Wind Catcher
You’re in the home stretch – time to put it all together!
1. Cut a piece of ribbon or string about 6–8 inches long.
2. Thread it through the bottom hole of the star and the top hole of the spiral, then tie it in a secure knot. This connects your swirly tail to the star.
3. Cut another piece of ribbon or string about 10–12 inches long.
4. Thread it through the top hole of the star and tie it into a loop. This is your hanging loop – the part that goes over a hook or nail on your porch.
Give it a gentle tug to make sure everything is secure, then hold it up and let it spin. That first moment when the spiral catches the air? Pure joy.
Tips to Make It Even Better
Want to take your wind catcher to the next level? Here are a few easy upgrades:
Add glitter: While the paint is still wet on the star, sprinkle on some silver or gold glitter for a dazzling sparkle effect.
Use patriotic ribbon: Swap plain string for a red-and-white striped ribbon or a blue grosgrain ribbon for a more polished look.
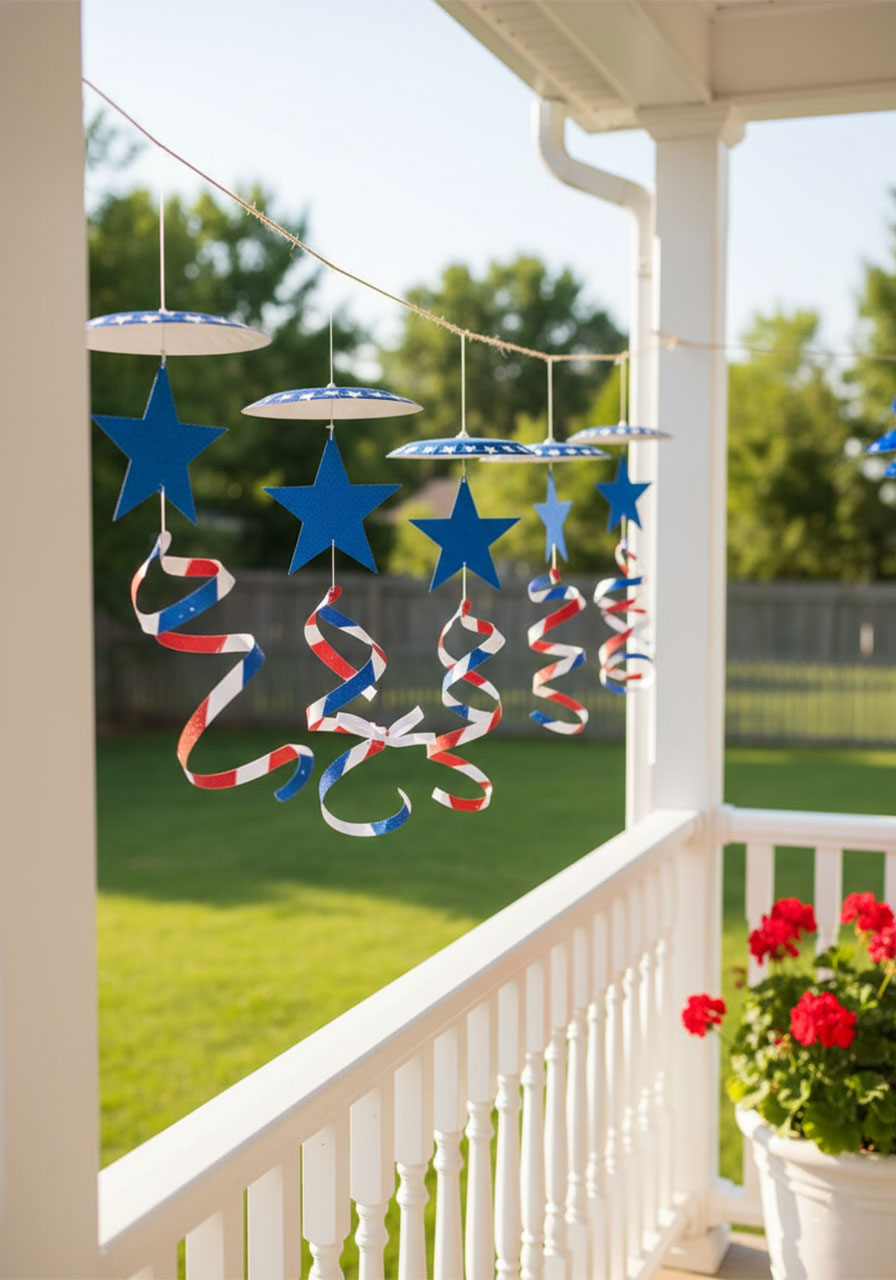
Make a garland: Create several wind catchers and hang them in a row across your porch railing for a festive summer display.
Let the kids personalize it: Have them write their names or draw stars on the back of the plate before painting. It becomes a little keepsake!
Where to Hang Your Wind Catcher
The best part about this craft is how versatile it is as a decoration. Here are some of our favorite spots:
From a porch hook or railing
In a sunny window where it’ll catch the light
On a tree branch in the backyard during your 4th of July cookout
As a festive centerpiece hung above the party table
In a kid’s bedroom window as a summer room decoration
Wherever you hang it, it’s guaranteed to spark smiles and compliments. People always love a handmade touch.
Why We Love This Craft
In a world of Amazon Prime and mass-produced party décor, there’s something genuinely grounding about sitting down with your kids and making something with your hands. It slows the summer down in the best way.
This wind catcher is more than just a decoration – it’s an afternoon well spent, a mess that’s totally worth it, and a little piece of pride you get to hang on your front porch for the whole neighborhood to see.
It’s the kind of craft that makes your home feel lived-in, loved, and full of personality. And honestly? That’s exactly the vibe we’re going for.
Frequently Asked Questions
What age is this craft good for?
This craft works great for kids ages 4 and up! Younger ones can help with painting, while older kids can handle cutting (with supervision). It’s a wonderful activity to do together – no experience needed.
Can I use watercolor paint instead of acrylic?
You can, but acrylic paint will give you much bolder, more vibrant colors that hold up better outdoors. Watercolor tends to be too transparent on paper plates. Stick with acrylic for the best results!
How long will it last outside?
Since it’s made from paper plates, it’s best for covered porches or short-term outdoor display. Bring it in if rain is expected to help it last through the whole season!
Can I make this ahead of time?
Absolutely! Make it a day or two before your party or cookout. Just let all the paint dry fully before assembling, and store it flat so the spiral doesn’t get bent out of shape.
What if I don’t have a hole punch?
No problem! Carefully use a pushpin or the tip of a sharp pencil to poke a small hole through the paper plate. It works just as well for threading the string through.
So there you have it – a Patriotic Paper Plate Wind Catcher that’s cheerful, creative, and completely doable on any budget. Whether you’re hosting a 4th of July bash, setting up for a Memorial Day cookout, or just want to add some festive flair to your front porch, this craft delivers every single time.
Go make something beautiful this summer. You’ve got this!
More 4th of July Ideas to Keep the Fun Rolling:
Memorial Day Star Fingerprint Craft for Kids (Star Template!)
Simple Paper Plate Flag Craft for Kids (Patriotic Activity)
Coffee Filter Watercolor Fireworks Craft: The Most Magical 4th of July Activity for Kids
12 Fun & Creative Memorial Day Crafts for Kids (Patriotic Activities the Whole Family Will Love)
Bald Eagle Craft for Kids: Template + Step-by-Step Guide for Groups of 20!
Patriotic Star Suncatcher Craft: The Easiest 4th of July Activity That Kids AND Adults Will Love
How to Make a Tin Can Fireworks Centerpiece (Easy Patriotic Craft for 4th of July)