
St. Patrick’s Day is just around the corner, and we’ve got you covered with the ultimate lineup of kid-friendly crafts that are big on fun and low on stress. Whether you’re a parent looking to keep little hands busy or a teacher planning the perfect classroom activity, these ideas are designed to spark creativity without the chaos.
Get ready for shamrocks, rainbows, leprechauns, and plenty of glitter (because what’s a craft session without a little sparkle?). We’ve tested these projects so you don’t have to guess what works – each one delivers maximum fun with minimal prep time.
Let’s dive into these lucky crafts!
1. Lucky You Treat Bucket

Turn a simple metal bucket into the most charming St. Patrick’s Day gift ever! This craft is perfect for creating special treats for classmates, neighbors, or that one teacher who deserves all the gold.
Best for: Kids ages 6+, classroom parties, gift-giving
Time to Complete: 30-40 minutes (plus drying time)
Mess Level: Low
What You’ll Need:
Small gold metal bucket (find them at craft stores)
Black spray paint
Green and black vinyl or craft foam
Chocolate gold coins or foil-wrapped candies
Black and white polka dot tissue paper or napkin
Scissors and glue
How to Make It:
1. Prep your bucket. If you want contrast, lightly spray paint sections of your gold bucket with black. Let it dry completely (about 30 minutes).
2. Create your design. Cut out the words “Lucky You” from green and black vinyl or foam. Layer black behind green for a fun 3D effect.
3. Stick it on. Apply your design to the front of the bucket. Press firmly and smooth out any bubbles.
4. Fill with treats. Line the bucket with festive tissue paper, then load it up with chocolate gold coins or wrapped candies.
Pro Tip: Make an assembly line with kids – one bucket per child. Let them personalize their buckets with different designs like “Pot of Gold,” “Lucky Friend,” or their own names!

2. Leprechaun Lookers (DIY Binoculars)

These adorable “binoculars” turn any kid into an official leprechaun hunter! They’re surprisingly easy to make and will keep little ones entertained for hours as they search for sneaky leprechauns hiding around the house or classroom.
Best for: Preschool through 2nd grade, active play
Time to Complete: 20-30 minutes
Mess Level: Medium (glue and glitter alert!)
What You’ll Need:
2 empty toilet paper rolls per child
Green construction paper
Glue stick and white glue
Scissors
Pipe cleaners (any color)
Sequins, pom-poms, and craft jewels
Hole punch
Green yarn or string (about 24 inches)
How to Make It:
1. Wrap those rolls. Have kids wrap each toilet paper roll in green construction paper and glue it down. This is the base of your binoculars.
2. Connect them together. Glue the two rolls side by side. Let the glue set for a few minutes so they stay put.
3. Add the neck strap. Punch a hole on the outer side of each roll. Thread your green yarn through both holes and tie secure knots. This creates a wearable strap.
4. Time to decorate! Here’s where kids can go wild. Provide pom-poms, sequins, pipe cleaners, and jewels. Let them glue decorations all over their lookers – the more bling, the better for spotting leprechauns!
5. Let them dry, then hunt! Once dry, kids can wear their lookers and search for hidden gold coins or leprechaun footprints you’ve secretly placed around the room.
Fun Variation: Hide small prizes around your space and let kids use their lookers to search for treasure. The first one to find five items wins a special prize!
3. Rainbow Rain Stick

This craft combines art, music, and a little bit of magic! Kids will love hearing the gentle rain sound their creation makes, and you’ll love how it incorporates learning about rainbows and St. Patrick’s Day traditions.
Best for: PreK through 3rd grade, sensory play
Time to Complete: 45 minutes to 1 hour
Mess Level: High (paint involved!)
What You’ll Need:
Paper towel tubes (one per child)
Aluminum foil
Rice (2-3 tablespoons per tube)
Acrylic paint in rainbow colors
Paintbrushes
Black glitter foam sheet
Gold bells and gold pipe cleaners
Cotton balls
Gold glitter
White glue
Masking tape
How to Make It:
1. Seal one end. Cut a piece of foil large enough to cover one end of the tube (make it 3-4 layers thick for durability). Wrap it around the end and secure with masking tape – really wrap that tape to make it sturdy!
2. Add the rain. Pour 2-3 spoonfuls of rice into the open end of the tube. Seal the other end with foil and tape, just like you did the first end.
3. Create the pot of gold. Cut black glitter foam to wrap around one end of the tube (about 2 inches wide). This becomes the “pot.” Glue it in place and add a circular piece to cover the end.
4. Paint your rainbow. On the opposite end, paint rainbow stripes around the tube (red, orange, yellow, green, blue, purple). Let the paint dry completely – this is a great stopping point if doing this over two sessions!
5. Add the clouds. Gently pull apart cotton balls to make them fluffy (not too poofy). Glue them to the end of the tube above the rainbow.
6. Sprinkle the gold. Add glue above the black pot section and sprinkle with gold glitter. Let dry completely.
7. Attach the bells. String 3-4 gold bells onto a gold pipe cleaner. Wrap it around the tube at the top of the black pot section and secure with glue.
Pro Tip: Play traditional Irish music while kids shake their rain sticks for an impromptu St. Patrick’s Day parade!
4. Paper Plate Pot of Gold
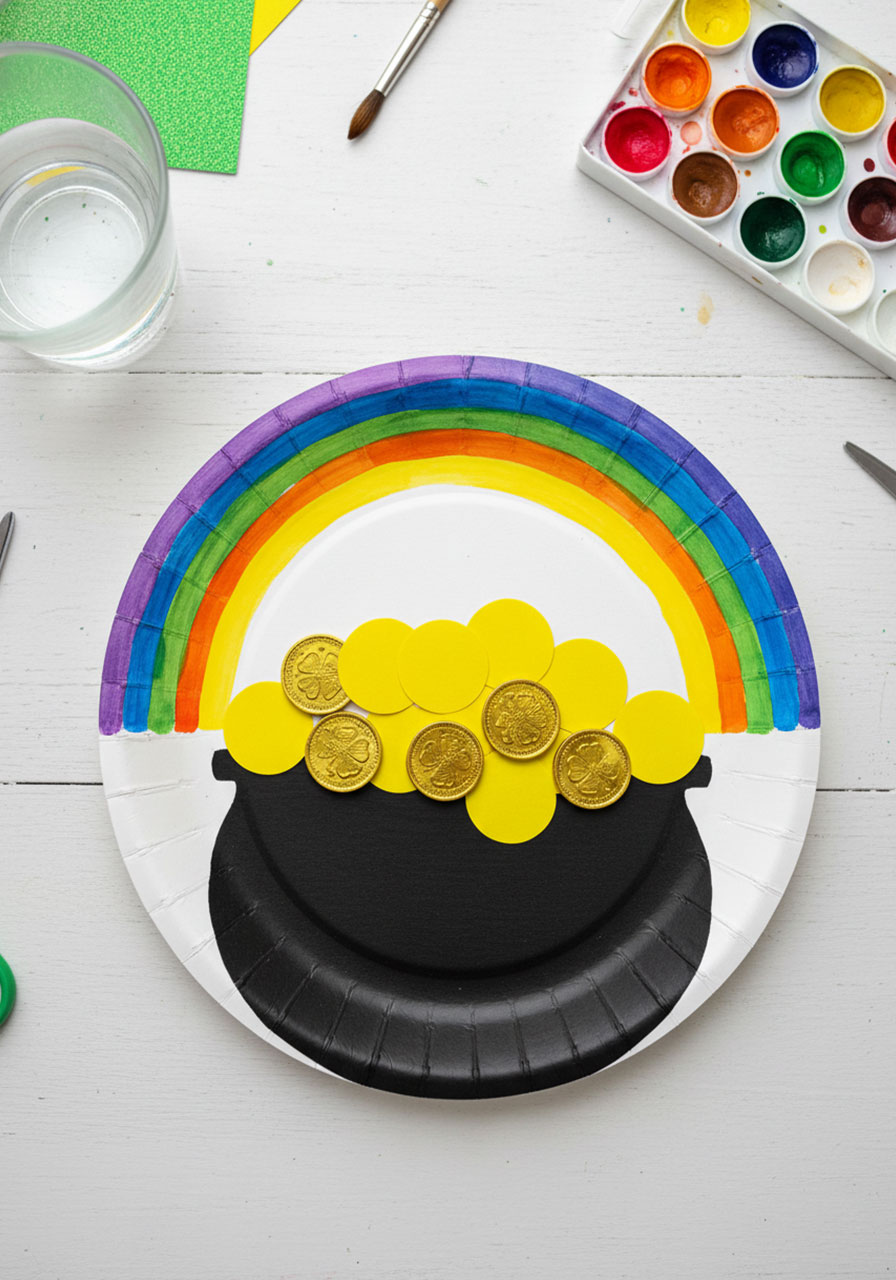
This watercolor craft is absolutely stunning when finished, and it’s way easier than it looks. Kids will beam with pride when they see their rainbow masterpiece!
Best for: PreK through 5th grade, all skill levels
Time to Complete: 30-40 minutes
Mess Level: Medium
What You’ll Need:
Paper plates (one per child)
Watercolor paints
Paintbrushes and cup of water
Scissors
Yellow construction paper or plastic gold coins
Glue (Fabri-Tac works great for coins)
Black paint or marker
How to Make It:
1. Cut your plate. Cut a semi-circle from the middle of the paper plate, leaving the outer rim completely intact. The rim becomes your rainbow!
2. Paint the rainbow. On the top curved section, paint rainbow stripes (remember ROY G BIV: red, orange, yellow, green, blue, indigo, violet). Watercolors create a beautiful soft effect!
3. Create the pot. Paint the bottom half of the plate black. This is your pot of gold.
4. Let it dry. While the paint dries, cut out small circles from yellow paper or gather your plastic coins.
5. Add the gold. Once everything is dry, glue coins to the back of the plate so they peek out from behind the black pot. Layer a few for a 3D effect!
Fun Variation: Skip watercolors and use tissue paper squares instead! Kids can glue small pieces of colored tissue paper onto the plate for a mosaic rainbow effect.
5. Paper Plate 4-Leaf Clover
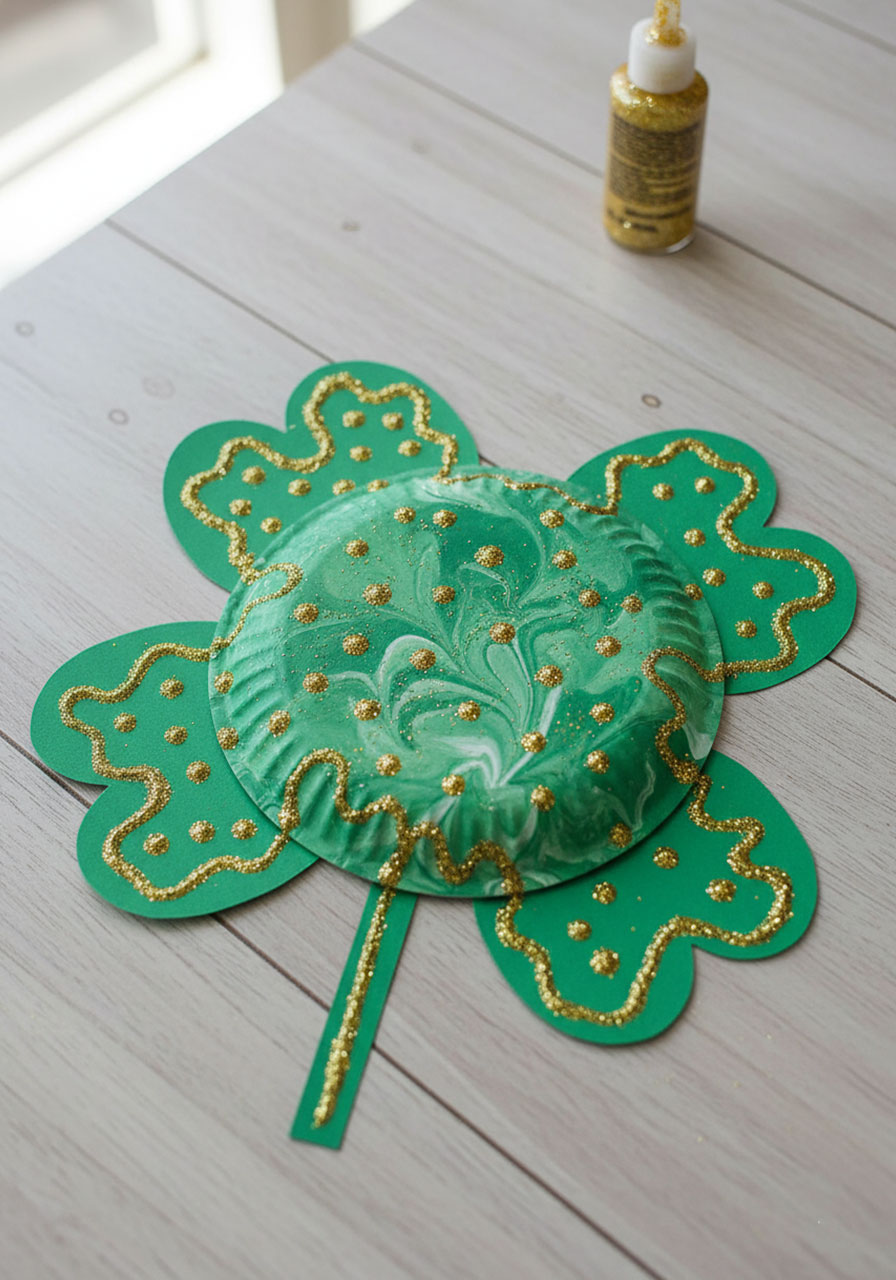
Sometimes the simplest crafts create the most magical results. This paint-mixing project teaches color theory while making an adorable St. Patrick’s Day decoration!
Best for: Toddlers through 2nd grade
Time to Complete: 25-35 minutes
Mess Level: Medium to High
What You’ll Need:
Paper plates (one per child)
Green and white paint
4 green paper hearts (cut from construction paper)
Green construction paper (for stem)
Glue or tape
Gold glitter
Scissors
How to Make It:
1. Mix the paint. Give kids white and green paint right on their paper plate. Let them mix the colors together – they’ll love watching the shades of green appear! No need to mix it perfectly; swirls are beautiful.
2. Let it dry. Set plates aside to dry completely (about 20-30 minutes).
3. Add the leaves. While waiting, cut 4 heart shapes from green construction paper (or have older kids cut their own). Cut a stem from green paper too.
4. Attach the clover. Once the plate is dry, tape or glue the 4 hearts around the edge of the plate with points facing inward, creating a clover shape. Add the stem at the bottom.
5. Glue on patterns. Have kids squeeze glue in swirls, dots, or any pattern they like onto their clover.
6. Glitter time! Sprinkle gold glitter over the glue. Let dry, then gently shake off excess glitter over a tray (so you can reuse it!).
Pro Tip: Set up a “glitter station” with a large tray or box lid underneath to catch excess sparkle. Your floors will thank you!
6. Toilet Paper Roll Leprechauns

These little guys are absolutely adorable and full of personality! Each leprechaun will look unique, making this the perfect craft for celebrating what makes each child special.
Best for: PreK through 4th grade
Time to Complete: 35-45 minutes
Mess Level: Medium
What You’ll Need:
Empty toilet paper rolls (one per child)
Green glitter paper or foam
Black foam paper
Gold glitter paper
Paint (skin tone and pink for cheeks)
Small googly eyes
Small black buttons
Orange pom-poms (1 small for nose, several large for beard)
Black marker
Glue
How to Make It:
1. Wrap the body. Cut a strip of green glitter paper to wrap around the bottom 2/3 of the toilet paper roll. This is the leprechaun’s suit. Glue it in place.
2. Paint the face. Paint the top third of the roll with a skin-tone color. Let it dry.
3. Build the hat. Roll green glitter paper into a tube shape for the top of the hat. Cut a strip of black foam and wrap it around the base (the hat band). Create a tiny buckle from gold glitter paper – cut a small square, then cut a smaller square from its center. Glue the buckle onto the black band.
4. Make the brim. Cut a circle from green glitter paper. Poke the top of the hat through the center of the circle to create the brim. Glue in place.
5. Create the beard. Starting at the center bottom of the face, glue large orange pom-poms in a semicircle to create a bushy leprechaun beard. Build it up toward the sides of the face.
6. Add facial features. Glue on googly eyes, add a small orange pom-pom for the nose, and glue a black button for the mouth. Paint two small pink circles for rosy cheeks.
7. Top it off! Glue the completed hat to the top of the leprechaun’s head.
8. Add personality. Use a black marker to draw a smile or any expression you want!
Pro Tip: Have kids name their leprechauns and create backstories. “This is Lucky Larry – he loves hiding gold coins in shoes!”
7. Magic Fizzing Shamrocks
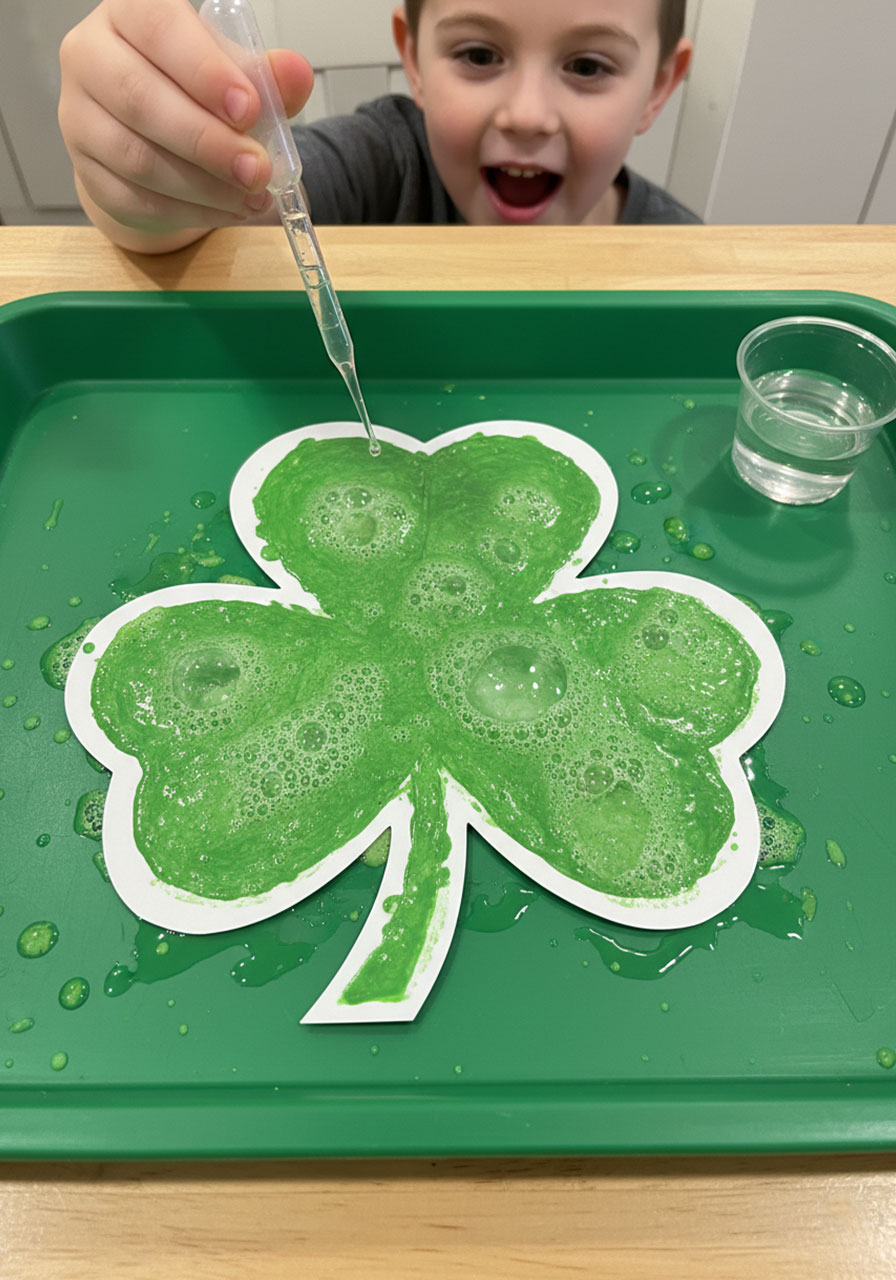
This is where art meets science, and kids go absolutely wild! The fizzing reaction never gets old, and you’ll have children begging to do this one again and again.
Best for: PreK through 3rd grade, STEM learning
Time to Complete: 20-30 minutes (plus fizzing fun!)
Mess Level: High (but worth it!)
What You’ll Need:
White paper cut into shamrock shapes
Baking soda
Green tempera paint
Paintbrushes
Small cups or bowls
White vinegar
Plastic pipettes or droppers
Large tray (to contain the mess!)
How to Make It:
1. Mix the fizzy paint. In a bowl, mix green tempera paint with baking soda (about 2 tablespoons of baking soda per 1/4 cup of paint). Stir until well combined.
2. Paint the shamrock. Place the shamrock cutout on a tray. Let kids paint the entire shamrock with the fizzy paint mixture. Encourage them to apply it thick!
3. Let it dry slightly. Wait about 2-3 minutes for the paint to set just a bit (it doesn’t need to be completely dry).
4. Prepare the magic potion. Pour white vinegar into small cups. Give each child a pipette or dropper.
5. Make it fizz! Let kids drop vinegar onto their painted shamrocks and watch the magic happen. The baking soda and vinegar will react, creating an exciting fizzing and bubbling effect!
6. Keep experimenting. Kids can keep adding vinegar to see how long they can keep the reaction going.
Pro Tip: Talk about the science! Explain that baking soda (a base) and vinegar (an acid) create a chemical reaction that produces carbon dioxide gas – that’s what makes the bubbles!
8. Wee Little Pot of Gold Cake Pops

These adorable treats are easier than they look and taste absolutely delicious! Perfect for classroom parties or family celebrations, they’re guaranteed to impress.
Best for: Ages 8+ (with adult supervision), special occasions
Time to Complete: 2 hours (includes chilling time)
Mess Level: Medium
What You’ll Need:
1 box vanilla cake mix (plus ingredients listed on box)
Green food coloring
1 container green frosting
Chocolate candy melts
Lollipop sticks
Yellow Sour Skittles or yellow M&Ms
Parchment paper
Floral foam or styrofoam block
How to Make It:
1. Bake the green cake. Prepare cake mix according to box directions, but add green food coloring to the batter until you get a nice shamrock green. Bake as directed and let cool completely.
2. Crumble and mix. Once cool, crumble the entire cake into fine crumbs in a large bowl. Add the container of green frosting and mix with your hands until it forms a dough-like consistency.
3. Chill overnight. Cover the bowl and refrigerate overnight (or at least 4 hours). This makes the mixture easier to work with.
4. Roll the pots. Roll the chilled mixture into small balls (about 1.5 inches in diameter).
5. Add the sticks. Melt a small amount of chocolate candy melts. Dip the tip of each lollipop stick into the melted chocolate, then insert into a cake ball. This helps the stick stay put. Place all the cake pops back in the fridge for 15 minutes.
6. Create the pot shape. Melt the remaining chocolate candy melts according to package directions. Dip each cake pop into the chocolate, coating it completely. Gently tap off excess chocolate.
7. Form the pots. Place each dipped cake pop upside down on parchment paper to dry. The chocolate will drip down slightly, creating a pot shape. Let them set completely (about 20 minutes).
8. Add the gold. Once dry, flip the cake pops right side up and stick them into floral foam to hold them. Dip yellow Sour Skittles or M&Ms into melted chocolate and place them on top of each “pot” to look like gold coins.
Fun Variation: Make some pots with rainbow sprinkles mixed into the cake for a surprise inside!
9. Super Sparkly St. Patrick’s Day Playdough

This glitter-loaded playdough is absolutely mesmerizing! Kids will play with this for hours, and the homemade recipe means you know exactly what’s in it.
Best for: Ages 2+, sensory play
Time to Complete: 20 minutes to make, hours of play!
Mess Level: Medium (glitter everywhere, but controllable)
What You’ll Need (for each color):
3 cups all-purpose flour
1/2 cup salt
6 tablespoons cream of tartar
3 tablespoons vegetable oil
3 cups water
Food coloring (yellow for gold, green for shamrock)
1/2 to 1 cup glitter (gold or green)
Large pot
Spoon for stirring
How to Make It:
1. Mix the ingredients. Add all ingredients (flour, salt, cream of tartar, oil, water, food coloring, and glitter) to a large pot. Stir until smooth and no lumps remain.
2. Cook it up. Place the pot over low heat. Stir constantly as the mixture heats. It will start to thicken and pull away from the sides of the pot.
3. Check for doneness. When the dough forms a ball and is still slightly sticky but mostly pulling together, turn off the heat. This usually takes 5-8 minutes.
4. Cool and knead. Carefully dump the dough onto a clean counter (it will be hot!). Once it’s cool enough to handle, knead it for 2-3 minutes until it’s smooth and no longer sticky. If it’s still tacky, knead in a tiny bit more flour.
5. Let them play! Set out the playdough with fun additions like gold coins, shamrock cookie cutters, small leprechaun figures, or green gems.
Pro Tip: Store the playdough in airtight containers or zip-top bags. It will last for several months! Make both colors and let kids mix them to experiment with color blending.
Play Ideas:
- Make leprechaun houses and hide gold coins inside
- Create shamrock shapes and decorate with gold coins
- Roll “snakes” to make rainbow shapes
- Build miniature pots to fill with gold
10. Rainbow Paper Shamrocks (3D Paper Art)

These stunning shamrocks look incredibly intricate, but they’re made with just construction paper and some clever folding! The rainbow layers create a jaw-dropping 3D effect that wows everyone.
Best for: 2nd grade and up
Time to Complete: 30-40 minutes
Mess Level: Low (just paper scraps!)
What You’ll Need:
Construction paper in rainbow colors (red, orange, yellow, green, blue, purple)
Scissors or paper cutter
Stapler
Hot glue gun (adult use) or strong craft glue
One button
Ruler
How to Make It:
1. Cut your strips. Measure and cut 1-inch wide strips from each piece of construction paper. Most standard construction paper is 9 inches wide, which gives you 8 strips per color plus one for the stem – perfect!
2. Stack in rainbow order. Layer your strips with green on the outside, then blue, purple, red, orange, and yellow in the center. This creates the rainbow effect.
3. Create graduated lengths. Slide each color back about 1 inch from the previous color. The green should be longest, yellow shortest. Once arranged, trim all the uneven ends so one side is flush. Staple this end together.
4. Form a teardrop. Starting with the yellow (shortest) strip, fold it down to meet the stapled end, creating a teardrop or heart shape. Hold it in place.
5. Add each layer. Fold each color down one at a time (orange, red, purple, blue, green), creating larger and larger layers. Staple all the ends together when you reach the green.
6. Make heart shapes. You now have one rainbow teardrop! Create a second one the same way. Place them side by side and staple or glue them together at the wide part to form a heart.
7. Build the shamrock. Repeat steps 1-6 to create a total of 4 hearts (you’ll need to make 8 teardrops total).
8. Create the stem. For the final teardrop, make it as usual but then trim off the rounded top to create a straight stem shape.
9. Assemble the clover. Arrange your 4 hearts in a clover pattern with the stem at the bottom. Apply hot glue down the center where all pieces meet. Place a button in the middle to hide the seam and add extra hold.
10. Secure it. Flip the shamrock over and add another line of glue down the center back for extra support.
Pro Tip: Hang these from the ceiling with fishing line for a floating shamrock display, or attach a magnet to the back for refrigerator decorations!
11. Rainbow Shamrock Suncatchers
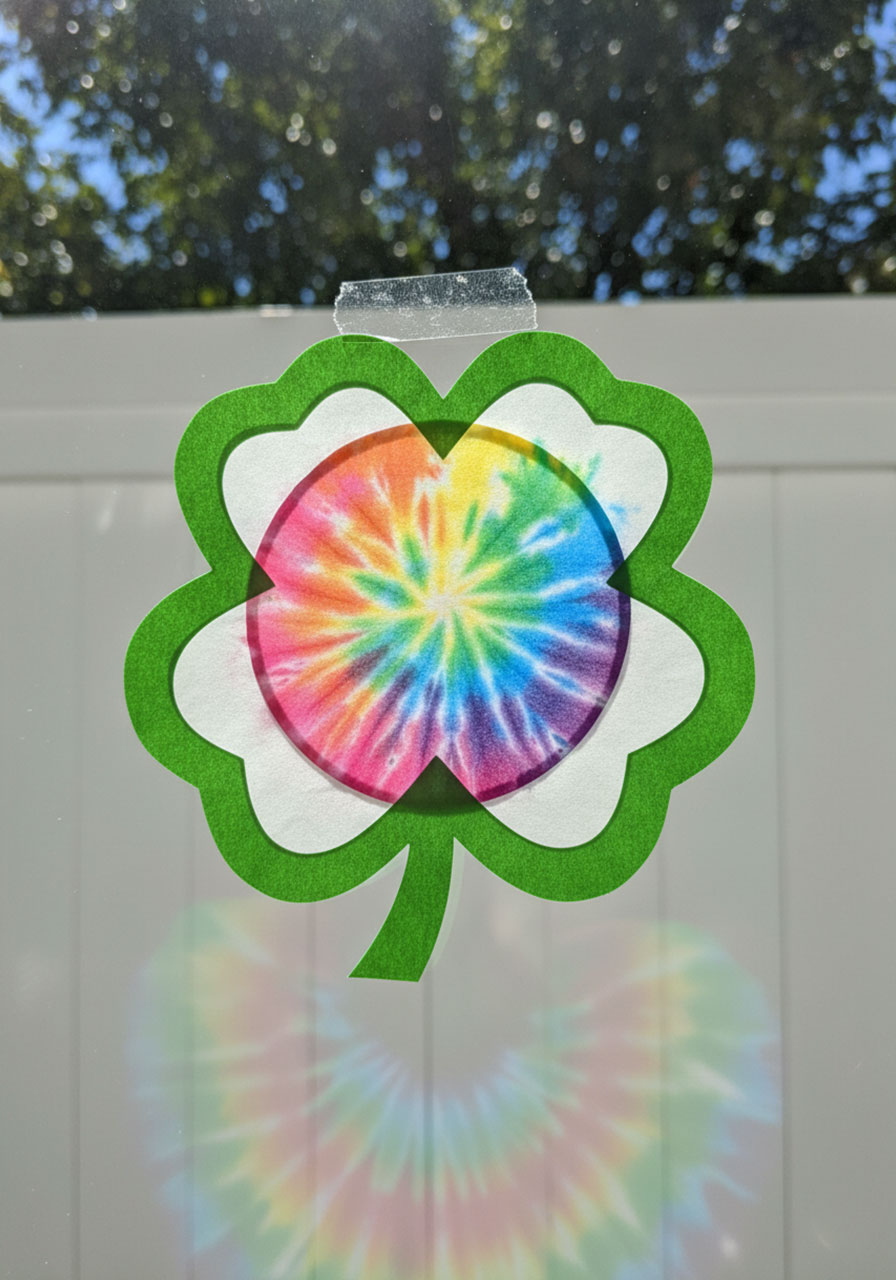
These magical suncatchers turn your windows into a St. Patrick’s Day wonderland! When the sun shines through them, they cast the most beautiful rainbow colors around the room.
Best for: PreK through 5th grade
Time to Complete: 40 minutes (includes drying time)
Mess Level: Medium
What You’ll Need:
White coffee filters (one per child)
Washable markers
Spray bottles filled with water
Paper towels
Green construction paper
Scissors
Glue stick or clear tape
How to Make It:
1. Color the filter. Give each child a coffee filter and washable markers. Have them color their entire filter, filling in all the white space. For rainbow shamrocks, encourage them to make rainbow stripes or sections. The more color, the better!
2. Set up for spraying. Lay decorated coffee filters on paper towels (this absorbs the excess water and protects your surface).
3. Spray with water. Let kids spray their colored filters with water. Watch as the colors blend, swirl, and create beautiful tie-dye effects! This is pure magic for little ones.
4. Dry completely. Let the coffee filters dry flat for 20-30 minutes (or until completely dry to the touch).
5. Make the frame. While filters dry, fold a piece of green construction paper in half, then fold it in half again. You now have a folded square.
6. Cut the shamrock. Using the inner corner of your folded paper as your starting point (this is the center of your shamrock), cut a heart shape. Keep the sides of your paper intact – don’t cut through them! When you unfold, you’ll have a shamrock-shaped hole.
7. Create the border. Fold the paper again the same way. Cut around the shamrock shape about 1/4 to 1/2 inch outside the original cut. This creates a frame. Set aside the solid shamrock shape for another project.
8. Assemble the suncatcher. Place the shamrock frame on top of a dried coffee filter. Use glue stick or clear tape to attach the frame to the filter.
9. Trim the excess. Use scissors to carefully cut away the extra coffee filter around the frame.
10. Display your art! Tape the suncatchers to windows where they’ll catch the sunlight. The light shining through creates the most beautiful stained-glass effect!
Fun Variation: Make frames in different shapes – hearts, circles, or even letters of your child’s name!
12. Leprechaun Trap STEM Challenge
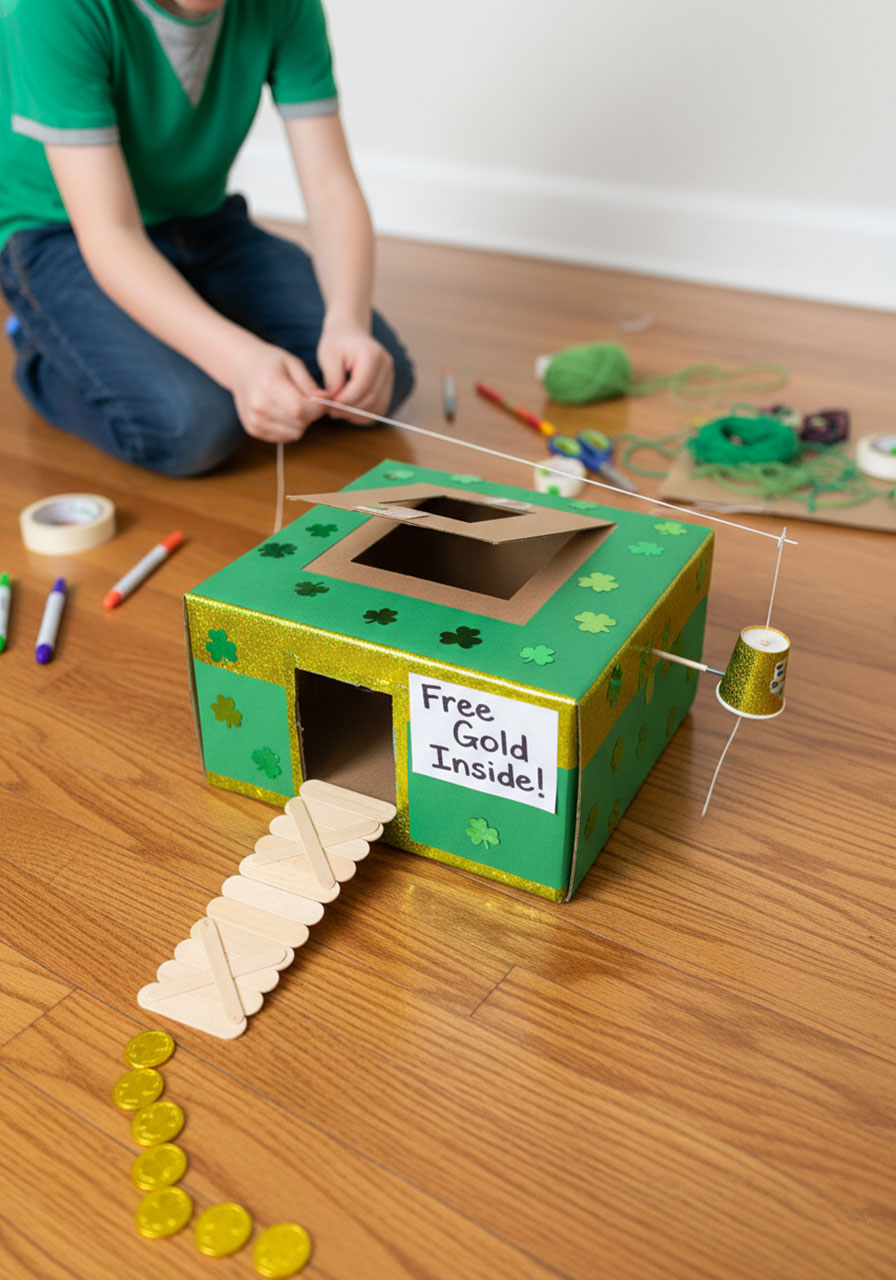
This isn’t just a craft – it’s an engineering adventure! Kids will use problem-solving skills, creativity, and a whole lot of imagination to design a trap clever enough to catch a sneaky leprechaun.
Best for: 1st grade and up, STEM learning
Time to Complete: 45 minutes to 1 hour
Mess Level: Medium to High
The Challenge: Design and build a working trap that could catch a leprechaun and protect his pot of gold!
What You’ll Need:
Cardboard box (shoebox size works great)
Popsicle sticks
Paper cups
String or yarn
Tape and glue
Green and gold construction paper
Scissors
Small toy gold coins
Aluminum foil (for “gold”)
Markers
Any other craft supplies you have on hand!
How to Make It:
1. Discuss trap mechanics. Start by talking about how traps work. What makes a good trap? (bait, a trigger mechanism, something to catch or contain). Brainstorm ideas together: trap doors, cages, net traps, etc.
2. Design the trap. Have kids sketch their trap design on paper first. Where will the leprechaun enter? What’s the bait? What triggers the trap? How does it catch him?
3. Build the base. Use the cardboard box as the foundation. Kids can cut doors, windows, or openings. They might turn the box on its side, cut a hole in the top, or modify it however their design requires.
4. Create the trigger. This is the trickiest part! Some ideas:
- A trap door that drops when the leprechaun steps on it (use a paper cup balanced on a pencil)
- A net that pulls up when string is tugged (attach string to coins so when they’re grabbed, the net lifts)
- A cage door that closes when bait is taken (balance a box lid so it falls)
5. Set the bait. Place shiny gold coins, “gold” wrapped in foil, or rainbow treats inside the trap where the leprechaun can see them.
6. Decorate the trap. Cover the outside with green and gold paper, draw shamrocks, create rainbow paths leading to the entrance, add signs that say “Free Gold Inside!” or “Leprechaun Welcome!”
7. Add special touches. Think about what would attract a leprechaun:
- A tiny ladder to climb inside
- A shamrock welcome mat
- Glitter paths (leprechauns love shiny things!)
- A mirror (leprechauns are known to be a bit vain!)
8. Test the trap. Before the big day, test the trigger mechanism. Does it work? Make adjustments if needed.
9. Set it overnight. Place the trap somewhere special on St. Patrick’s Day eve. In the morning, check for “evidence” that a leprechaun visited – maybe he left green footprints, scattered gold coins, or left a cheeky note!
Pro Tip for Teachers/Parents: After kids go to bed or leave for the day, “spring” the trap and leave evidence of a leprechaun visit – gold coins scattered around, tiny green footprints (cut from foam), or a note from the leprechaun thanking them for the trap but saying he was too clever to get caught!
Engineering Questions to Ask:
- What type of trigger will work best?
- How can you test if your trap works?
- What would make a leprechaun trust this trap?
- If your first design doesn’t work, what can you change?
13. Edible Rainbow Fruit Kabobs with Marshmallow Clouds
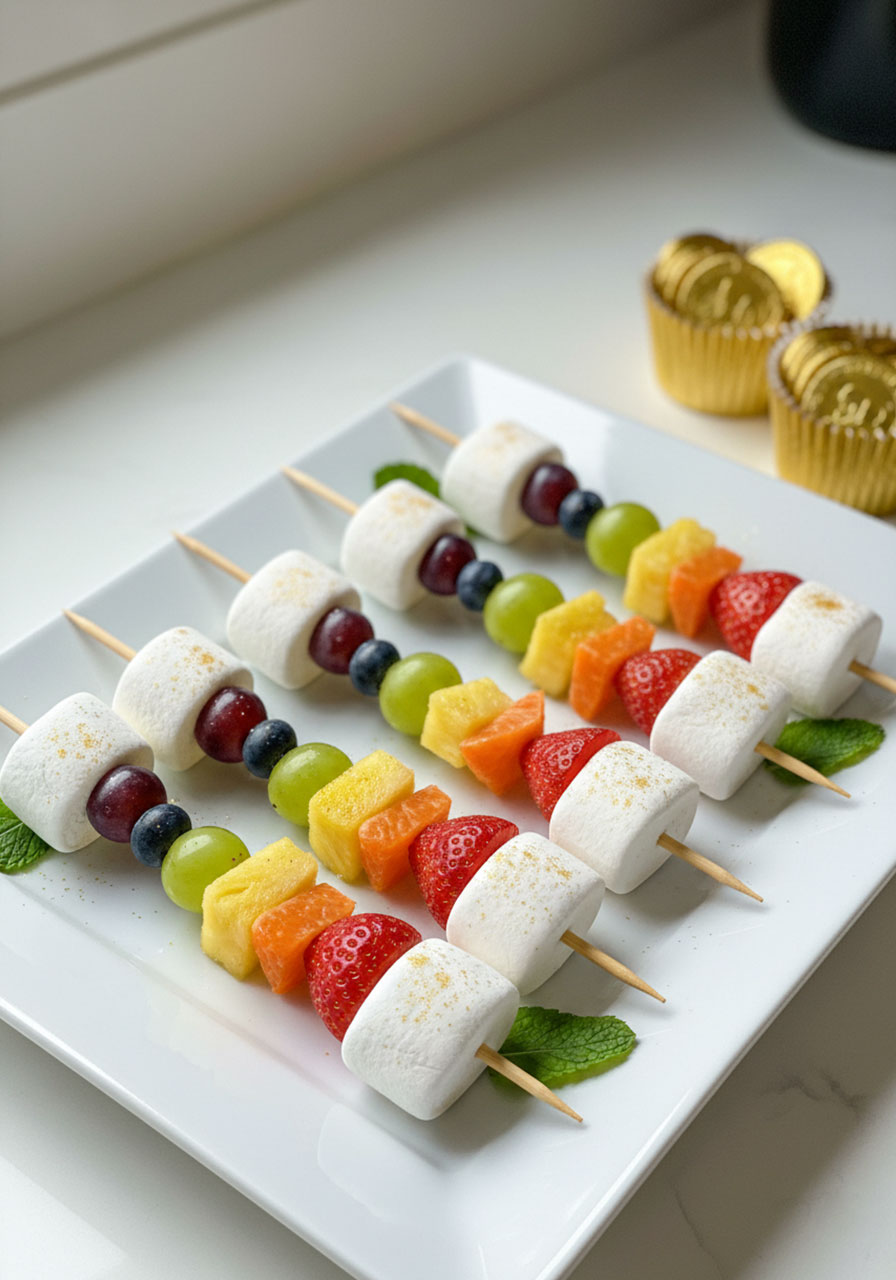
Who says crafts can’t be delicious? These rainbow kabobs are almost too pretty to eat (but don’t worry, kids will still devour them!). It’s a healthy, fun, and colorful activity that doubles as a tasty snack.
Best for: All ages (with supervision for young children with skewers)
Time to Complete: 20-30 minutes
Mess Level: Low to Medium
What You’ll Need:
Wooden skewers or lollipop sticks
Strawberries (red)
Mandarin oranges or cantaloupe chunks (orange)
Pineapple chunks (yellow)
Green grapes or kiwi slices (green)
Blueberries (blue)
Purple grapes (purple)
Large marshmallows (for clouds)
Gold-wrapped chocolate coins
Small paper cups (optional, for the “pot”)
Gold glitter edible spray or gold sprinkles (optional)
How to Make It:
1. Prep the fruit. Wash all fruit thoroughly. Cut strawberries in half, peel and separate mandarin oranges, cube pineapple, and halve grapes if they’re too large. Slice kiwi into rounds if using.
2. Gather your builders. Set up a “rainbow building station” with all the fruit organized in separate bowls in rainbow order (red, orange, yellow, green, blue, purple).
3. Start with the cloud. Thread 2-3 marshmallows onto the bottom of each skewer. Push them down to the very end – this is your pot of gold’s cloud base!
4. Build the rainbow. Working from bottom to top (or top to bottom – either works!), add fruit in rainbow order:
- Strawberry half (red)
- Mandarin segment or cantaloupe (orange)
- Pineapple chunk (yellow)
- Green grape or kiwi (green)
- Blueberries (blue)
- Purple grape (purple)
5. Add the second cloud. Top the rainbow with 2-3 more marshmallows at the other end.
6. Create the pot of gold (optional). Fill small paper cups with gold-wrapped chocolate coins. Place your rainbow kabob in the cup so the marshmallow cloud sits on top of the “pot.”
7. Add sparkle (optional). Lightly spray the marshmallows with edible gold glitter spray or sprinkle with gold sugar for extra pizzazz!
8. Arrange and serve. Display all the rainbow kabobs on a large platter. Watch them disappear in seconds!
Pro Tip: Make this a “build-your-own” activity! Set out all the ingredients and let each child create their own rainbow. Some will follow the color order perfectly, others will make creative combinations – both are wonderful!
Health Hack: Serve with a yogurt dip flavored with honey and vanilla for an extra special treat. You can even add green food coloring to make “shamrock dip!”
Educational Bonus: While building, talk about:
- The order of rainbow colors (ROY G BIV)
- Where rainbows come from
- Why we eat colorful foods (different colors = different nutrients!)
- The legend of leprechauns hiding gold at the end of rainbows
14. Glowing Shamrock Slime
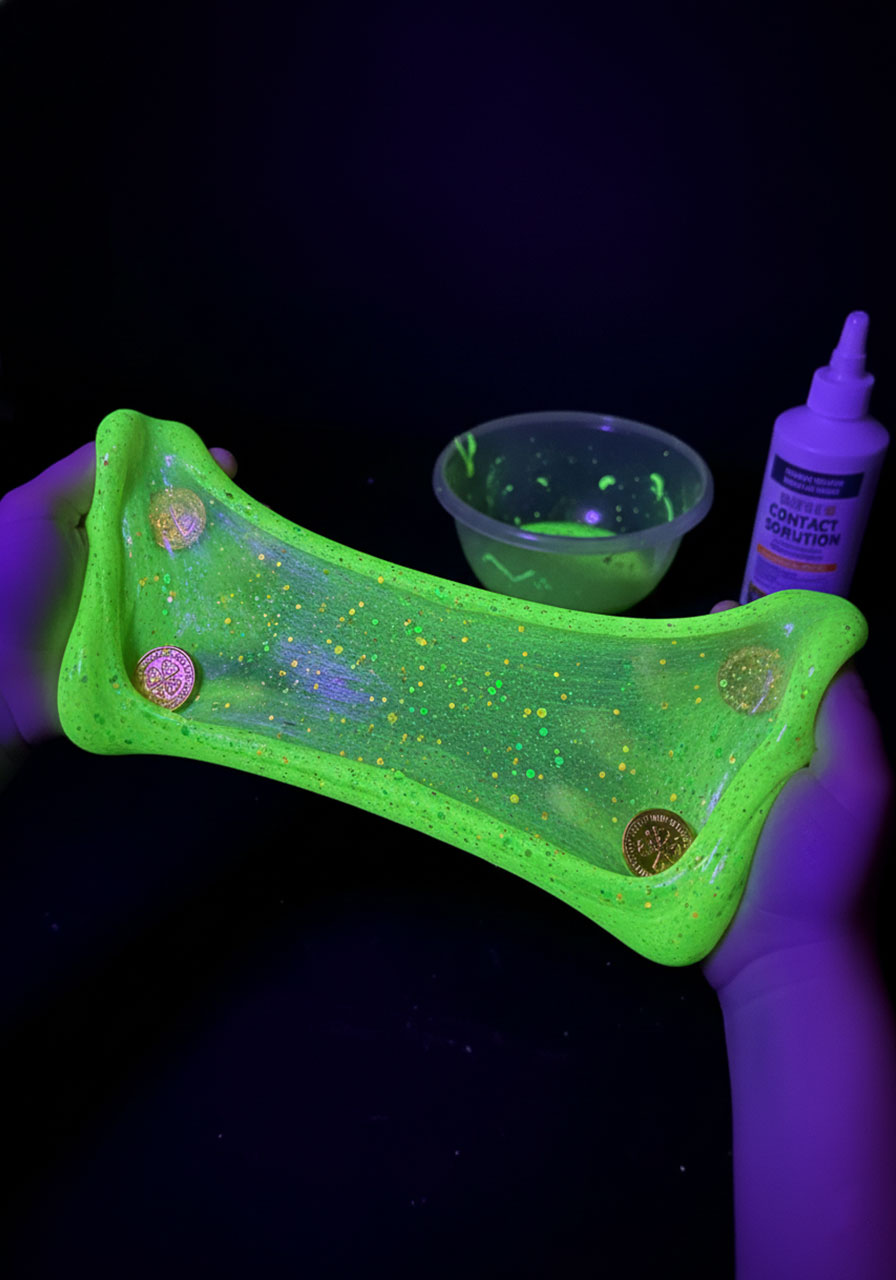
This is the showstopper craft that will have kids absolutely mesmerized! The slime glows under a black light, stretches like crazy, and sparkles with gold glitter. It’s sensory play meets science experiment meets St. Patrick’s Day magic!
Best for: Ages 5+ (with supervision), sensory seekers
Time to Complete: 15 minutes to make, hours of play
Mess Level: High (but worth every second!)
What You’ll Need:
4 oz clear school glue (one bottle)
1/2 cup water
1/2 teaspoon baking soda
1 tablespoon contact lens solution (must contain boric acid)
Neon green food coloring or glow-in-the-dark paint
Gold glitter (lots of it!)
Green glitter (optional)
Large mixing bowl
Spoon or spatula
Black light (optional, but makes it AMAZING!)
How to Make It:
1. Start with the glue base. Empty the entire bottle of clear glue into your mixing bowl.
2. Add water and mix. Pour in 1/2 cup of water. Stir thoroughly until the glue and water are completely combined and smooth.
3. Make it green and glowy. Add several drops of neon green food coloring (or a tablespoon of glow-in-the-dark paint if you have it). Stir well. Keep adding color until you get a vibrant shamrock green that makes you smile!
4. Add the sparkle. Pour in a generous amount of gold glitter – about 2-3 tablespoons. Add green glitter too if you want extra pizzazz! Stir it in.
5. Activate with baking soda. Sprinkle in the baking soda and stir thoroughly for about 30 seconds.
6. Add the magic ingredient. Pour in 1 tablespoon of contact lens solution (it MUST contain boric acid – check the label!). Stir immediately. The slime will begin to form and pull away from the sides of the bowl almost instantly!
7. Knead it. Once it starts to come together, use your hands to knead the slime. It will be sticky at first – keep kneading! After 2-3 minutes of kneading, it will become smooth, stretchy, and perfect.
8. Adjust if needed. Too sticky? Add a little more contact solution (just a few drops at a time). Too stiff? Add a tiny bit of water and knead it in.
9. Play time! Stretch it, squish it, poke it, twist it – slime is endlessly entertaining!
10. Test the glow. If you have a black light, turn off the regular lights and turn on the black light. Watch your shamrock slime GLOW! Kids will absolutely lose their minds!
Pro Tip: Store the slime in an airtight container or zip-top bag when not in use. It will last for weeks (though it probably won’t survive that long before being played with constantly!).
Play Ideas:
- Hide tiny gold coins in the slime and let kids dig them out
- Use shamrock-shaped cookie cutters to make slime shamrocks
- Stretch it super thin and see if you can see through it
- Race to see who can make the longest slime snake without it breaking
- Create an entire leprechaun village scene with the slime as the “ground”
Science Talk: Explain that slime is a polymer – the glue contains long chains of molecules, and the contact solution helps those chains link together, creating something that’s not quite liquid and not quite solid. It’s in between, which scientists call a “non-Newtonian fluid”!
Safety Note: Slime is not edible! Always supervise young children. If anyone has skin sensitivity, have them wear gloves while playing.
Make This St. Patrick’s Day Unforgettable!
There you have it – 14 absolutely amazing St. Patrick’s Day crafts that bring creativity, learning, and tons of fun together! Whether you’re a parent looking to create special memories with your kids or a teacher planning the perfect classroom celebration, these projects have you covered.
The best part? These aren’t just random crafts – they’re tested, kid-approved, and designed to actually work without making you want to tear your hair out. From the messy magic of fizzing shamrocks to the delicious fun of rainbow fruit kabobs, there’s something here for every age, skill level, and mess tolerance.
So grab your supplies, put on some Irish music, and let the shamrock shenanigans begin! Your kiddos are going to have an absolute blast, and you might just have a little fun too (especially during the glowing slime part – trust us on that one).
Pro Tip for Planning: Don’t try to do all 14 in one day (unless you’re a superhero). Spread them out over the week leading up to St. Patrick’s Day, or choose 3-4 favorites to make it special without overwhelming yourself or the kids.
Happy crafting, and may the luck of the Irish be with you!
More St. Patrick’s Day Party Ideas to Keep the Fun Rolling:
Craft Stick Leprechaun Hat: The Cutest St. Patrick’s Day Craft for Kids
DIY Lucky Pot of Gold Gift: The Easiest St. Patrick’s Day Craft That’ll Make You the Hero
St. Patrick’s Day Shamrock Man Craft: The Easiest (and Cutest!) Holiday Project for Kids
5 Adorable St. Patrick’s Day Projects You Can Make This Weekend
5 Easy St. Patrick’s Day Crafts That’ll Make You Look Like a Creative Genius (Zero Luck Required!)
Easy Ideas to Host an Epic St. Patrick’s Day Breakfast for Kids
18 Easy and Fun St. Patrick’s Day Activities for Toddlers (No Prep Required!)
15 Easy St. Patrick’s Day Crafts for Kids That Are Actually Fun
